can you put an above ground trampoline in the ground 7 shocking facts 2025
The Temptation of Ground-Level Trampoline Installation
Can you put an above ground trampoline in the ground? It’s a question I hear from homeowners dreaming of that sleek, integrated backyard look. The short answer is yes, technically you can—but there’s a big “but” attached to this seemingly simple project.
While it’s physically possible to sink a regular trampoline into your lawn, manufacturers typically don’t recommend it. The appeal is obvious: a flush installation creates a seamless look in your landscape, reduces fall heights (a major safety plus for parents), and eliminates that awkward mowing challenge around liftd legs.
Here’s what you really need to consider before grabbing that shovel:
| Aspect | Quick Answer |
|---|---|
| Is it possible? | Yes, technically |
| Is it recommended? | No, not by manufacturers |
| Main concerns | • Reduced airflow affects bounce quality • Frame corrosion from soil moisture • Voided warranty • Safety hazards from improper installation |
| Better alternative | Purpose-built in-ground trampoline kits |
| Cost comparison | In-ground installation: $1,500-$5,000+ Above-ground trampoline: $100-$4,500 |
I’ve seen the excitement in homeowners’ eyes when they imagine that perfect sunken trampoline. But I’ve also witnessed the disappointment when things go wrong—and they often do without proper planning.
The physics of trampolines require adequate airflow beneath the jumping surface. When you restrict this by placing a standard trampoline in a hole, you’re fundamentally changing how it functions. That satisfying bounce? It might disappear faster than your kids’ enthusiasm for cleaning their rooms.
Moisture is another silent destroyer. Standard above-ground trampolines aren’t designed to withstand constant ground contact and soil moisture. The metal frame can corrode surprisingly quickly, leading to structural integrity issues that pose serious safety risks.
Speaking of safety, according to research on trampoline injuries, improper installation can actually increase certain risks, despite the reduced fall height.
As someone who’s helped Boston-area homeowners create beautiful outdoor spaces for over three decades, I’ve seen many DIY in-ground trampoline attempts that ended with costly repairs or complete replacements. What seemed like a simple weekend project turned into thousands in unexpected expenses.
The good news? There are purpose-built trampolines specifically designed for in-ground installation. These models account for drainage needs, airflow requirements, and moisture protection—all critical elements for long-term success and safety.
If you’re serious about creating that seamless backyard play space, I’d strongly recommend exploring options like proper in-ground trampoline drainage, installing an appropriate in-ground trampoline retaining wall, and learning how to install an in-ground trampoline correctly.
The initial investment might be higher, but the safety benefits, durability, and long-term enjoyment make it worthwhile. After all, isn’t peace of mind worth the extra care when it comes to your family’s outdoor fun?
Can You Put an Above Ground Trampoline in the Ground?
The question “can you put an above ground trampoline in the ground?” is one we hear frequently at Boston Landscape Co. While it might seem like a simple DIY project, there’s much more to consider than just digging a hole.
When evaluating this option, we need to look at local building codes, understand the physics of how trampolines actually work, consider potential damage to the frame, and review safety statistics that might make you think twice.
Did you know that approximately 100,000 trampoline-related injuries occur annually in the United States? While sinking a trampoline into the ground might seem like it would reduce injuries, improper installation can actually create new safety hazards.
As one major trampoline manufacturer bluntly puts it: “Technically, yes. You can put a normal trampoline in the ground. Should you, though? Absolutely not.” This isn’t just marketing speak—there are solid reasons behind this industry-wide position.
The Short Technical Answer—”Yes, But …”
Can you put an above ground trampoline in the ground? The honest answer is yes, but with some significant concerns you should understand:
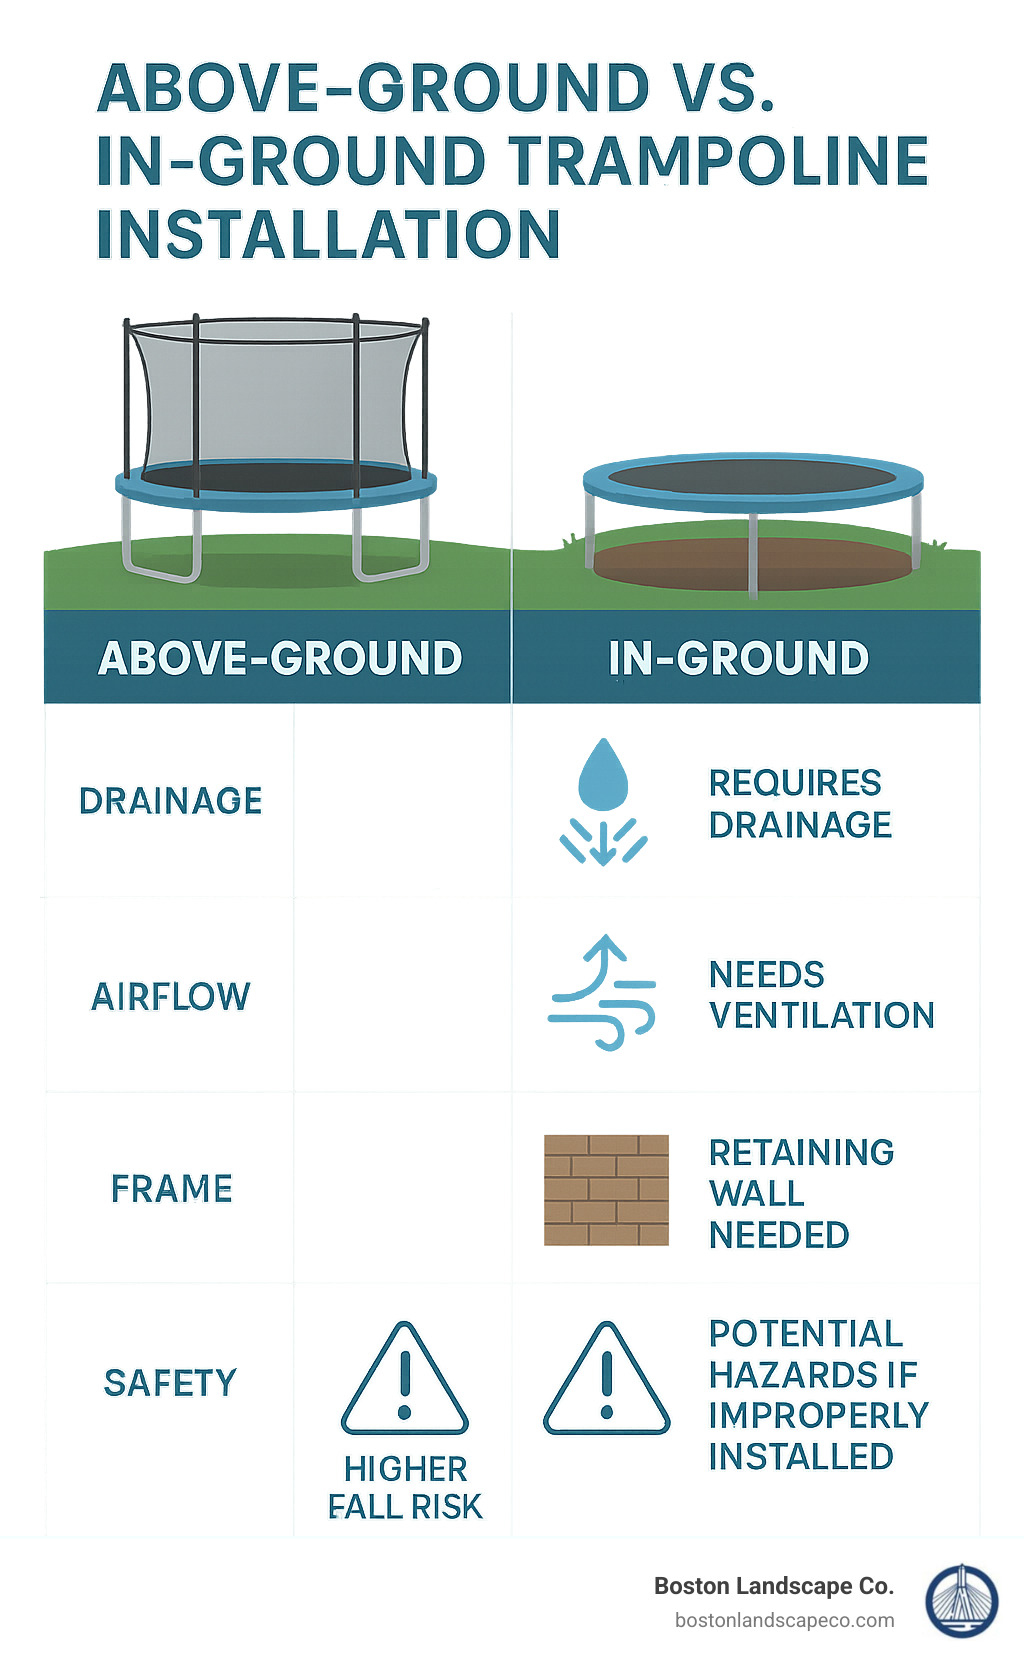
Standard trampolines simply aren’t designed for ground contact. The metal frames and components aren’t treated to withstand constant exposure to soil moisture, which dramatically accelerates corrosion. The bounce quality will suffer due to reduced airflow, and installation errors can create dangerous gaps and edges that become tripping hazards. Perhaps most importantly, most manufacturers will void your warranty the moment your trampoline touches dirt.
Mike, a homeowner from Billerica who called us after his DIY attempt, shared his experience: “I thought I’d save money by just digging a hole and dropping in our existing trampoline. Within a year, the springs were rusting, the bounce was terrible, and rainwater kept pooling in the pit. I ended up spending more fixing these issues than if I’d bought a proper in-ground kit.”
How Burial Impacts Bounce Quality
Many homeowners don’t realize that a trampoline’s bounce isn’t just about springs—it’s also about air displacement. When you jump on a trampoline, the air beneath the mat compresses and then helps propel you upward.
When you put an above ground trampoline in the ground without proper ventilation, this natural system gets disrupted. You’ll notice an increased “slapping” noise as the mat hits trapped air. Your bounce height will be significantly reduced, the mat won’t tension properly (causing uneven jumping), and the components will wear out faster due to increased stress.
As one of our landscape architects explains, “For proper function, you need your trampoline to be at least four inches off the ground to create a channel for air to flow.” This air channel isn’t just a nice-to-have—it’s crucial for maintaining the proper bounce dynamics that make trampolining fun and safe.
Warranty, Insurance & Liability
The most overlooked aspect of this project is how it affects your legal and financial protections. Before you start digging, you should know that:
Most manufacturer warranties contain explicit language stating that in-ground installation immediately voids all coverage. Your home insurance policy may deny claims related to modified trampolines, considering them “unauthorized alterations.” Local bylaws in Massachusetts often require permits for excavations deeper than certain thresholds. And perhaps most concerning, your liability for injuries could increase if your installation doesn’t meet safety standards.
Sarah from Stoneham learned this the hard way: “After my nephew sprained his ankle on our DIY in-ground trampoline, I called our insurance company. They informed me that our policy wouldn’t cover the injury because we had modified the equipment against manufacturer specifications.”
Before making any decisions, we always recommend checking your trampoline’s warranty documentation and contacting your insurance provider to understand the potential implications of an in-ground installation.
Above-Ground vs Purpose-Built In-Ground Trampolines
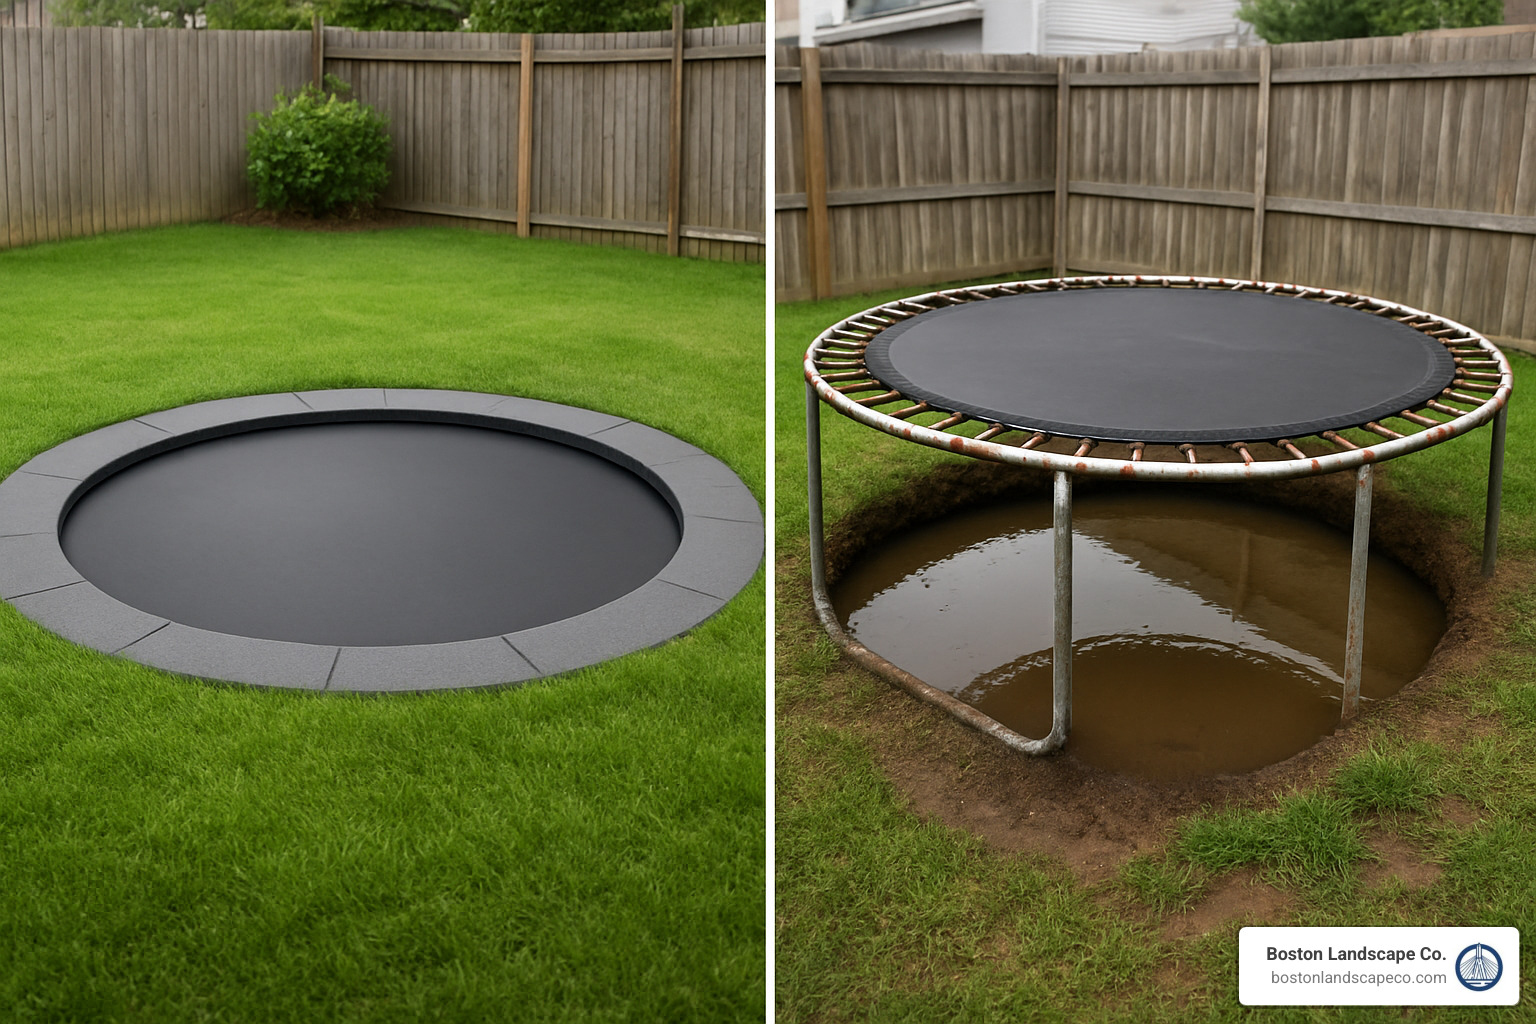
When homeowners ask me, “can you put an above ground trampoline in the ground?”, I often explain that there’s a world of difference between burying a standard trampoline and installing one specifically designed for in-ground use.
Think of it like trying to use a road bike for mountain biking – yes, both have wheels and handlebars, but they’re engineered for completely different environments. The same applies to trampolines.
Purpose-built in-ground trampolines feature specialized frames without the typical legs you see on above-ground models. Instead, they use robust, legless designs specifically engineered to withstand soil contact. They also come with improved galvanized coatings that fight off the constant moisture assault from surrounding soil – something standard trampolines simply aren’t equipped to handle.
The aesthetic difference is striking too. Purpose-built models blend seamlessly with your landscape, while buried standard trampolines often look like exactly what they are – an above-ground trampoline awkwardly stuffed into a hole.
| Feature | Standard Buried Trampoline | Purpose-Built In-Ground Trampoline |
|---|---|---|
| Frame Design | Legs that create awkward gaps | Streamlined, legless ground-contact frame |
| Rust Protection | Basic galvanization that fails quickly | Heavy-duty corrosion resistance |
| Ventilation | None (leads to poor bouncing) | Engineered venting systems |
| Expected Lifespan | 1-3 years when buried | 7-10+ years with proper care |
Structural Engineering 101
I’ve seen many DIY in-ground trampoline projects fail because homeowners underestimate the engineering involved. Purpose-built in-ground trampolines use heavier gauge steel that can handle the constant pressure from surrounding soil. Their frames are designed with specialized coatings that provide superior protection against the relentless moisture that standard galvanization simply can’t withstand.
The retaining wall system is another critical difference. As John, one of our clients in Billerica, finded: “I thought I could just dig a hole and drop in our trampoline. Six months later, the sides were caving in, and the frame was already showing rust spots. Wish I’d talked to Boston Landscape Co. first!”
Purpose-built models account for the need for proper retaining structures – whether that’s specialized walls, concrete blocks, or composite materials designed to hold back soil while allowing proper airflow.
Safety Features Face-Off
Many parents assume that putting a trampoline in the ground automatically makes it safer. The truth is more complicated.
Yes, in-ground trampolines reduce fall height – that’s their biggest safety advantage. But improperly installed in-ground trampolines create their own hazards, including dangerous gaps between the frame and surrounding soil where little legs and arms can get trapped.
Safety experts still recommend enclosure nets even for in-ground installations, especially for younger children. And the padding requirements are actually more specialized – in-ground models need vented pads that maintain crucial airflow while providing protection.
“The safety advantage only exists when the installation is done correctly,” explains a trampoline safety specialist I consulted with recently. “A poorly installed in-ground trampoline can actually be more dangerous than a properly installed above-ground one.”
For a deeper dive into safety considerations, check out our detailed article on Are In-Ground Trampolines Safer?
Installation Requirements & Tools
Installing a purpose-built in-ground trampoline isn’t just digging a hole. It’s a landscaping project that requires planning and specific techniques.
The pit shape matters enormously – you need a bowl-shaped excavation rather than straight walls to prevent collapse. A proper drainage layer using crushed stone with the correct slope is essential unless you want a trampoline-shaped swimming pool after every rainstorm.
The ventilation system is perhaps the most overlooked aspect. Without proper airflow, your trampoline won’t bounce properly. This requires either specialized venting pads or an engineered air gap around the perimeter.
Finally, the retaining structure needs careful consideration. Whether using masonry, treated wood, or specialized retaining systems, this isn’t an area to cut corners. At Boston Landscape Co, we approach in-ground trampoline installations with the same care and attention to detail as we would a patio or retaining wall.
For step-by-step guidance on proper installation techniques, visit our detailed In-Ground Trampoline Installation guide.
Step-by-Step Guide: Installing a Trampoline in the Ground Correctly
If you’re determined to install a trampoline in-ground, following these steps will help ensure safety and longevity. We strongly recommend using a purpose-built in-ground trampoline rather than modifying a standard above-ground model.
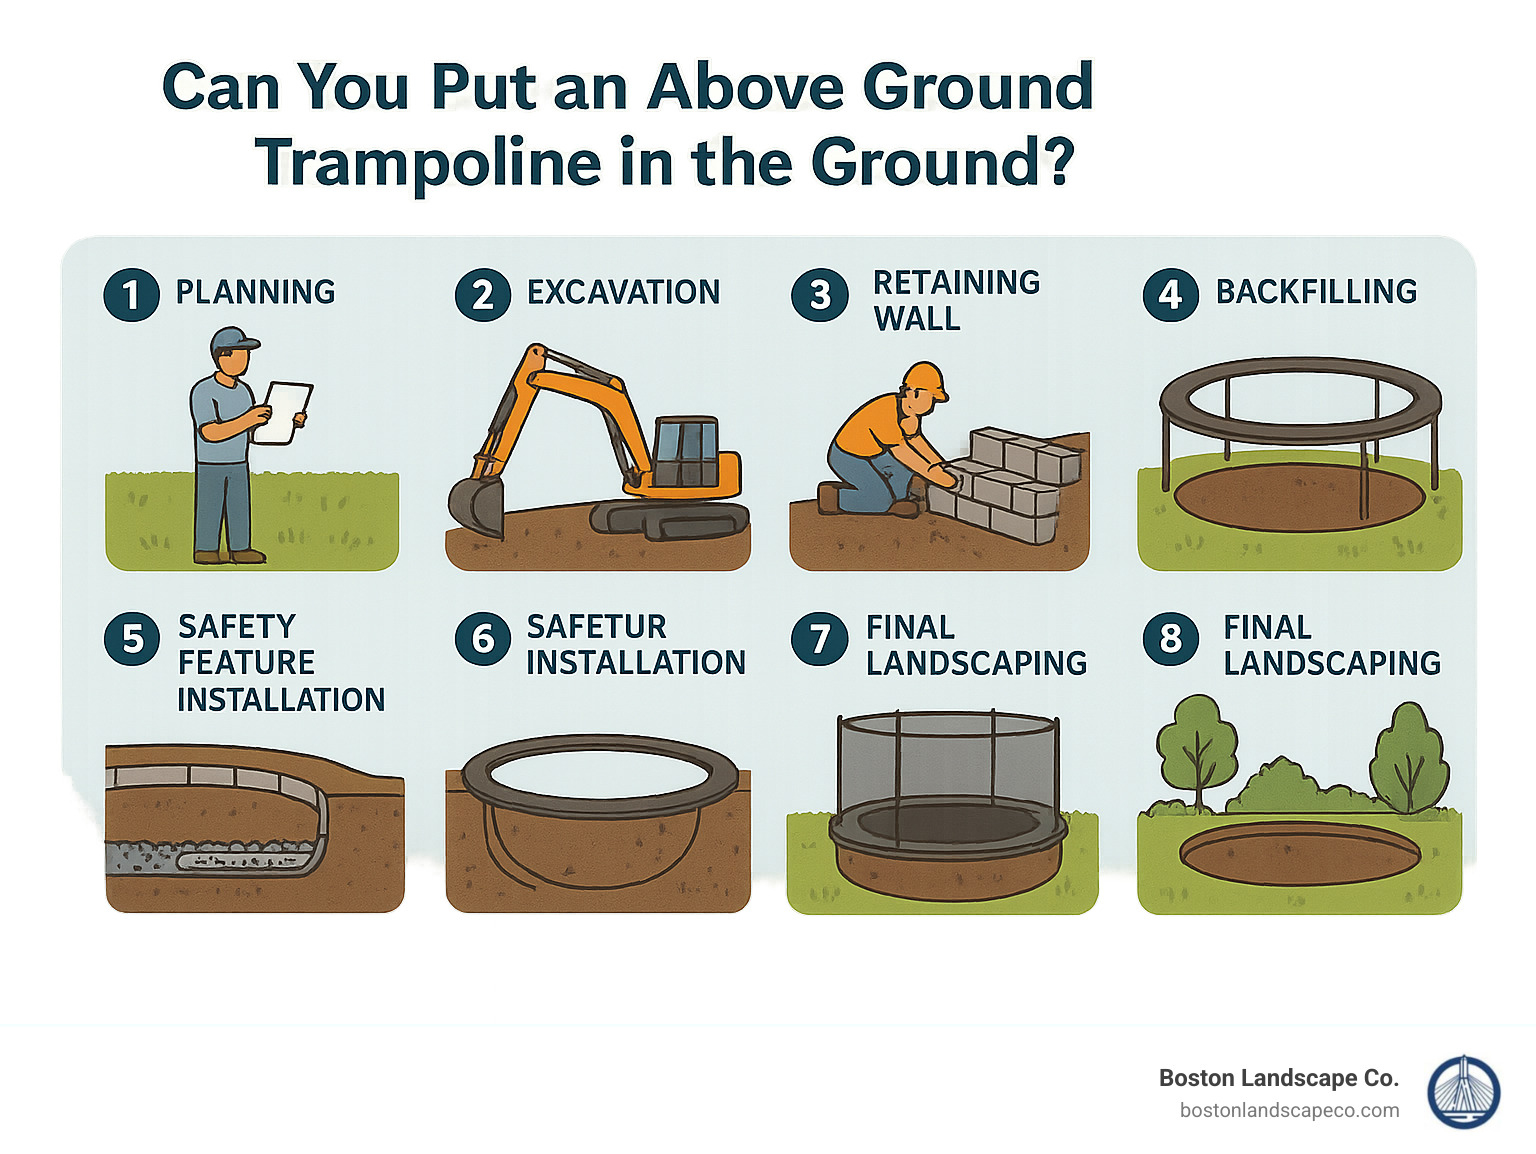
Planning, Permits & Mark-Out
Before digging any significant hole in your yard:
- Call 811: Have underground utilities marked to avoid hitting gas, electric, or water lines
- Check Local Regulations: Some municipalities require permits for excavations deeper than 2-3 feet
- Measure Clearance: Ensure at least 6 feet of clear space around all sides of the trampoline
- Choose Location Carefully: Avoid areas with poor drainage or high water tables
“We’ve seen homeowners start digging only to hit irrigation lines or find ledge rock that makes excavation nearly impossible,” says our excavation team leader at Boston Landscape Co. “Proper planning prevents these costly surprises.”
Digging the Pit—Depth & Shape
The excavation itself is critical to proper function:
- Bowl Profile: Dig a concave, bowl-shaped hole rather than straight sides
- Proper Depth: Typically 3-4 feet deep depending on trampoline model
- Wider Than Frame: Excavate at least one foot wider than the trampoline frame
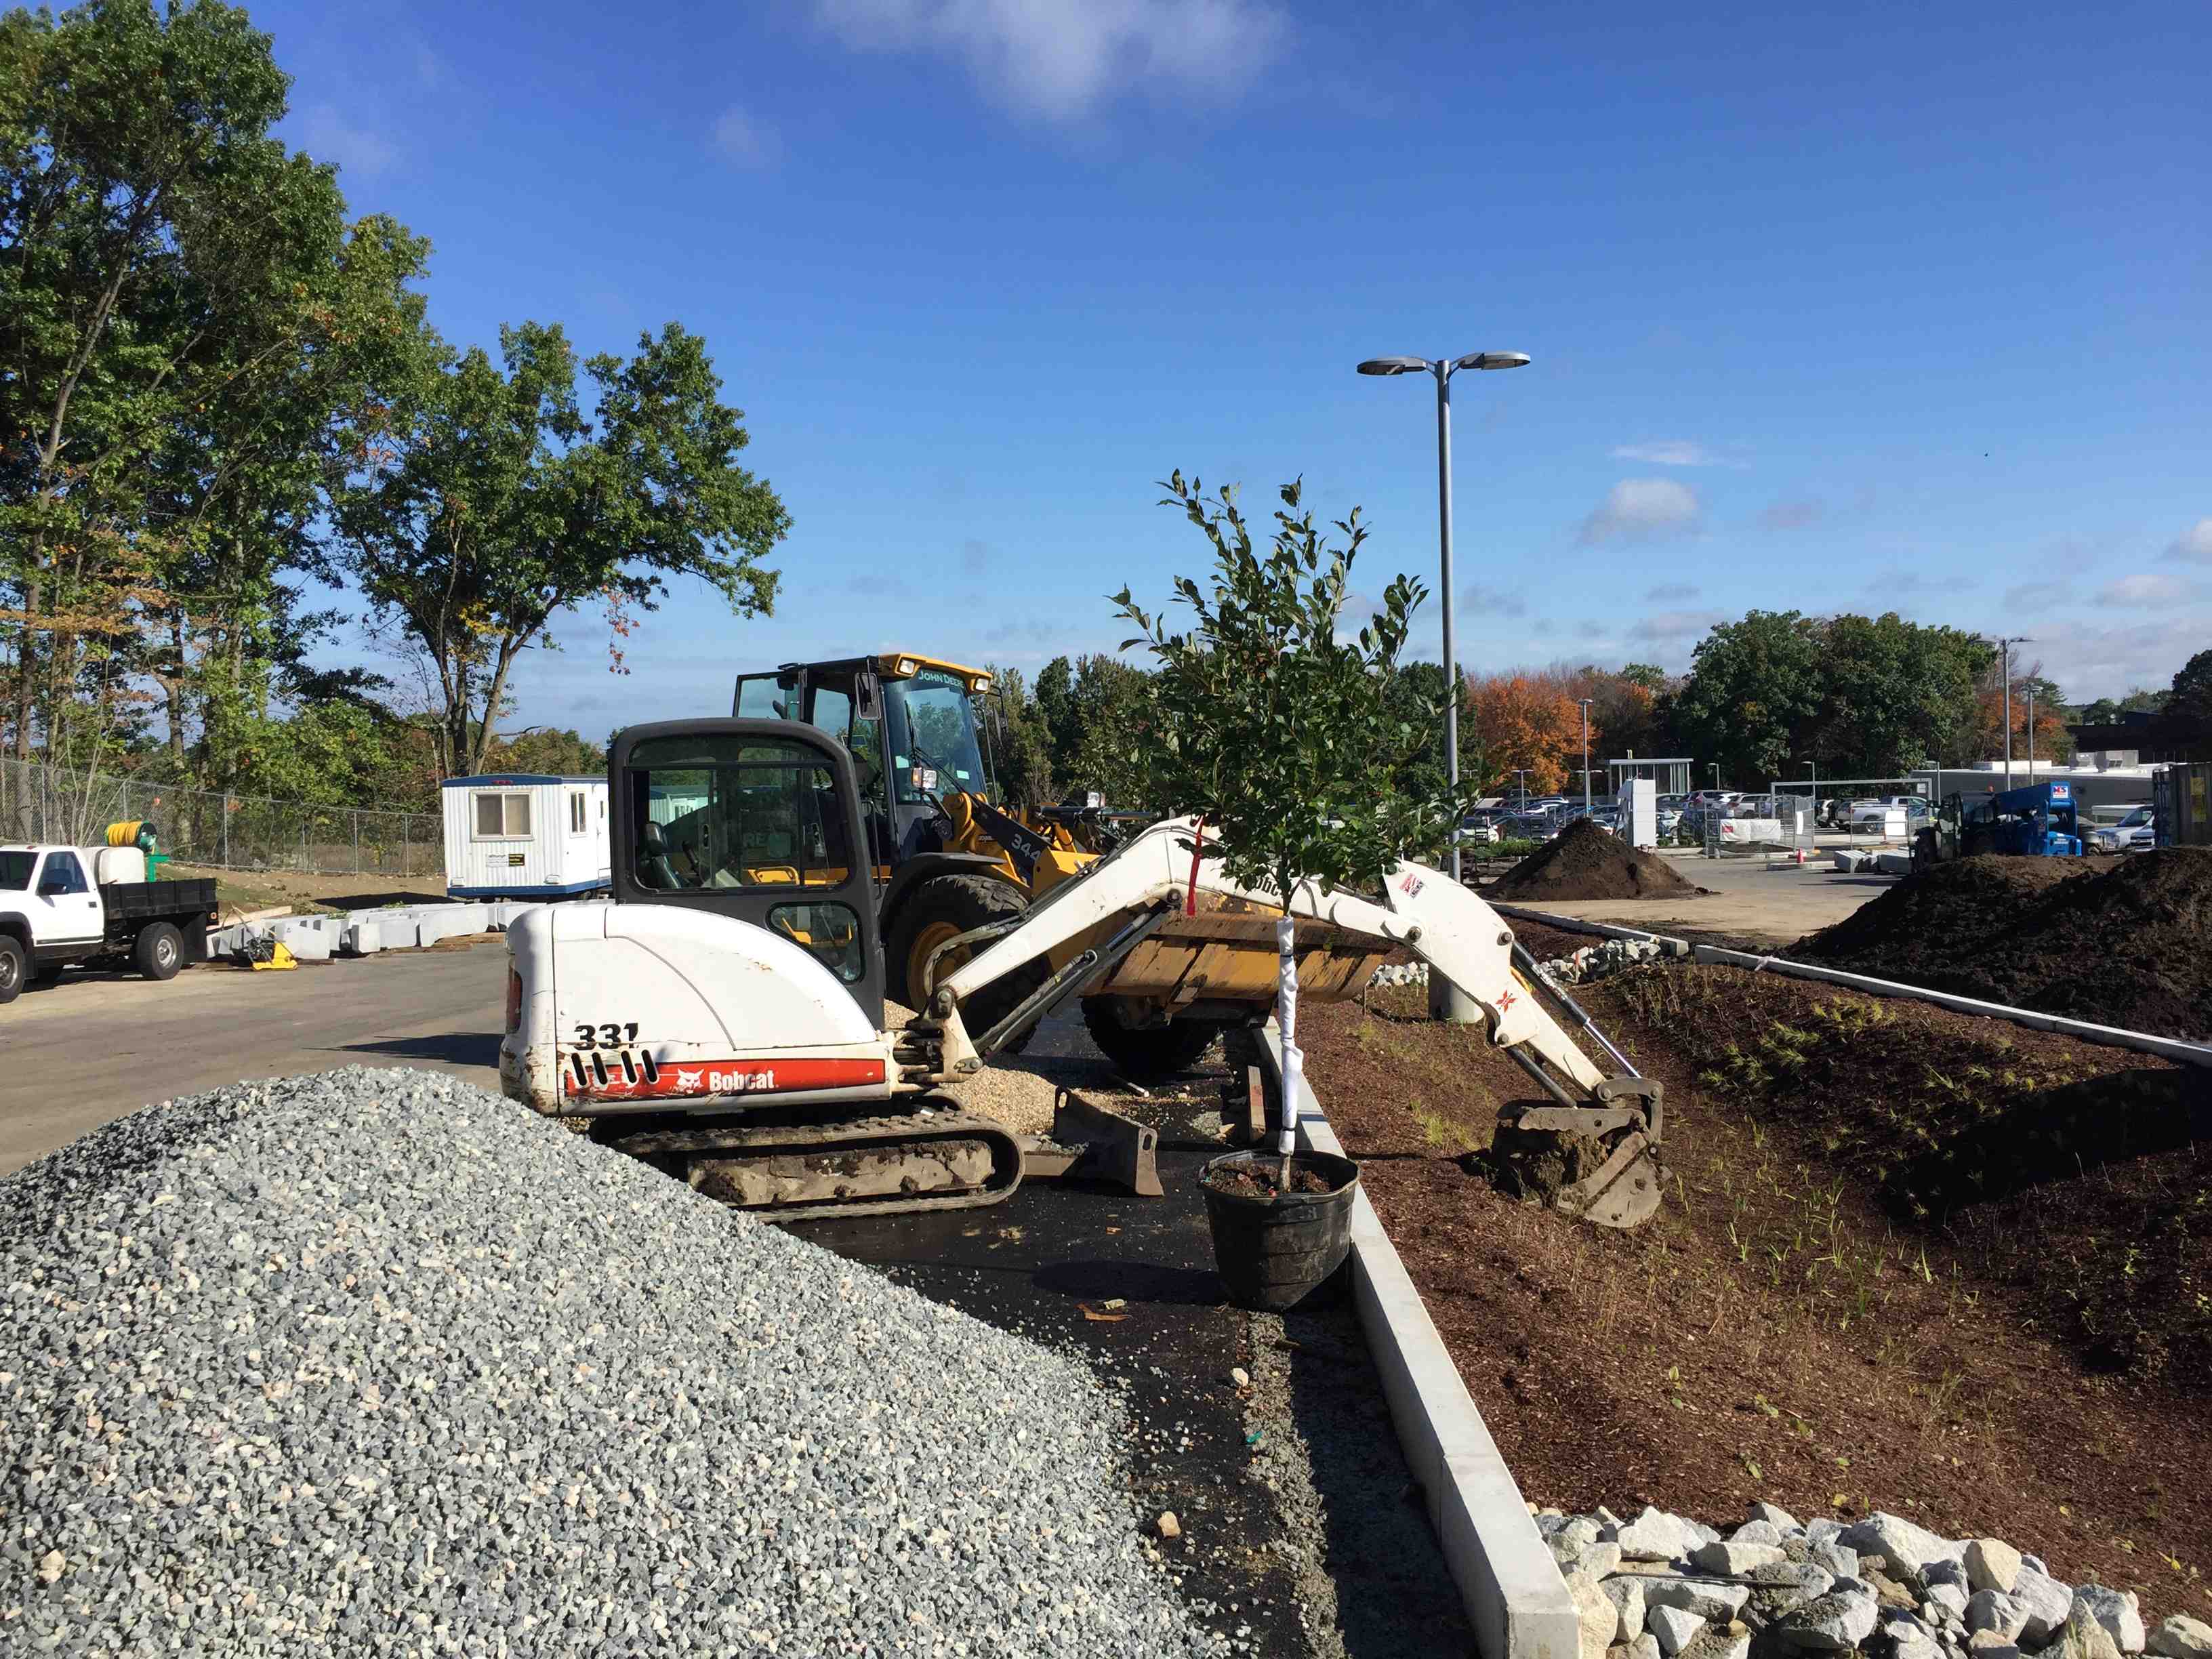
- Equipment Consideration: While hand digging is possible for smaller models, a mini-excavator or skid-steer saves tremendous time and effort
“Dig the hole to a manufacturer-specified depth (usually 60–100 cm), sloping from edge to center,” recommends one installation guide. This sloping is crucial for both drainage and structural integrity.
Drainage & Ventilation Essentials
Proper drainage and airflow are the two most critical elements of a successful in-ground trampoline installation:
- Drainage Base: Install 4-6 inches of crushed stone at the bottom of the pit
- French Drain System: For areas with poor drainage, install a perforated pipe leading away from the pit
- Air Gap: Maintain a 2-3 inch gap between the trampoline and surrounding soil for air circulation
- Landscape Fabric: Line the pit with fabric to prevent weed growth and soil erosion
“Where will all the rain and drain water go?” is a crucial question. Some creative installers even route drainage from the trampoline pit to water gardens or ponds, turning necessity into a feature.
For more on creating proper drainage systems, see our article on In-Ground Trampoline Retaining Wall which covers integrated drainage solutions.
Securing Frame, Backfill & Finishing Touches
The final installation steps ensure stability and safety:
- Level Placement: Use a long level across multiple points to ensure the frame sits perfectly level
- Secure Anchoring: Even in-ground trampolines should be anchored to prevent shifting
- Careful Backfilling: Compact soil in layers around the outer edge of the pit
- Turf Restoration: Replace or repair lawn around the installation for a seamless look
“Place U-shaped cinder blocks under each leg and use a long 2×4 and level to ensure the frame is perfectly level,” suggests one DIY installer who successfully completed an in-ground project.
Costs, Timelines & Maintenance Reality

Let’s talk dollars and sense when it comes to sinking your trampoline into the ground. This isn’t just a weekend warrior project—it’s a significant backyard investment that comes with real costs and ongoing maintenance needs.
Budget Breakdown & Hidden Expenses
When clients ask us about putting their trampolines in the ground, they’re often surprised by the true financial picture. Based on internet data and industry averages (not Boston Landscape Co pricing), here’s the reality:
A DIY installation typically runs between $800-$2,000 just for materials and equipment rental. If you’re hiring professionals to handle the entire project, expect to pay anywhere from $3,000-$7,500+, while purpose-built in-ground trampoline kits start around $1,500 and can exceed $5,000 before installation even begins.
But the story doesn’t end with these base costs. Just last month, we consulted with a Billerica family who finded ledge rock halfway through their DIY dig—instantly doubling their excavation costs.
The hidden expenses that catch most homeowners off guard include excavation challenges, which can send costs soaring if you hit rock or clay. Retaining wall materials average $15-20 per square foot, proper drainage systems add another $300-$900, and don’t forget about soil disposal—hauling away all that dirt typically costs $200-$600.
“I budgeted $1,500 for my in-ground installation,” shared Mark from Stoneham. “By the time I factored in equipment rental, materials, and having to pay someone to haul away the excess soil, I was well over $3,000.”
These figures represent internet averages, and depending on your specific site conditions and requirements, the high end can easily reach 3x these amounts—especially in New England with our notorious rocky soil.
Maintenance Checklist to Avoid Pitfalls
Installing your trampoline is just the beginning of your relationship with it. Without proper maintenance, that beautiful in-ground setup can quickly become a rusty, waterlogged headache.
After every heavy rain, you’ll want to check that your drainage system is functioning properly. Nothing kills trampoline components faster than standing water. During spring thaw, inspect for frost heave damage that might have created dangerous gaps between your trampoline and the surrounding soil.
Each season brings its own maintenance needs. In summer, keep an eye out for excessive dryness that might cause soil shrinkage around your installation. Come fall, clearing leaves and debris becomes crucial to prevent drainage clogs. And when winter arrives in Massachusetts, a quality weather cover becomes essential to prevent snow accumulation that could damage your trampoline’s frame and mat.
The annual maintenance ritual should include testing and cleaning your sump pump (if installed), replacing any rusted springs or hardware, checking your retaining wall for signs of deterioration, and giving that jumping mat a thorough cleaning.
“The biggest mistake I see homeowners make is thinking that once their trampoline is in the ground, it’s maintenance-free,” explains our excavation team leader. “In reality, can you put an above ground trampoline in the ground? Yes, but keeping it functioning properly requires consistent attention.”
One client told us they skipped the drainage step to save money, only to find themselves replacing springs every spring due to rust—ultimately spending more than if they’d installed proper drainage from the start. The lesson? When it comes to in-ground trampolines, cutting corners on installation or maintenance inevitably leads to higher costs down the road.
With proper planning, installation, and maintenance, your in-ground trampoline can provide years of enjoyment. But go in with eyes wide open about the true costs involved—both upfront and ongoing—and you’ll avoid the disappointment that comes from unexpected expenses.
Alternatives When You’d Rather Not Dig
Let’s face it – digging a massive hole in your yard isn’t everyone’s idea of a fun weekend project. If you’re intrigued by the look of an in-ground trampoline but feeling overwhelmed by the excavation, cost, or maintenance requirements, you’ve got options!
“After getting quotes for an in-ground installation, I nearly fell off my chair,” laughs Jennifer, a Boston homeowner. “We found a middle-ground solution that gave us most of the benefits without needing a backhoe in our yard.”
Here are some practical alternatives that can give you similar benefits without the excavation headache:
Ground anchors provide serious stability for your above-ground trampoline, preventing those scary “trampoline in the neighbor’s yard” scenarios during windstorms. These heavy-duty systems typically cost between $50-150 and can be installed in an afternoon.
Improved safety enclosures with professional-grade nets and padding can dramatically reduce injury risk. Many newer models feature curved poles and double-zipper entries that significantly boost safety.
Landscaped surrounds can transform an eyesore into a feature. Building decorative decking or creating planted areas around your trampoline integrates it beautifully into your yard’s design while providing a soft landing zone.
Semi-recessed installations give you the best of both worlds by partially sinking the trampoline using raised landscape beds around it. This reduces the visual impact while minimizing digging requirements.
For more creative approaches to this challenge, check out our detailed guide on Putting a Trampoline Into the Ground.
Pre-Engineered In-Ground Kits
The gold standard alternative to burying a standard trampoline is using a purpose-built in-ground kit. These specialized systems solve many of the problems that come with retrofitting a standard trampoline.
“If you love the look of an in-ground trampoline, you probably want to sink one into the ground—but there’s a lot more to it than just cutting off the legs,” explains one manufacturer who offers specialized in-ground kits.
Drop-in shells made from fiberglass or reinforced plastic create perfect retaining walls without the hassle of building your own. These pre-formed systems typically cost $1,000-3,500 based on internet data (not Boston Landscape Co pricing).
Integrated ventilation channels are built right into these systems, maintaining proper airflow and bounce quality without complex engineering. This solves one of the biggest problems with DIY in-ground installations.
Installation time is typically reduced by 30-50% compared to building a custom pit and retaining structure. Many homeowners report completing the entire project in a single weekend rather than spreading it over several weeks.
Perhaps most importantly, these kits maintain manufacturer warranty coverage since they’re specifically designed for in-ground use. This peace of mind alone is worth considering the premium price for many families.
Above-Ground Safety Upgrades
If you decide that keeping your trampoline above ground makes the most sense, there are several ways to improve both safety and aesthetics:
Access ladders provide safe entry and exit points, reducing the awkward climbing that often leads to falls. Look for models with wide steps and handrails for maximum safety.
Padded enclosure poles add extra cushioning to rigid frame elements. The best options use thick, weather-resistant foam that won’t degrade quickly in the sun.
Wind stakes are essential in areas with frequent high winds. These simple devices can prevent your trampoline from becoming an unintended flying object during storms.
Impact-absorbing ground cover around the perimeter creates a safer landing zone. Materials like rubber mulch or specialized padding can reduce injury severity if someone does fall off.
“Most above-ground trampolines are at least three feet off the ground, which is why a safety enclosure is always recommended,” notes one safety expert. “But with the right accessories, you can make an above-ground model nearly as safe as an in-ground installation.”
At Boston Landscape Co, we’ve helped countless homeowners find creative solutions to their trampoline placement challenges. Whether you choose to dig deep or stay above ground, the key is thoughtful installation with safety as the priority.
Frequently Asked Questions About “Can You Put an Above Ground Trampoline in the Ground?”
Can you put a normal above-ground trampoline completely flush with the lawn?
This is one of the most common questions we hear at Boston Landscape Co, and the answer is straightforward: no, you shouldn’t install a standard trampoline completely flush with your lawn.
There’s actually a good reason for this. Your trampoline needs to breathe! A gap of at least 2-4 inches between the jumping mat and the ground is essential for proper air circulation. Without this space, you’ll notice two immediate problems: significantly reduced bounce quality (nobody wants that!) and an annoying “slapping” noise every time someone jumps.
Think of it like trying to bounce on a pillow that’s lying flat on the floor – there’s nowhere for the air to go when you press down, so you get very little spring back up. The same physics apply to your trampoline.
Beyond the performance issues, flush installation creates a perfect environment for moisture problems. Without proper drainage and airflow, you’re essentially creating a rust factory for your frame and springs. I’ve seen trampolines deteriorate in a single season when installed this way.
How deep should the hole be for a 12-ft round trampoline?
For a standard 12-foot round trampoline, you’ll want to dig a bowl-shaped hole approximately 13-14 feet in diameter. This gives you that crucial one-foot clearance around all sides of the trampoline.
As for depth, aim for about 36 inches at the center, with a gradual slope from the edges inward. This bowl shape isn’t just aesthetic – it serves an important purpose by providing structural support while allowing for proper drainage and air circulation.
If you’ve invested in a purpose-built in-ground trampoline, always defer to the manufacturer’s specific depth requirements. These specialized models are engineered with precise dimensions in mind, and following their guidelines will ensure optimal performance and safety.
One homeowner told me after completing their installation: “I wish someone had emphasized how important that bowl shape is. We initially dug straight sides and had to redo the entire pit when we realized our mistake.”
What happens to the pit after heavy rain or snow melt?
Without proper drainage, your beautiful in-ground trampoline can quickly turn into an unwanted backyard pond! After heavy rain or snow melt, an improperly prepared pit can collect water, creating a cascade of problems:
First, standing water is the enemy of metal components. It will accelerate rust on your frame and springs, potentially cutting your trampoline’s lifespan in half. The damp environment also creates perfect conditions for mold and mildew to flourish on the underside of your jumping mat – not something you want your kids bouncing on.
Beyond the trampoline itself, water-saturated soil can shift and settle unevenly, potentially destabilizing the entire structure. And if you live in a climate with freezing temperatures (like we do here in Massachusetts), those freeze-thaw cycles create ground heaving that can warp or damage your trampoline frame.
This is precisely why drainage isn’t an optional add-on – it’s absolutely essential. At Boston Landscape Co, we design drainage solutions specific to each property’s unique conditions. Typically, this involves a combination of a crushed stone base, properly sloped pit floor, and either a French drain system or sump pump for properties with challenging drainage issues.
As one client in Billerica told us after we installed their drainage system: “The peace of mind knowing my kids’ trampoline won’t be sitting in a pool of water after every storm is worth every penny we spent on proper drainage.”
When it comes to in-ground trampolines, proper preparation prevents poor performance!
Conclusion
So, can you put an above ground trampoline in the ground? Technically yes, but as we’ve explored throughout this article, it’s rarely the best approach for your backyard or your wallet. Purpose-built in-ground trampolines offer superior safety, longevity, and performance compared to simply burying a standard above-ground model.
The appeal of a ground-level trampoline is undeniable – that sleek, integrated look that blends seamlessly with your landscaping while providing hours of family fun. But as with many home improvement projects, cutting corners often leads to disappointment and additional expenses down the road.
At Boston Landscape Co, we’ve seen how proper planning and installation make all the difference between an in-ground trampoline that becomes a backyard eyesore requiring constant maintenance versus one that provides years of trouble-free enjoyment. Our team understands the unique challenges that New England soil conditions present – from seasonal frost heaving to drainage issues that can quickly undermine an improperly installed trampoline pit.
Whether you ultimately choose an in-ground or above-ground installation, safety should always be your top priority, followed by proper installation techniques and commitment to ongoing maintenance. A well-installed trampoline can provide years of backyard memories and physical activity for your family.
If you’re in the Greater Boston area and considering taking the plunge with an in-ground trampoline, we’d love to help. Our experienced team offers expert excavation and landscaping services to ensure your project is completed safely and professionally. We’ll help you steer everything from proper drainage solutions to attractive landscaping integration that makes your trampoline look like it was always meant to be part of your outdoor space.
Ready to bounce into action? Contact Boston Landscape Co for a consultation and learn more about our professional in-ground trampoline services. We’re here to help you create the backyard of your dreams – one that’s both beautiful and functional for your entire family to enjoy.
