
The Ultimate Guide to Sod Installation in Newton
What Newton Homeowners Need to Know About Sod Installation
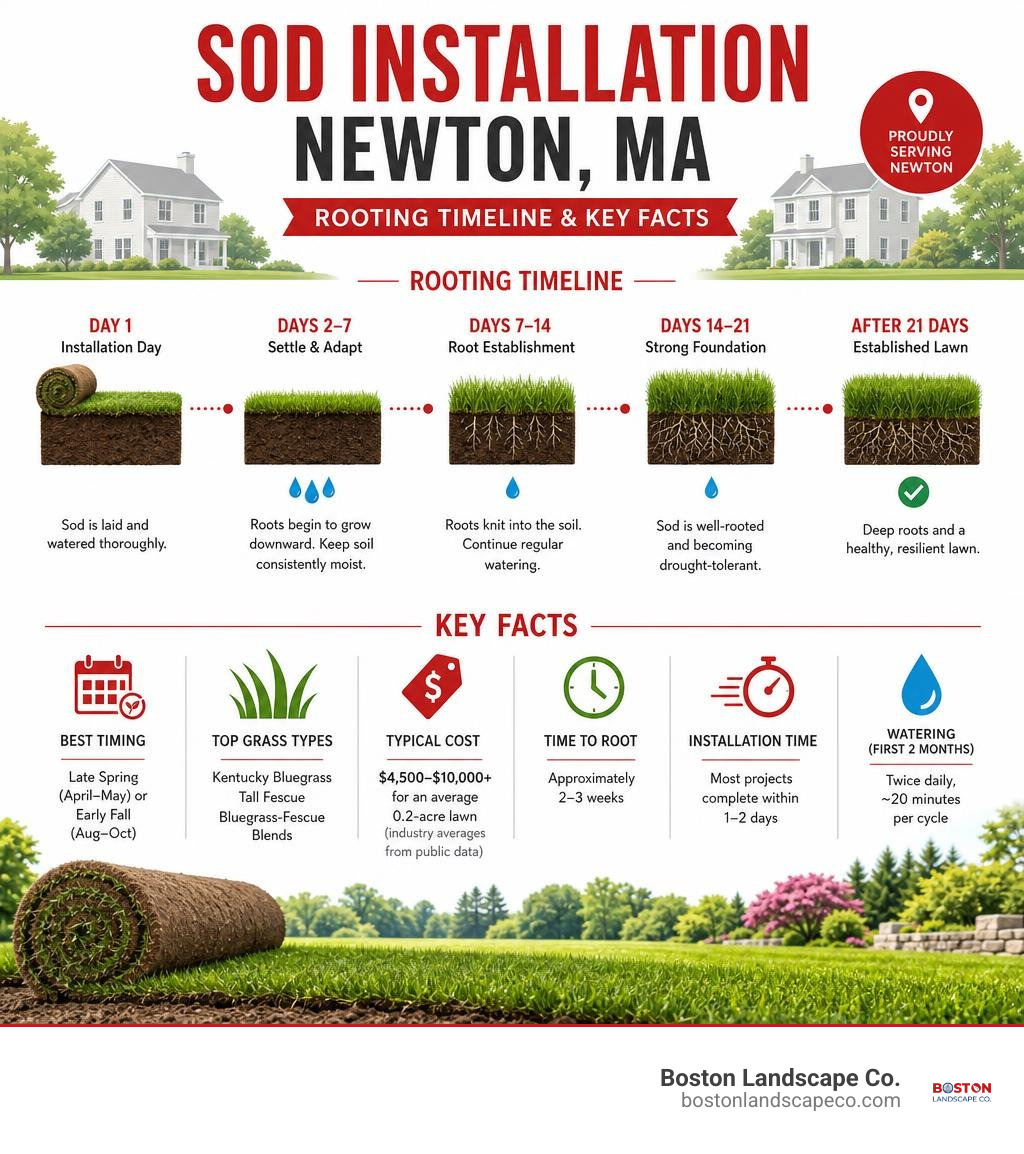
Sod installation in Newton, MA is one of the fastest ways to go from a patchy, tired lawn to a dense, green yard — often in a single day. But getting it right depends on timing, grass variety, soil prep, and proper aftercare.
Here’s a quick snapshot of what matters most:
| Factor | Key Takeaway |
|---|---|
| Best timing | Late spring (April–May) or early fall (August–October) |
| Top grass types | Kentucky Bluegrass, Tall Fescue, Bluegrass-Fescue blends |
| Typical cost | $4,500–$10,000+ for an average 0.2-acre lawn (industry averages from public data) |
| Time to root | Approximately 2–3 weeks |
| Installation time | Most projects complete within 1–2 days |
| Watering (first 2 months) | Twice daily, ~20 minutes per cycle |
Newton’s 13 distinct villages — from the estate lots of Chestnut Hill to the tight in-village blocks of Newton Centre — each come with their own lawn challenges. Mature tree canopy, glacial-till soils, and varying sun exposure mean that what works in one neighborhood may not work in another.
This guide walks through everything: timing, grass selection, soil prep, costs, aftercare, and how to find the right professional for your property.
I’m Steve Schumacher, owner-operator of Boston Landscape Co. since 1991, with over three decades of hands-on experience delivering professional sod installation in Newton, MA and across Greater Boston. Whether you’re restoring a front yard or completing a full lawn replacement after a renovation, I’ll share exactly what our crews look for before the first roll of sod ever hits the ground.
Explore more about Sod installation Newton MA:
Best Time of Year for Sod Installation Newton MA
Laying down fresh sod is a race against the clock. Once cool-season turf is harvested, it is a living, breathing crop that must establish roots before extreme weather sets in. In the Newton area, our local climate dictates two primary windows for successful establishment: early fall and late spring.
While you can technically lay sod anytime during the active growing season (and even lay dormant sod in winter under highly specific conditions), timing your installation correctly saves water, reduces weed competition, and minimizes plant stress.

The Early Fall Window (Late August to Mid-October)
Ask any experienced New England landscape contractor, and they will tell you: early fall is the absolute premier window for sod installation.
During September and October, the soil in Massachusetts remains warm from the summer sun, while the air temperatures begin to cool. This combination is paradise for cool-season grasses. The warm soil stimulates rapid root growth, allowing the sod to “knit” into the native soil before the winter freeze.
Additionally, fall brings reliable natural rainfall and significantly lower weed pressure compared to spring. This ensures your new lawn doesn’t have to fight off aggressive crabgrass while trying to establish its root system.
The Late Spring Window (Mid-April to May)
If you missed the fall window, late spring is your next best option. Once the ground thaws and soil temperatures climb back above 50°F, grass enters a rapid growth phase.
Laying sod in the spring allows the turf to establish its roots using the abundant spring rains. However, spring installations require vigilant monitoring. As the calendar transitions into June and July, young sod with shallow roots is highly vulnerable to summer heat waves and drought.
We frequently manage spring installations in nearby communities like Burlington and Chelmsford. If you reside in these areas, you can explore our tailored local guides:
- Burlington, MA Professional Sod Installation Services
- Chelmsford, MA Professional Sod Installation Services
Why You Should Avoid Mid-Summer Installation
While it is technically possible to install sod in July or August, we highly advise against it. The extreme heat forces the grass into a semi-dormant, stressed state. To keep summer sod alive, you must water it up to three times a day, which increases the risk of fungal diseases like brown patch or pythium blight.
Below is a direct comparison to help you plan your project timeline:
| Seasonal Metric | Spring Installation (April–May) | Fall Installation (Sept–Oct) | Summer Installation (July–Aug) |
|---|---|---|---|
| Rooting Speed | Moderate (2–3 weeks) | Rapid (10–14 days) | Slow (Stressed by heat) |
| Water Requirements | Moderate | Low to Moderate | Extremely High |
| Weed Competition | High (Crabgrass season) | Low | High |
| Fungal/Disease Risk | Low | Extremely Low | High |
| Overall Success Rate | High | Optimal | Low to Moderate |
Selecting the Right Grass Varieties for Newton’s Climate
Choosing the wrong grass variety is one of the most common reasons new lawns fail in Eastern Massachusetts. Newton features a mix of wide-open, sunny properties and heavily shaded historic neighborhoods. To ensure your sod survives long-term, you must match the grass species to your specific yard conditions, soil type, and lifestyle.

Cool-Season Grasses for Sod Installation Newton MA
Because Newton sits in USDA Climate Zone 6b, we use cool-season grass varieties that thrive in warm summers and freezing New England winters.
- Kentucky Bluegrass (KBG): This is the gold standard for high-end, ornamental residential lawns. It features a deep blue-green color, a fine texture, and a soft feel underfoot. Kentucky Bluegrass spreads via underground stems called rhizomes. This self-repairing ability makes it excellent for active families and high-traffic yards. However, KBG requires full sun (at least 6 to 8 hours of direct sunlight) and a consistent irrigation and fertilization program to stay thick.
- Turf-Type Tall Fescue (TTTF): If you want a low-maintenance, resilient lawn, Tall Fescue is an exceptional choice. It features a deep root system (sometimes reaching 2 to 3 feet deep) which gives it superior drought tolerance and the ability to stay green during dry summer spells without constant watering. It also tolerates moderate shade and resists common lawn pests.
- Bluegrass-Fescue Blends: For the typical suburban yard, a mixed blend offers the best of both worlds. The fescue provides shade tolerance and disease resistance, while the bluegrass fills in bare spots and adds that classic, dense carpet look.
We regularly install these high-performing cool-season blends for residential properties in Lexington and surrounding towns. Learn more about our regional turf programs on our Lawn Installation Services page.
Addressing Shade and Soil Challenges in Newton Villages
Newton’s unique “city of villages” geography presents distinct microclimates and soil profiles:
- The Shade Challenge: Villages like Waban, Auburndale, and West Newton Hill are famous for their beautiful, mature sugar maples and oaks. While these trees provide incredible character, they create dense afternoon shade and compete with your lawn for water and nutrients. In these shaded zones, traditional Kentucky Bluegrass will quickly thin out. We recommend shade-tolerant fine fescue or specialized Tall Fescue blends that can photosynthesize efficiently in filtered light.
- Acidic, Glacial Soils: Newton’s native soil consists largely of glacial till and rocky upland soils. These soils are naturally acidic, often registering a pH between 5.5 and 6.5. Most premium turfgrasses thrive in a neutral pH range of 6.0 to 7.0. During our site preparation, we perform detailed soil testing and apply pelletized limestone to neutralize the acidity, making essential nutrients available to the new grass roots.
- Compaction and Drainage: Clay-heavy soils and high foot traffic lead to severe soil compaction. Compacted soil starves grass roots of oxygen and prevents water from draining. Before laying sod, we mechanically loosen the topsoil and incorporate organic compost to improve drainage and structure.
For a deeper dive into establishing a resilient lawn in our local soils, check out our guide on New Lawn Installations Tips for a Lush and Healthy Yard and read about our specialized services on Lawn Installations Newton MA.
The Professional Sod Installation Process and Preparation
The secret to a flawless, long-lasting sod lawn lies entirely in the preparation. Laying the sod is actually the easiest part of the process; it is the hours spent grading, clearing, and amending the soil beforehand that dictate whether your lawn will thrive or fail by year two.
Step-by-Step Site Preparation
To prevent settling, pooling water, and poor root knitting, we follow a rigorous preparation sequence:
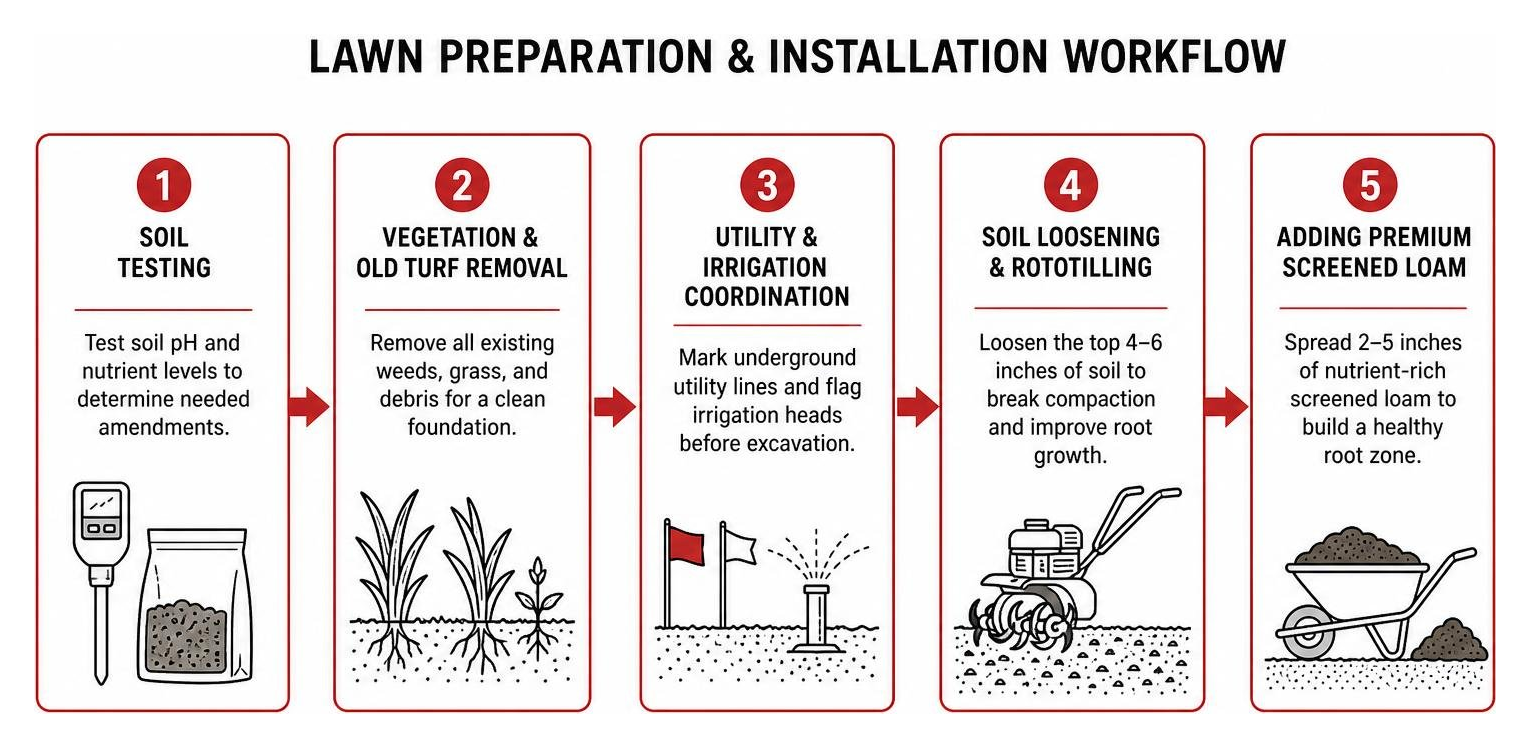
- Soil Testing: We begin by extracting soil core samples to test nutrient levels and pH. This tells us exactly what organic amendments or lime applications your Newton property requires.
- Vegetation and Old Turf Removal: We strip away all existing weeds, crabgrass, and dead turf. Laying sod over existing vegetation is a recipe for failure, as the decaying matter will rot, create air pockets, and kill the new root system.
- Utility and Irrigation Coordination: Before any heavy equipment touches your yard, we coordinate with Dig Safe (811) to mark underground utility lines. We also flag all existing sprinkler heads and irrigation lines to prevent damage during excavation.
- Soil Loosening and Rototilling: Using professional rototillers, we loosen the top 4 to 6 inches of soil. This breaks up compacted glacial till, uncovers hidden rocks, and creates a welcoming environment for young roots.
- Adding Premium Screened Loam: We spread 2 to 5 inches of organic-rich, screened topsoil to establish a nutrient-dense root zone.
- Final Grading: Our crews hand-rake the entire area to establish positive drainage, ensuring water flows away from your home’s foundation and hardscapes. We then use a light water roller to settle the soil, eliminating low spots and air pockets.
We bring this same meticulous level of detail to commercial and residential projects throughout Billerica and the wider region. You can read our comprehensive A Z Guide to Commercial Sod Installation and explore our residential options on Residential Landscaping Newton MA.
Professional Execution of Sod Installation Newton MA
Once the soil bed is perfectly prepped, the fresh-cut sod must be installed immediately. Sod is a living, perishable crop. During the warm spring and summer months, it must be laid within 36 hours of harvest; in cooler weather, it may last up to 72 hours.
Our professional installation process includes:
- Staggered Joints: We lay the sod rolls in a staggered, brick-like pattern. This prevents long, continuous seams where water could channel and erode the soil.
- Tight, Butt Seams: We press the edges of each sod piece tightly against one another without overlapping. Overlapping causes the edges to dry out and die, while gaps allow weeds to break through.
- Shaping and Cutting: We use specialized sod knives to cleanly trim around garden beds, patios, walkways, and irrigation heads.
- Rolling for Soil Contact: Once the sod is laid, we run a 150-to-200-pound water roller over the entire lawn. This presses the sod roots firmly into the prepared topsoil, eliminating destructive air pockets.
- Immediate Saturation: We begin watering the newly laid sod within the first hour of installation. Water is the lifeblood that triggers immediate root knitting.
Cost of Professional Sod Installation in Massachusetts
When planning a landscaping project, understanding the investment required is essential.
Disclaimer: The pricing details provided below represent average market costs compiled from publicly available online industry data. They do not represent the actual pricing or guaranteed rates of Boston Landscape Co. Every property features unique grading, accessibility, and soil preparation needs that require an individualized assessment.
Sod installation pricing is influenced by several factors, including the size of your yard, the amount of old turf that needs to be stripped, soil amendments, and site accessibility.
According to general online industry data, the raw cost of cool-season sod material alone in the Northeast typically ranges from $0.30 to $0.80 per square foot (or roughly $130 to $360 per standard pallet covering 450 square feet), excluding delivery and labor.
When you factor in professional labor, heavy machinery, old lawn removal, grading, adding premium loam, and rolling, the total installed cost typically averages $0.90 to $1.80 per square foot.
To account for wide industry variability, massive differences in property access, and extensive site preparation (such as clearing rocky glacial till or correcting major drainage issues), professional project costs in Massachusetts generally fall into the following wide ranges:
- Small Yard / Partial Lawn Replacement (Up to 1,500 sq. ft.): $3,000 to $7,500+
- Average Suburban Lawn (approx. 0.2 Acres / ~8,700 sq. ft.): $9,000 to $25,000+
- Large Estate / Complex Grading Projects (0.5+ Acres): $25,000 to $75,000+
While sod requires a higher upfront investment than traditional seeding, it provides an instant, weed-free lawn and immediate erosion control. To compare the long-term financial and aesthetic benefits of different grass establishment methods, read our resource on The Cost of Sod Per Acre and Everything in Between.
Post-Installation Care and Maintenance
Your professional sod crew has packed up their trucks, and you are left standing next to a gorgeous, vibrant green lawn. Now, the baton is passed to you. The first 2 to 4 weeks are critical; your primary job is to keep the root zone consistently moist.
Here is your day-by-day roadmap to successful sod establishment:
Phase 1: Weeks 1 & 2 (The Rooting Phase)
- Watering Frequency: Water your new lawn twice daily — typically once in the early morning and once in the early afternoon. Avoid watering late in the evening, as standing water overnight can invite fungal disease.
- Watering Depth: Run your sprinklers for roughly 20 minutes per zone, or until the soil beneath the sod is thoroughly saturated. You want the sod and the top 2 inches of soil to feel like a damp sponge.
- Traffic Control: Keep all children, pets, and heavy traffic off the lawn. Walking on wet, unrooted sod will create permanent depressions and tear the delicate new root fibers.
Phase 2: Weeks 3 & 4 (The Transition Phase)
- Checking the Roots: Gently tug on a corner of a sod roll. If you feel strong resistance, the roots have successfully knitted into the topsoil.
- Adjusting the Water: Gradually transition from frequent, shallow watering to deeper, less frequent sessions (e.g., once a day, then every other day). This encourages the roots to grow deeper in search of moisture.
- The First Mow: Once the grass reaches 3.5 to 4 inches tall, it is ready for its first haircut. Set your lawnmower to its highest setting (around 3 inches) and make sure the blades are razor-sharp. Never cut off more than one-third of the grass blade height at one time. Ensure the ground is dry before mowing to prevent tire ruts.
To keep your investment thriving year-round with proper seasonal fertilization, aeration, and weed management, visit our Lawn Maintenance Newton MA service page.
Frequently Asked Questions about Sod Installation
Can you lay sod over existing grass?
No. Laying fresh sod directly over existing grass or weeds is one of the most common DIY mistakes, and it almost always results in lawn failure. The old grass will block the new sod’s roots from making direct contact with the soil. As the buried grass dies, it rots, trapping heat and moisture while creating air pockets that suffocate and kill the new turf. Proper installation requires stripping away all old vegetation to expose bare, loose soil.
How long does it take for new sod to root?
Under ideal spring or fall conditions, fresh sod will begin growing shallow feeder roots within 7 to 10 days. By week three, the root system should be firmly knitted into the native soil, making it very difficult to pull up. Heavy traffic, sports, and pet play should still be avoided until after the fourth week to allow the root system to mature.
How do I choose a reputable sod installer in Newton?
Look for a local contractor with deep roots in the community, proper licensing, and comprehensive liability and worker’s compensation insurance. A reputable installer should always perform an on-site evaluation, conduct soil testing, handle all utility markings (Dig Safe), and provide clear, written aftercare instructions. Avoid contractors who offer cut-rate pricing by skipping soil preparation, as this leads to lawn failure within a year or two.
Conclusion
A beautiful, lush lawn elevates your home’s curb appeal, provides a safe space for your family, and increases your property value. While sod installation in Newton, MA delivers instant visual gratification, long-term success requires professional soil analysis, meticulous grading, and proper turf selection tailored to our unique New England climate.
At Boston Landscape Co., we have spent over 35 years perfecting the art of lawn installation and property maintenance across Greater Boston, including communities like Concord, Lexington, and Burlington. Our experienced crews handle every phase of the process — from soil testing and excavation to precision sod laying and custom irrigation setup.
Ready to transform your outdoor space? Let’s build a lawn that lasts.
Contact Boston Landscape Co. today at +781-438-6690 or click below to request your professional consultation.
Request an Estimate | Explore Our Lawn Installation Services
Like us on Facebook!
