In Ground Trampoline Installation: 7 Essential Tips 2024
In ground trampoline installation offers an incredible opportunity to improve your outdoor space with safety, aesthetics, and functionality. This installation process seamlessly integrates the trampoline into the landscape, reducing the risk of falls and creating a visually appealing play area. If you’re eager to get started but pressed for time, here’s a quick rundown:
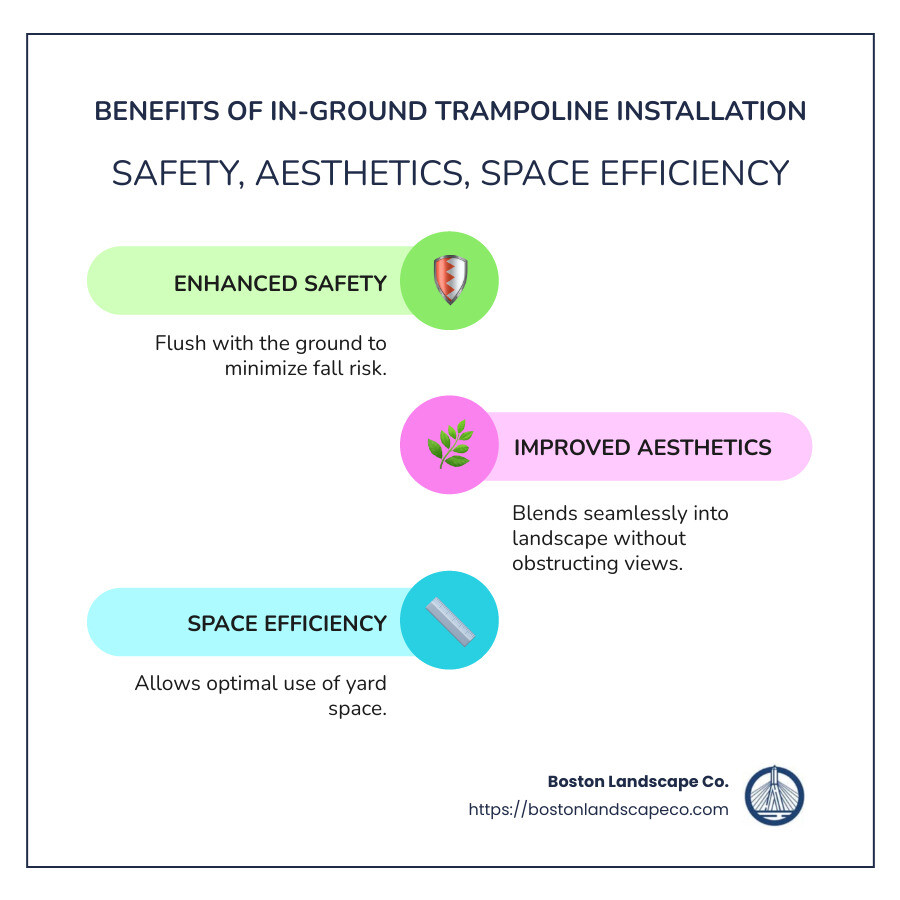
- Safety: Minimizes fall risk by being flush with the ground.
- Aesthetics: Blends with the landscape without obstructing views.
- Space Efficiency: Optimizes use of space, making it great for any yard size.
I’m Steve Schumacher. With over 30 years in landscaping, I specialize in creating beautiful and safe outdoor environments, including in ground trampoline installation. My extensive experience ensures your project is in good hands.
Easy in ground trampoline installation glossary:
– how to install an in ground trampoline
– in-ground trampoline drainage
– how to build trampoline in ground
Choosing the Right Location
Selecting the perfect spot for your in ground trampoline installation is crucial for both safety and enjoyment. Here’s what you need to consider:
Flat Area
First things first, find a level area in your backyard. A flat surface ensures the trampoline sits evenly, which is vital for safe bouncing. Uneven ground can cause instability and might require extra digging or leveling. If your yard is on a slope, you may need to dig a trench to create a flat base.
Tree Roots
Watch out for tree roots! These can pose a significant challenge during installation. Roots not only make digging difficult but can also damage the trampoline structure over time. Choose a location away from large trees to avoid this issue. If that’s not possible, consider consulting a professional to safely remove or bypass roots.
Space Efficiency
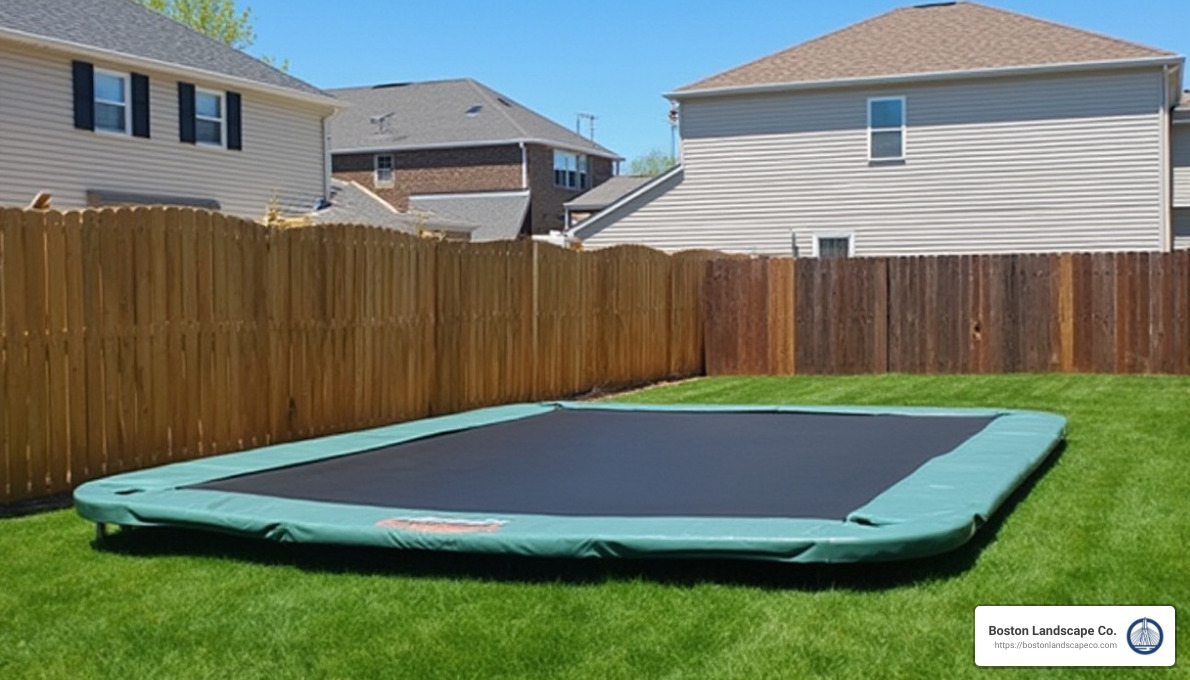
An in ground trampoline is a fantastic way to maximize your garden space. Because it’s flush with the ground, it doesn’t dominate the area like traditional above-ground models. This makes it ideal for smaller gardens or those who want to maintain an open feel in their backyard. Ensure there’s ample space around the trampoline for safe play and easy access.
By carefully considering these factors, you’ll ensure a successful installation that improves your garden’s functionality and beauty.
In Ground Trampoline Installation Process
Installing an in-ground trampoline involves several key steps to ensure safety, stability, and longevity. Let’s explore the process, focusing on digging the hole, installing retaining walls, and setting up drainage.
Digging the Hole
Bowl Shape and Depth Requirements
Start by digging a hole with a bowl shape. This design is crucial for optimal bouncing conditions and proper drainage. The center of the bowl should be the deepest point, which helps manage water flow and provides a safe area for jumping.
The required depth depends on the size of your trampoline. For example, larger trampolines typically need deeper holes. Always check the manufacturer’s manual for specific depth requirements. Generally, you might be looking at depths around 36 inches for the inner hole of a standard trampoline size.
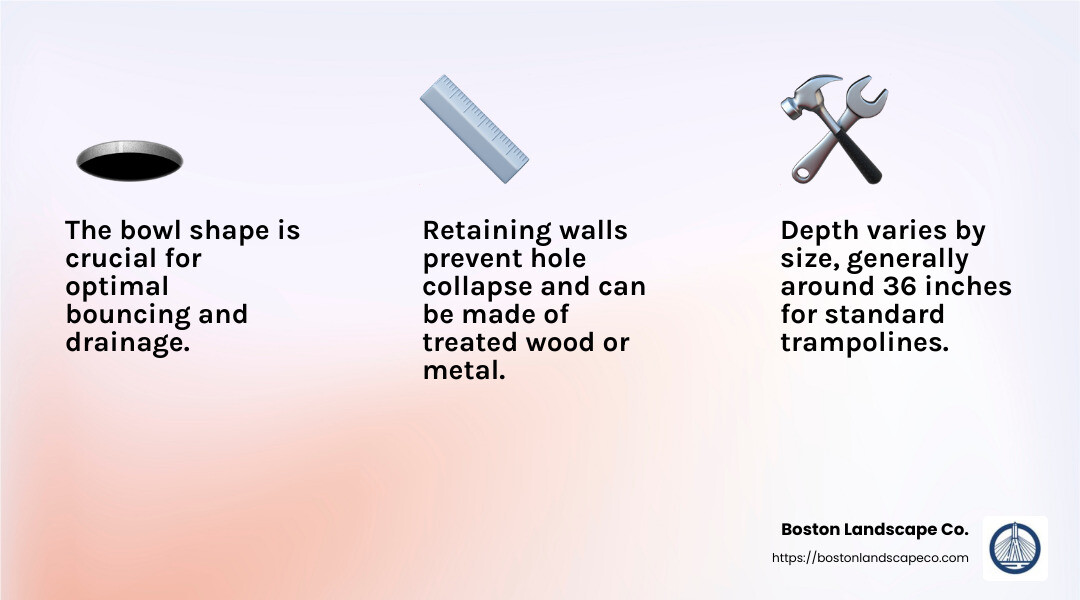
Installing Retaining Walls
Materials and Integrity
Retaining walls are essential to prevent the sides of your trampoline hole from collapsing. You have several material options, including treated wood, metal panels, or specially designed retaining wall blocks. Choose materials that resist moisture and pressure to maintain the integrity of the structure over time.
Installing these walls correctly is vital. They should be sturdy and well-secured, forming a barrier that supports the soil surrounding the trampoline pit. This step not only ensures safety but also prolongs the life of your installation by preventing soil erosion and collapse.
Setting Up Drainage
Sump Pump and Soakaway
Proper drainage is a must to keep your trampoline area dry and safe. Without it, water can accumulate, leading to rust and other damage. In areas prone to heavy rain, installing a sump pump at the bottom of the hole is a reliable solution. This device actively removes water, preventing it from pooling.
Alternatively, consider building a soakaway. This is a pit filled with stone, shingle, or brick, which helps rainwater naturally drain away from the trampoline area. For effective drainage, the pit should be about 600 x 600 x 600 millimeters.
By carefully digging, installing retaining walls, and setting up drainage, you’ll ensure your in-ground trampoline is both safe and durable. These steps are foundational to a successful installation, leading to years of enjoyment and fun.
Assembling and Installing the Trampoline
Once you’ve prepped the ground, it’s time to assemble and install your in-ground trampoline. This involves putting together the frame, attaching the mat and springs, and finishing with backfilling and touches for a seamless look.
Assembling the Frame
Start by assembling the trampoline frame according to the manufacturer’s instructions. This is crucial to ensure everything fits together properly and safely.
- Lay Out the Parts: Begin by laying out all frame components on the ground. Ensure you have everything needed before starting assembly.
- Connect the Sections: Follow the guide to connect the top and bottom sections of the frame. Make sure each connection is secure and tight.
- Ensure Ground Level: Before placing the frame into the hole, confirm that it sits flush with the ground. This ensures a smooth transition from the ground to the trampoline.
Attaching the Mat and Springs
With the frame in place, it’s time to attach the trampoline mat and springs. This step requires some muscle but is essential for a smooth bounce.
- Begin at Key Points: Start by attaching springs at the 3, 9, 12, and 6 o’clock positions. This helps maintain even tension across the mat, making the rest of the process easier.
- Work in Opposites: Continue attaching springs in a pattern that works opposite sides. This keeps the tension balanced and ensures the mat is evenly stretched.
- Test the Bounce: Once all springs are attached, do a quick test bounce. This checks that everything is secure and provides a consistent bounce.
Backfilling and Finishing Touches
Now that the trampoline is assembled, it’s time to backfill the area around it and finish with some aesthetic touches.
- Backfill with Soil: Carefully backfill the space between the retaining walls and the ground. Soil compaction is key here—pack it down firmly to prevent future settling.
- Add a Turf Layer: For a polished look and to blend the trampoline with your yard, add a layer of turf or soft padding around the edges. This not only improves appearance but also adds a layer of safety.
By carefully assembling the frame, attaching the mat and springs, and carefully backfilling, you ensure a safe and durable installation. This setup will offer your family countless hours of fun and exercise, right in your backyard.
Health and Safety Benefits
Installing an in-ground trampoline offers numerous health and safety benefits for both kids and adults. Let’s explore how jumping on a trampoline can boost physical and mental well-being, and why adding a safety net is a smart move.
Physical Exercise
Trampolining is a fantastic way to get moving. Every bounce strengthens muscles and improves cardiovascular health. It’s a full-body workout that improves coordination and balance. Kids especially benefit as it helps develop their motor skills and body control. Plus, the repetitive bouncing motion can improve bone density, which is essential for growing bodies.
Mental Health
Jumping on a trampoline isn’t just fun—it’s a natural mood booster. The act of bouncing releases endorphins, those feel-good chemicals in the brain. This can help reduce stress and improve overall mood. Regular trampoline sessions can be a joyful way to support mental health for both children and adults.
Safety Net
While in-ground trampolines reduce the risk of falls from height, adding a safety net provides an extra layer of protection. This is especially important for younger children or those who might get a bit too enthusiastic with their jumps. A safety net ensures that everyone can focus on having fun without worrying about accidental falls.
By integrating these health and safety benefits into your trampoline setup, you’re not just installing a play area—you’re creating a space for physical activity and mental well-being. This thoughtful approach ensures that every jump is safe, fun, and beneficial for the whole family.
Frequently Asked Questions about In Ground Trampoline Installation
What do you put under an inground trampoline?
When setting up an in-ground trampoline, it’s crucial to think about what’s underneath it. Proper groundwork is key for both safety and longevity.
Drainage System: To avoid water pooling in the trampoline pit, a drainage system is necessary. This can be as simple as a gravel layer at the bottom of the hole. The gravel helps water flow away, keeping the area dry and safe.
Gravel Layer: A layer of gravel not only aids in drainage but also provides a stable base for the trampoline. It helps prevent the trampoline from sinking or becoming uneven over time.
Do in-ground trampolines need drainage?
Absolutely! In-ground trampolines must have proper drainage to manage water effectively. Without it, water can collect in the pit, leading to rust, mold, or even structural damage.
Water Management: A well-designed drainage system ensures that rainwater or other moisture doesn’t compromise the trampoline’s structure. It’s like giving your trampoline a raincoat!
Sump Pump: In areas prone to heavy rainfall, a sump pump might be necessary. This pump actively removes water from the trampoline pit, keeping everything dry and secure.
Can you put a normal trampoline underground?
Yes, you can, but it requires some modifications to ensure safety and stability.
Modifications: A regular trampoline can be installed in-ground, but you’ll need to make some changes. The frame must be adjusted to sit at ground level, and retaining walls should be built to support the sides and prevent soil from collapsing.
Safety: Safety is paramount. Make sure the trampoline is level with the ground and that there’s proper drainage. Adding a safety net is also a wise choice, especially if young children will be using it.
By addressing these common questions, you can ensure a smooth and safe in-ground trampoline installation process. Whether you’re managing water with a sump pump or modifying a regular trampoline, these steps are essential to creating a fun and secure play area.
Conclusion
At Boston Landscape Co., we believe that changing your outdoor space into a haven of fun and relaxation is within reach. Our comprehensive services are designed to improve your backyard with projects like in-ground trampoline installation, offering both aesthetic appeal and practical functionality.
Outdoor Improvement: Our team specializes in creating outdoor environments that are not only beautiful but also functional. Whether you’re looking to add an in-ground trampoline or undertake a complete landscape redesign, we have the expertise to bring your vision to life.
Comprehensive Services: We pride ourselves on offering a wide range of services custom to meet your specific needs. From digging the perfect trampoline hole to ensuring proper drainage, we handle every detail with professionalism and care. Our commitment to quality ensures that your trampoline will be a safe and enjoyable feature for years to come.
If you’re ready to lift your backyard and create lasting memories, contact Boston Landscape Co. today to learn more about our installation services. Let’s work together to make your outdoor space a destination for endless enjoyment!
