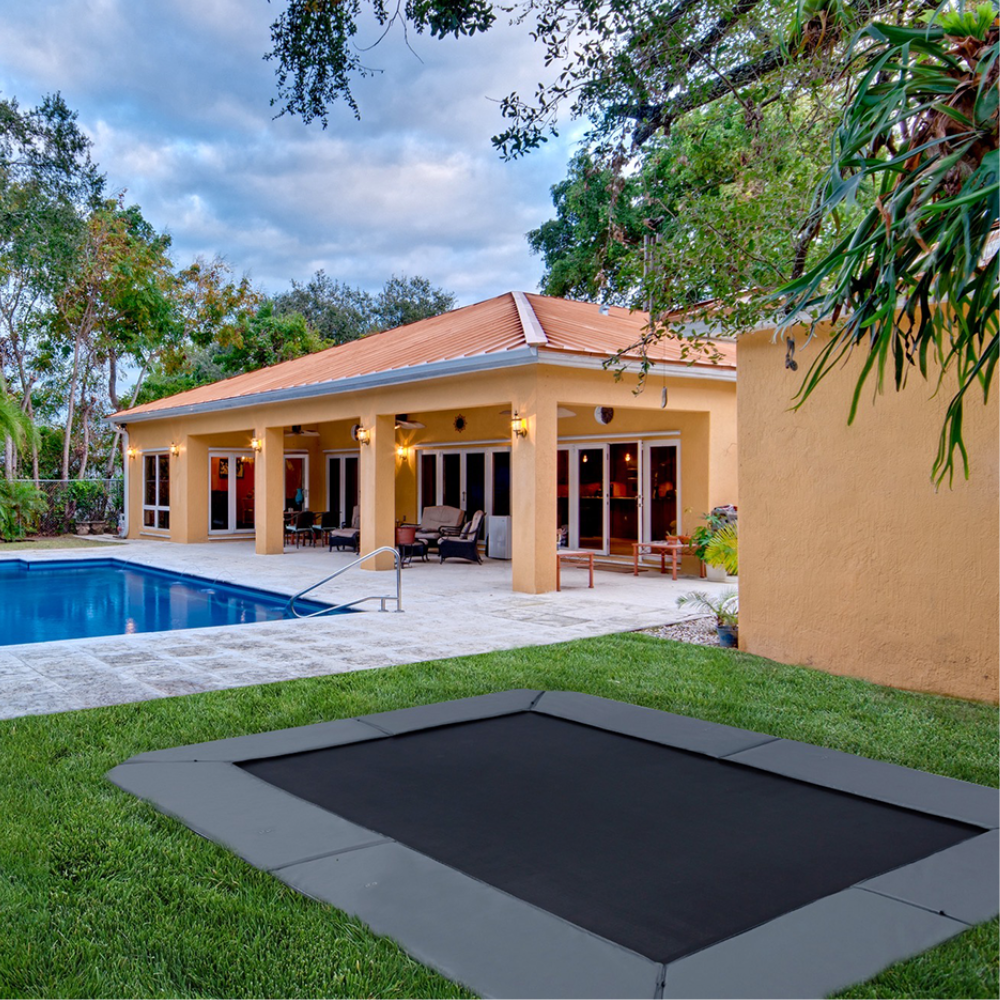
In Ground Trampoline Retaining Wall: Top 10 Essential Tips
What is an In Ground Trampoline Retaining Wall and Why Do You Need One?
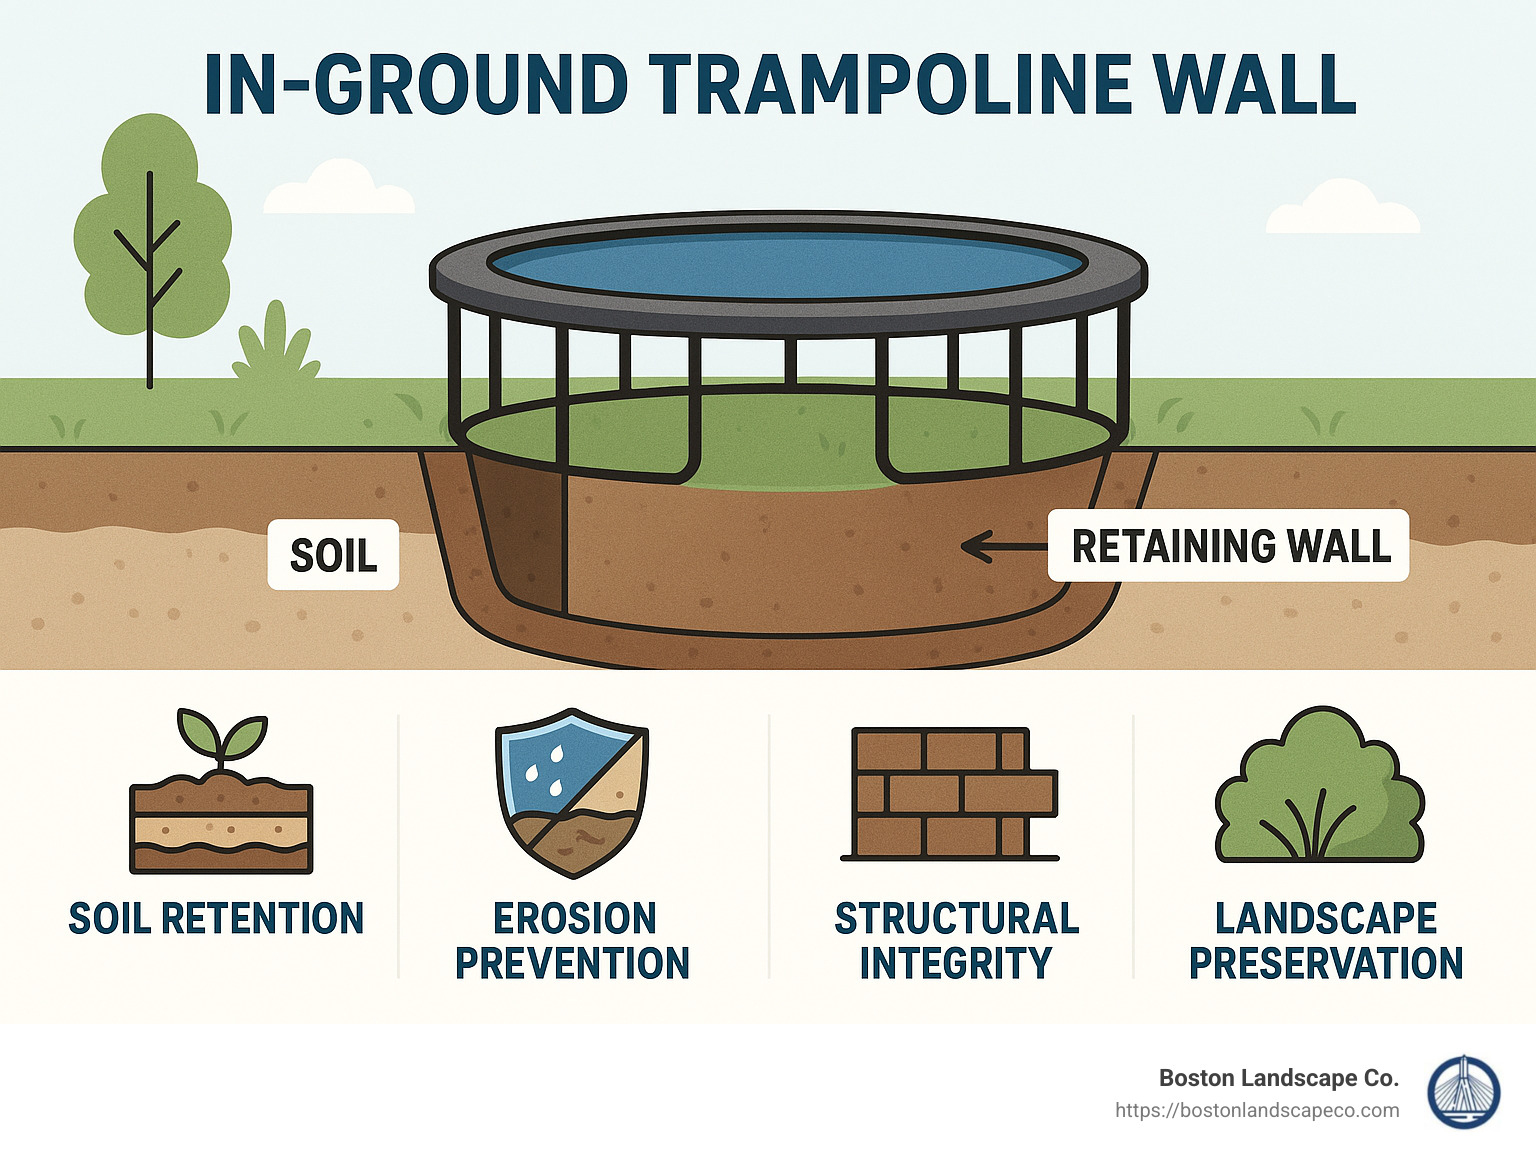
An in ground trampoline retaining wall is a structural barrier built around the perimeter of a trampoline installed below ground. It’s essential because it:
- Prevents soil erosion and collapse around the trampoline
- Protects trampoline structure and frame
- Improves backyard safety by providing stability
- Reduces landscape maintenance and avoids frequent excavation
Simply put, if you’re thinking of installing an in-ground trampoline, a robust retaining wall will ensure your backyard stays safe, stable, and looking great for years.
I’m Steve Schumacher, owner-operator of Boston Landscape Co since 1991, and I have extensive experience designing and installing in ground trampoline retaining wall systems for homeowners and commercial property managers throughout the Greater Boston area. From my decades of landscaping expertise, I’ll guide you through exactly what you need to know about this important backyard feature.
In ground trampoline retaining wall glossary:
– how to build trampoline in ground
– in-ground trampoline drainage
– how to install an in ground trampoline
Understanding In-Ground Trampolines
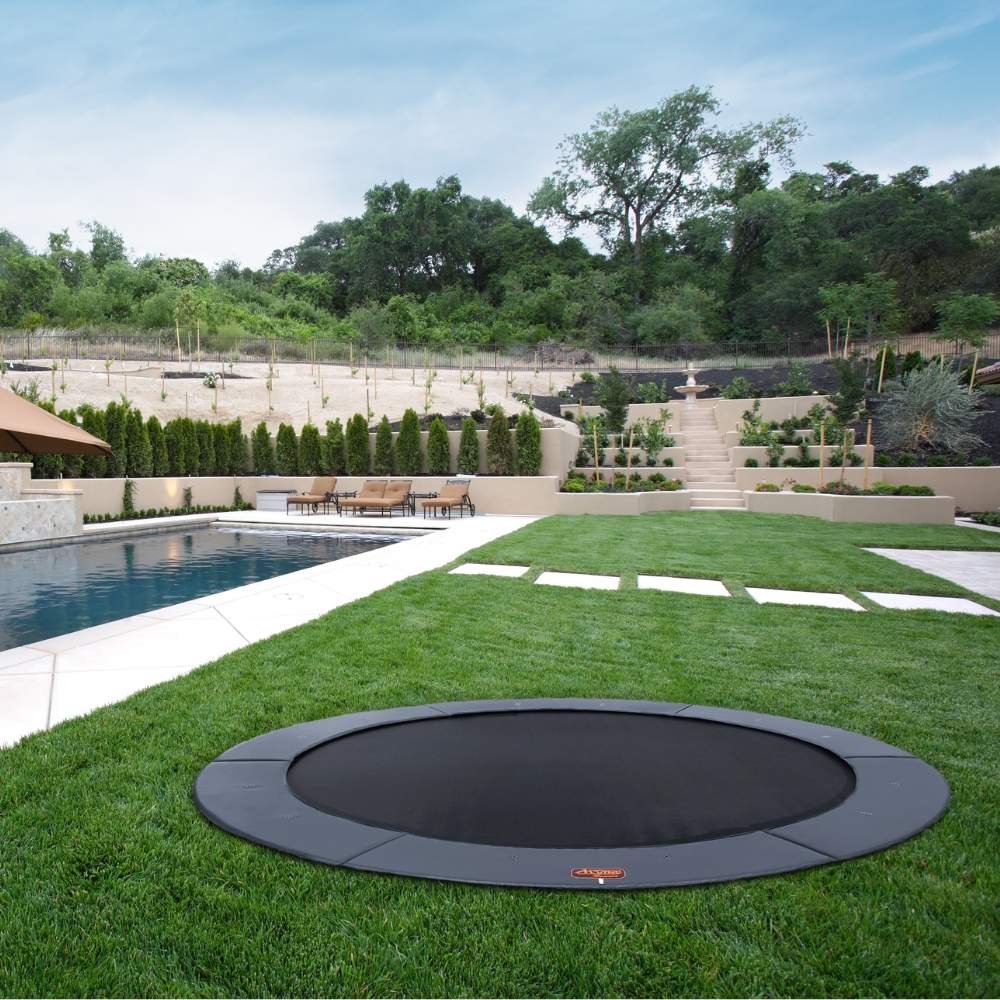
In-ground trampolines are exactly what you’d expect: trampolines set right into your yard, with their jumping surface nearly flush with the ground level. Unlike the traditional above-ground models that sit several feet high and dominate your backyard view, these trampolines are installed within a pit, giving your landscape a clean, streamlined look.
An in-ground trampoline typically includes a sturdy trampoline frame, responsive springs, a durable jumping mat, and—crucially—a quality in ground trampoline retaining wall. This retaining wall isn’t just for show; it keeps your yard’s soil neatly in place, preventing it from sliding into the pit and harming the trampoline structure or your carefully planned landscaping.
One of our Lexington customers shared their fond childhood memories of in-ground trampolines: “Ever since I was a kid, I’ve loved in-ground trampolines. My grandparents had one at their house and another at their cabin. We loved how easy it was to run on and off, share turns, and just have fun without climbing up and down ladders.” Now, they’ve brought that same joyful convenience to their own yard.
Advantages of In-Ground Trampolines
Across Massachusetts, homeowners are increasingly choosing in-ground trampolines—and for good reason. First up is aesthetics. These trampolines blend naturally into your landscape, offering a clean look without blocking sightlines or clashing with your garden design.
Another major benefit is accessibility. Kids—and adults!—can simply step onto the trampoline without having to climb up ladders. This ease of use is especially helpful for younger children or anyone with mobility challenges. One parent from Burlington told us her son “LOVES the trampoline. He runs on and off it without any trouble, and I can keep an eye on him easily from our patio.”
Then there’s the matter of safety. While all trampolines need careful safety measures, in-ground versions lower the jumping surface height. This can potentially reduce injury risks associated with falls. A strong in ground trampoline retaining wall adds further stability to create a safer jumping environment overall.
Finally, in-ground trampolines are great for saving space. Without bulky safety nets or high frames, your yard remains open and spacious, allowing you to enjoy every inch of your property.
Potential Challenges
Of course, no project comes without its challenges. Before you dive into installing an in-ground trampoline, make sure you’re aware of a few important factors.
Drainage is a big one. Proper water drainage is critical to avoid rust, mold, or a soggy trampoline mat. Without addressing this issue, water can build up in the trampoline pit, damaging your equipment or making jumping less fun (nobody likes bouncing in a puddle!).
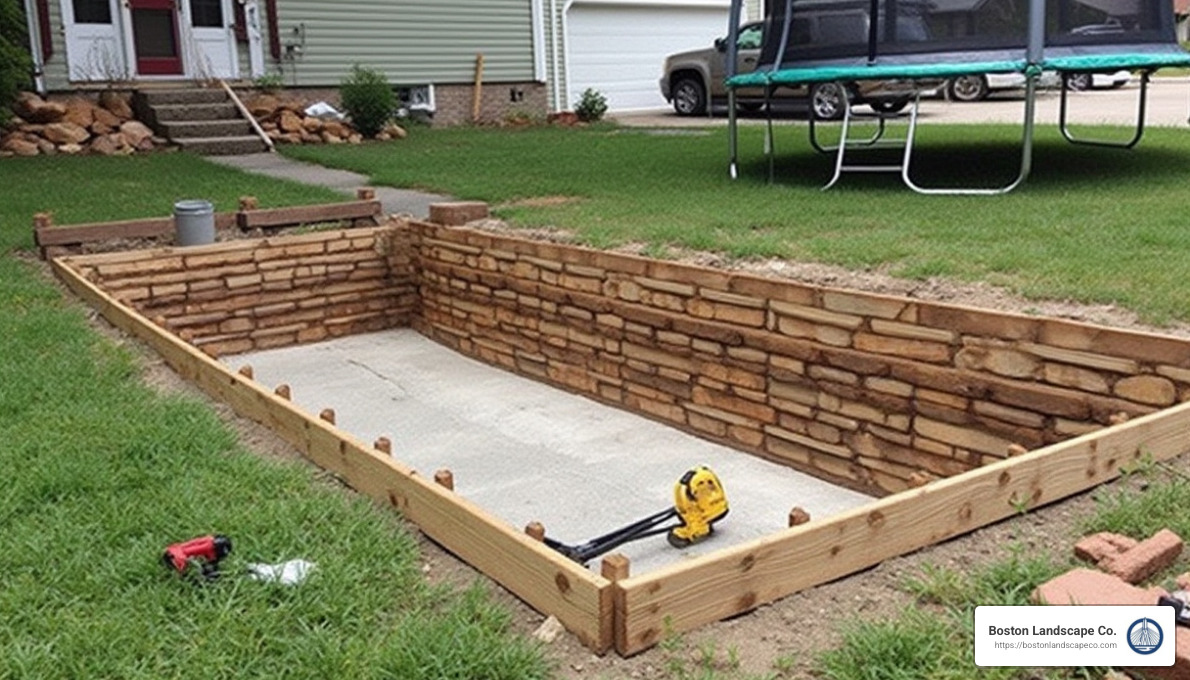
Another consideration is the overall complexity of installation. Compared to assembling an above-ground trampoline, installing an in-ground model is significantly more involved. You’ll need excavation work, careful measurements, and a strong, well-built in ground trampoline retaining wall. It’s often wise to get professional help here—unless you really enjoy digging large holes in your yard!
Maintenance can also be slightly trickier. While trampoline upkeep itself is similar across types, in-ground trampolines require you to keep an eye on the pit, making sure it’s free from debris, pests, or excess moisture.
It’s worth mentioning a common misconception that in-ground trampolines are automatically safer than above-ground ones. However, one industry expert clarifies this: “Isn’t getting an in-ground trampoline installed safer than having it above ground? The short answer is ‘No.'” Even though the surface is lower, proper safety measures—including a correctly built retaining wall and potentially a safety net—are still essential.
At Boston Landscape Co., we’ve helped countless homeowners steer these challenges with ease. Our decades of experience in landscaping and installing sturdy trampoline systems ensure your in-ground trampoline will be safe, attractive, and built to last.
For more detailed guidance, check out our resources on how to build trampoline in ground, in-ground trampoline drainage, and how to install an in ground trampoline.
What is an In-Ground Trampoline Retaining Wall?
An in ground trampoline retaining wall is a sturdy barrier built around the outside edge of your trampoline pit. Think of it as a protective boundary that keeps the earth from collapsing inward and potentially ruining your trampoline—and your backyard fun!
When you dig a hole in your yard for an in-ground trampoline, the surrounding soil naturally wants to slide into the pit. This is where the retaining wall steps in. It holds back the soil, prevents erosion, and ensures your trampoline pit stays stable and safe for jumping.
At Boston Landscape Co., we’ve built hundreds of these retaining walls throughout Stoneham, Billerica, and the Greater Boston area. Usually, they’re constructed from durable materials like pressure-treated wood, concrete blocks, steel panels, or specially designed plastic panels. Each of these materials has its own pros and cons (which we’ll dive into a bit later), but their main job is the same: keeping your trampoline pit’s walls sturdy and secure.
Our lead hardscape designer at Boston Landscape Co. always emphasizes the importance of a proper retaining wall to our clients: “Without a good-quality retaining wall, your trampoline pit could quickly turn into a messy headache. Every time it rains, soil could slide right in, damaging your trampoline frame and creating a frustrating, muddy mess.”
But a retaining wall does even more than just hold back the soil. It also plays an important role in keeping your trampoline functioning at its best. By providing firm structural support, the wall helps maintain a level and steady trampoline frame. Plus, it ensures there’s good airflow beneath your trampoline mat, which is key for maintaining a great bounce.
A well-built retaining wall also adds a tidy, attractive border around your trampoline, blending it nicely with your landscaping. It makes lawn and garden care much simpler, because you won’t be constantly cleaning up dirt and debris that would otherwise collapse into your trampoline pit.
For more information about retaining wall basics and their importance in landscaping projects, check out this helpful resource from the Landscape Network.
Importance of a Retaining Wall in Trampoline Installation
When it comes to installing an in-ground trampoline, there’s simply no skipping out on a quality in ground trampoline retaining wall. Here’s why it’s so essential:
Preventing Soil Erosion
New England weather can get pretty harsh, especially with heavy rains and snowfall. Without a retaining wall, your trampoline pit could quickly fill with mud and debris after storms, causing headaches and costly repairs. A solid retaining wall keeps your soil safely in place, protecting your trampoline investment.
Maintaining Trampoline Structure
The retaining wall provides crucial support to your trampoline’s frame. Without it, the trampoline could become uneven or unstable over time, leading to safety risks and poor bounce quality. A sturdy wall helps ensure the trampoline stays level, safe, and reliable for years to come.
Landscaping Preservation
Aside from the trampoline itself, a well-designed retaining wall helps your yard look neat and attractive. It creates a clear separation between your trampoline and surrounding lawn and garden areas, simplifying your landscaping chores and adding curb appeal.
We’ve seen what happens when homeowners try to cut corners or skip the wall completely. One customer from Lexington confessed to us, “We tried using cheaper materials at first, and boy, did we regret it. Every rainstorm washed soil into the trampoline pit, and soon it became a constant mess. I wish we’d known earlier how important a good retaining wall was!”
If you’re considering installing an in-ground trampoline, trust us—investing in a quality retaining wall from the start is worth every penny. It keeps your trampoline safe, makes maintenance easy, and ensures your yard stays beautiful season after season.
Why Do You Need a Retaining Wall for Your In-Ground Trampoline?
You might be tempted to ask, “Do I really need a retaining wall for my trampoline pit? Can’t I just dig a hole and drop it in?” (We’ve heard this more times than you might think!) But, as much as we’d love to say it’s that easy, the truth is an in ground trampoline retaining wall is absolutely essential. Here’s why:
First and foremost, there’s the issue of soil pressure. Believe it or not, soil is heavy—and even heavier when wet. Without a solid retaining wall, soil pressure can quickly lead to the sides of your trampoline pit collapsing inward. This isn’t just messy; it can cause serious damage to your trampoline frame and create a significant safety hazard.
Speaking of safety, a stable retaining wall keeps your trampoline level and properly supported. A trampoline that shifts or becomes uneven due to soil erosion is a definite recipe for twisted ankles and skinned knees. A retaining wall also prevents uneven erosion around the pit, helping you avoid nasty hidden trip hazards.
But it’s not just about safety—it’s about practicality too. A well-built retaining wall significantly reduces maintenance over time. Without one, you’ll find yourself regularly re-excavating the pit, clearing out soil and debris after every storm. Trust us, it’s not how you want to spend your weekends.
Additionally, proper retaining walls improve structural stability. A trampoline frame is built to withstand jumping—not the constant pressure and shifting of soils. A retaining wall provides critical support, helping your trampoline frame maintain its shape and functionality for years to come.
Finally, let’s not forget about landscape protection. Your backyard is part of your home, and nobody wants their carefully planned landscaping to turn into a mud pit after the first rain. A sturdy in ground trampoline retaining wall neatly separates your trampoline from your lawn or garden beds, preventing erosion and keeping your outdoor space attractive and easy to maintain.
One of our customers from Woburn summed it up perfectly: “Honestly, at first we thought the retaining wall was just an extra cost we could skip. But the team at Boston Landscape Co. explained how important it really is. Now, three years later, our trampoline is still perfectly level, the yard looks great, and we haven’t had to spend any extra money or effort fixing the pit.”
Still curious about the installation process? Check out our detailed guide on Putting a Trampoline into the Ground for more helpful information.
How a Retaining Wall Contributes to Safety and Longevity
Think of an in ground trampoline retaining wall as the trusty sidekick that makes your trampoline the hero of your backyard. It might not be flashy, but it does the important behind-the-scenes work that keeps everything safe and sturdy.
The most obvious benefit is that it prevents soil from collapsing into the trampoline pit. Here in the Greater Boston area, we deal with heavy rains, snow, and freeze-thaw cycles that can shift and soften the soil. A durable retaining wall stands firm against these elements, keeping soil safely in place around the trampoline.
Next, the retaining wall acts as a barrier between your trampoline frame and the surrounding soil. Without this protection, moisture and dirt can quickly rust and weaken the metal frame. By providing a clear separation, the wall extends the lifespan of your trampoline significantly.
And let’s talk about the maintenance again—because fewer chores means more fun. With a quality retaining wall, you’re not constantly clearing out soil, leaves, or debris that fall into the pit. You’ll spend less time adjusting the trampoline or removing debris, and more time enjoying it.
We often remind our clients, “Protect your investment by choosing a high-quality trampoline retaining wall kit.” It might seem like an extra upfront expense, but trust us, it’s far cheaper (and less frustrating!) than frequently repairing or replacing your trampoline later on.
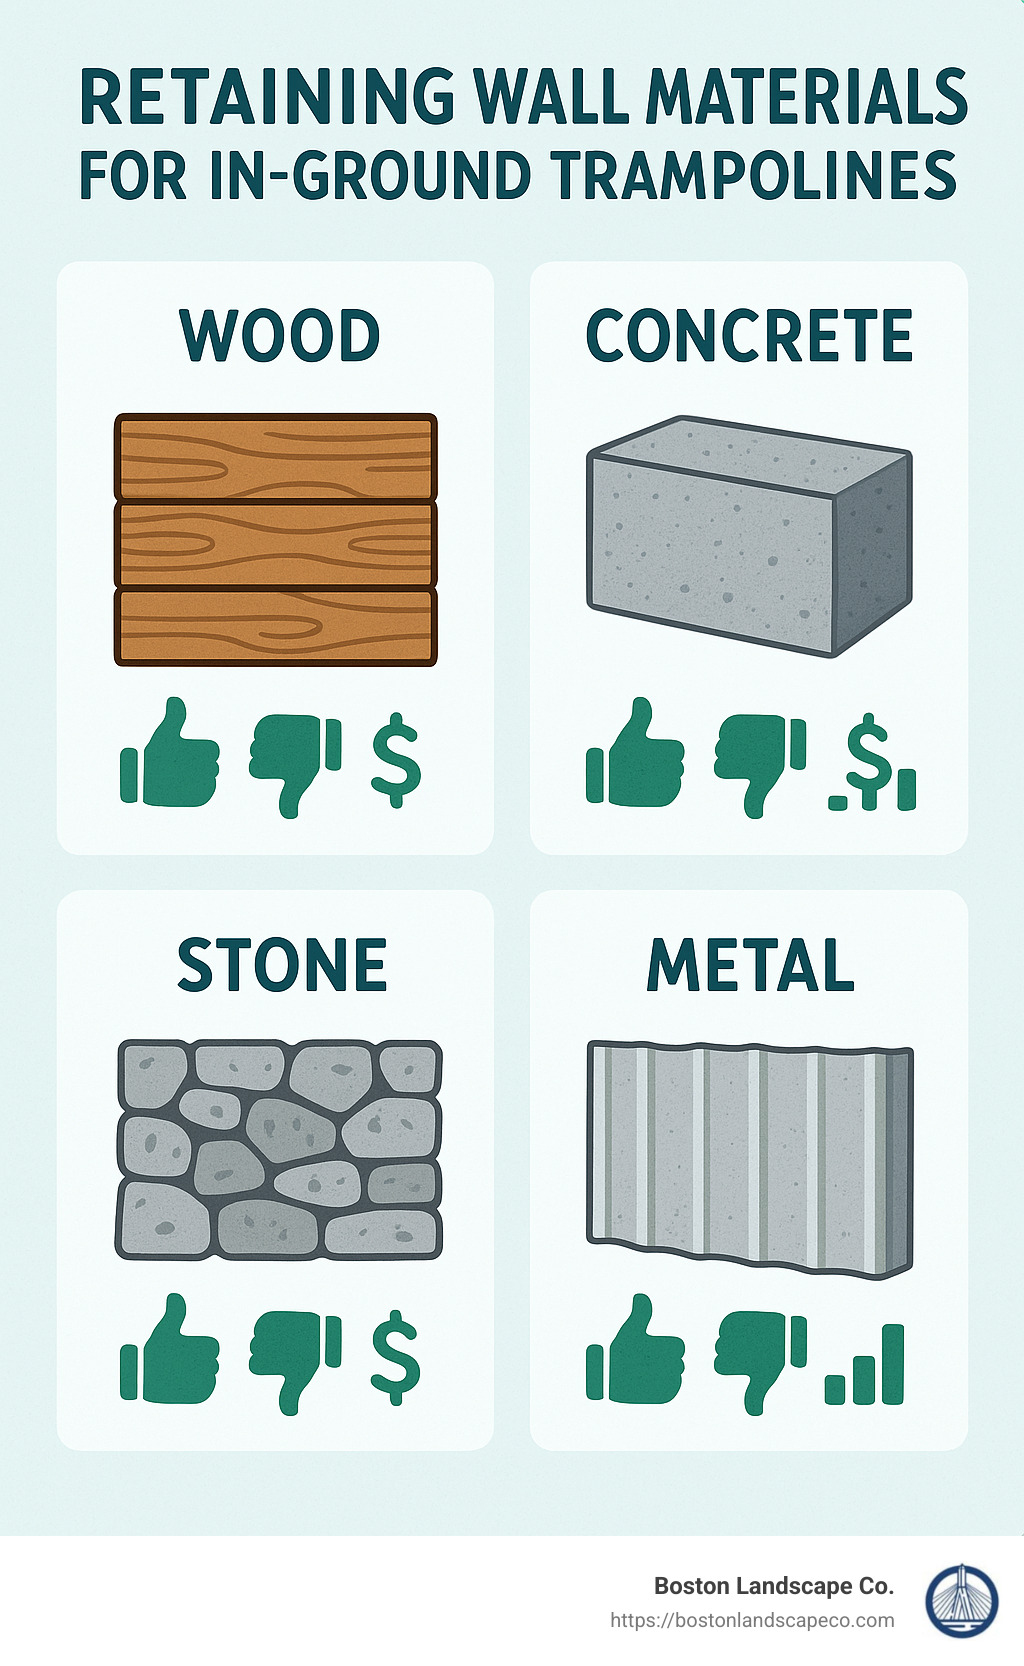
Choosing the Right Materials for Your Retaining Wall
When it comes to installing an in ground trampoline retaining wall, choosing the right materials is essential. The materials you select will directly impact how your trampoline area looks, how durable the wall will be, and of course, what it will cost. Here’s a closer look at the most common options to help you make the best choice for your backyard and budget.
Pros and Cons of Different Materials
Many homeowners start by considering pressure-treated wood because it’s budget-friendly and relatively simple to work with, especially if you’re a DIY enthusiast. Wood blends naturally into your landscape, and you can easily stain or paint it to match your existing outdoor décor. However, keep in mind that wood typically only lasts about 7-15 years and requires regular maintenance to prevent rotting, warping, or cracking—particularly in New England’s unpredictable climate.
If you’re looking for something lightweight and specifically designed for in-ground trampolines, plastic panels might be a good fit. Plastic panels are resistant to rot and rust, are easy to install (often featuring interlocking sections), and require minimal upkeep. But be careful—plastic can become brittle over time due to UV exposure and may not handle heavy soil pressure as effectively as sturdier options.
For homeowners seeking a middle ground between affordability and strength, steel panels have become increasingly popular. Built tough, steel provides excellent structural support and durability, standing up well against heavy soil and harsh weather conditions. Steel retaining walls, especially those designed specifically for in-ground trampolines, typically last decades with proper care. On the downside, steel panels are pricier than wood or plastic, can be challenging to handle due to their weight, and may rust if not properly coated or maintained.
If durability and longevity matter most to you, consider using concrete blocks or poured concrete. Concrete is incredibly sturdy and can easily withstand New England weather, from heavy snowfalls to spring downpours. This type of wall offers maximum structural support and doesn’t rust or rot. Plus, concrete can be customized to complement your existing landscape or hardscape features. But remember, concrete is the most expensive option and usually requires professional installation. It’s also a permanent choice, making it difficult to modify down the line if your backyard needs change. Additionally, you’ll likely need a dedicated drainage solution to avoid water buildup.
One of our Lexington customers recently went with the steel panel system for their in ground trampoline retaining wall, sharing their thinking with us: “We wanted something that would last many years without constant maintenance. The steel panels initially cost more, but knowing they’re built to last decades made the investment totally worth it.”
Environmental Considerations When Selecting Materials
In Massachusetts, our seasons swing from hot, sunny summers to freezing winters with plenty of snow and rainfall in between. That means your retaining wall materials must be up for the challenge. Weather resistance should be top of mind when choosing materials—opt for something that holds strong against moisture, temperature extremes, and heavy precipitation year-round.
Another important factor is sustainability. Eco-friendly materials like recycled plastic panels or sustainably harvested wood are excellent choices if keeping your environmental footprint small is a priority. Composite materials, for example, are popular among our customers in Concord and Carlisle, blending durability and eco-friendliness beautifully.
Your local soil type also plays a key role in material choice. Heavy clay soils exert considerable pressure, requiring stronger materials like steel or concrete. Sandy soils, meanwhile, are lighter and may allow for more flexible material options.
Finally, think about how your chosen material will work with your drainage solutions. Proper drainage is crucial to avoid water pooling, rust, and erosion. Concrete blocks and steel panels can be designed to integrate seamlessly with drainage pipes or gravel beds, while plastic or wood might require additional planning to accommodate efficient drainage. You can learn more about drainage solutions on our dedicated page: In-Ground Trampoline Drainage.
Considering these factors together will help you choose the right materials—all while keeping your backyard safe, beautiful, and low-maintenance for years to come.
Cost Considerations of Installing a Retaining Wall
Budgeting for your in-ground trampoline project means taking a careful look at the costs involved in building a quality in ground trampoline retaining wall. Knowing roughly what to expect can help you plan ahead and avoid surprises down the road.
First, let’s look at materials. Pressure-treated wood is usually the most budget-friendly option, with average prices ranging from $500 up to about $1,500 for a standard trampoline pit. Plastic panel systems, designed specifically for trampolines, typically run from $900 to around $3,000, depending on quality and pit size. For a sturdier, longer-lasting solution, steel panel systems come in around $1,000 to $3,500. At the top end, concrete blocks or poured concrete walls offer maximum strength and durability but come with a higher price tag—usually between $1,500 and $6,000 depending on complexity.
Next, consider installation. Going the DIY route can be appealing if you’re handy with tools and have some spare time on weekends. Beyond materials, you’ll likely spend around $200 to $600 on equipment rentals and supplies. However, installing an in ground trampoline retaining wall can be challenging—especially if you’re not experienced with excavation or construction.
Professional installation, on the other hand, ensures the job is done right and safely. Hiring professionals typically adds another $1,000 to $3,000 in labor costs. But don’t underestimate the peace of mind that comes from knowing an experienced team like ours at Boston Landscape Co. is handling the heavy lifting.
Putting it all together, your total project costs could range significantly. On the budget-friendly side (a DIY approach with wood), you’re looking at around $700 to $2,100. For a mid-range option, professionally installed plastic panels will usually run you $1,900 to $6,000. Premium setups with steel or concrete, installed by professionals, can stretch anywhere from about $2,500 to $9,500.
Important Note: These are average costs based on internet data and not actual costs for Boston Landscape Co. Actual pricing may vary significantly based on your specific project requirements, location, and current market conditions.
One of our happy customers in Medford recently shared their experience: “When we started planning for our trampoline, I was honestly a bit nervous about the cost. But the folks at Boston Landscape Co. took their time walking us through the options. We settled on a retaining wall that fit our budget and our backyard, ending up around $2,200 all-in. Considering the quality and peace of mind, it felt like a great deal!”
Long-Term Savings vs. Initial Investment
While it’s tempting to go with the lowest upfront cost, it’s crucial to weigh the long-term savings you’ll enjoy from investing in quality materials and proper installation. Cheaper materials, like wood, can seem attractive at first—but they typically last only 7–15 years and may require regular maintenance. Over time, the cost of cleaning, repairing, or even replacing a budget wall can quickly add up.
On the other hand, a higher-quality wall built from steel or concrete panels might cost more at the outset—but it will withstand harsh Massachusetts winters, heavy rainfall, and wear-and-tear for decades to come. When you factor in lower ongoing maintenance, fewer repairs, and a longer lifespan (usually three or four times longer than wood), the initial investment quickly starts to make a lot of financial sense.
Another often-overlooked benefit is how a professionally installed in ground trampoline retaining wall can boost your home’s overall value. Families in towns like Winchester, Burlington, or Lexington often look for attractive backyard features when buying homes. A well-built trampoline setup can become a selling point, especially in neighborhoods with lots of young families.
We often gently remind our Greater Boston clients: “The most expensive retaining wall you’ll ever build…is the one you’ll have to build twice.” Going for quality right from the start saves you both headaches and money in the long run.
DIY vs. Professional Installation: Which is Right for You?
When you’re ready to install your in ground trampoline retaining wall, you’ll face an important decision: Should you tackle the project yourself or trust it to professionals? There’s no one-size-fits-all answer—your ideal choice depends on your skill set, available time, budget, and the overall complexity of your backyard project. Let’s explore each option to help you make the best decision for your needs.
DIY Installation of an In-Ground Trampoline Retaining Wall
Doing it yourself can be incredibly rewarding—not to mention easier on your budget. But before you break out the shovel, ask yourself honestly about your experience and comfort level with similar projects. You’ll want to have at least some familiarity with basic construction and landscaping principles. Being able to measure accurately, build a level structure, and understand proper drainage techniques is key to a successful DIY installation.
Time is another essential factor in your decision. DIY projects typically take longer than professional installations, especially if you’re working evenings or weekends. Plan for roughly 5-10 hours of prep work—like researching, planning your layout, and gathering materials. Excavating your pit can take anywhere from 8-16 hours, depending on your soil conditions and whether you rent equipment (highly recommended!) or dig by hand (ouch!). Building the retaining wall itself usually takes an additional 8-24 hours of work, followed by another 2-4 hours for trampoline installation. In total, expect around 23-54 hours spread across multiple weekends.
You’ll also need to either own or rent essential tools and equipment. Besides excavation equipment (like a mini-excavator, which most DIYers find indispensable), you’ll need measuring tools such as a tape measure, level, and string line. Power tools—like drills and saws—will be required to build and assemble your retaining wall structure. Don’t forget safety equipment like gloves and goggles, along with drainage materials such as gravel and perforated pipe.
As one DIY enthusiast in Reading shared with us, “I installed our in ground trampoline retaining wall myself over three weekends. It was definitely a lot of work, but I saved about $1,500 compared to professional quotes. The biggest challenge? Getting the excavation right. Trust me—renting proper equipment is worth every penny!”
Professional Installation of an In-Ground Trampoline Retaining Wall
Of course, not everyone has the time, experience, or interest in DIY projects—and that’s perfectly okay! Hiring professionals can save you significant time, effort, and stress. The experienced team here at Boston Landscape Co. can often complete installation projects in just a day or two—what might take you weeks or even months to finish on your own.
When you choose professional installation, you’re getting several important benefits. First, expertise matters: professionals are trained and experienced in critical areas like drainage management, soil conditions, and ensuring proper structural integrity for your in ground trampoline retaining wall. They’ll also have specialized equipment on hand, making the excavation and building process faster and smoother.
Another advantage of hiring pros is the protection of warranties. Reputable companies (like ours!) stand behind their work. If something isn’t quite right, you’ll have peace of mind knowing you’re covered. Plus, professionals can help steer any local permitting requirements, saving you the hassle and potential headaches down the road.
Finally, think about the time savings. Instead of spending multiple weekends wrestling with equipment and materials, you can sit back and watch your backyard change unfold quickly and professionally. One of our Woburn clients summed it up perfectly: “Having professionals install our in-ground trampoline was absolutely worth it. They finished in a day and a half what would have taken us weeks, and their expertise with the drainage system alone was worth the cost.”
If you’re leaning towards professional installation and want to explore your options further, we have a helpful guide on In-Ground Trampoline Near Me, so check it out!
Whether you choose the DIY approach or professional expertise, the goal remains the same—a safe, beautiful, and long-lasting in-ground trampoline your family will enjoy for years to come.
Steps to Install an In-Ground Trampoline Retaining Wall
Whether you’re a DIY enthusiast ready to jump in or you’re simply curious about hiring professionals like us at Boston Landscape Co., understanding the installation steps for an in ground trampoline retaining wall is crucial. Let’s walk through the process together, so you’ll know exactly what to expect—minus any unexpected surprises!
1. Planning and Preparation
First things first—let’s talk about planning. You’ll want to choose the perfect spot for your trampoline. A location that’s at least 6 feet away from structures, trees, or other obstacles is ideal. It might seem tempting to squeeze the trampoline in a tight space, but trust us: extra breathing room is always better (your landscape—and your neighbor—will thank you).
Next, contact your local “Call Before You Dig” service by dialing 811 here in Massachusetts. They’ll mark underground utilities and help you steer clear of buried electric cables, pipes, and other surprises. Also, check with your municipal building department to see if any permits are needed—better safe than sorry.
Gather all your tools and materials before you start digging. Nothing slows down a project like frequent trips to the hardware store. A bit of preparation now saves hours of frustration later.
2. Measuring and Marking
Measure twice, dig once—that’s our motto at Boston Landscape Co.! Your trampoline pit should be at least one foot wider than your trampoline’s diameter. Mark this carefully with stakes and strings or brightly colored spray paint. Consider ground slope during this step; you’ll want a slight slope to help water drain naturally away from your trampoline.
3. Excavation
Now comes the fun part: digging. Grab your shovel—or better yet, rent a mini excavator. You’ll need to dig about 3 to 4 feet deep, depending on your trampoline’s height (check the manufacturer’s recommendations).
Here’s a pro tip from one of our Lexington clients who went the DIY route: “When we dug our hole, we used a mini excavator our contractor brought in. It was hilarious seeing him operate this tiny machine—he joked it felt like he was scooping dirt out one teaspoon at a time!”
Also, plan ahead for soil removal. You’ll have a surprising amount of dirt to move, so know ahead of time where you’ll put it or how you’ll dispose of it.
4. Building the Retaining Wall
With your hole ready, it’s time to build your in ground trampoline retaining wall. Begin by preparing a solid, level foundation for your wall material. Whether you’ve chosen pressure-treated wood, plastic panels, steel panels, or concrete blocks, carefully follow the manufacturer’s guidelines or best construction practices.
The retaining wall needs to be strong enough to withstand Massachusetts weather, soil pressure, and rambunctious trampoline jumpers. Be sure to reinforce it properly, and don’t forget to incorporate your drainage solutions at this stage—it’s vital to keep that pit dry.
5. Installing the Trampoline
Once your wall is built, you’re ready to set up your trampoline. Assemble your trampoline’s frame according to the manufacturer’s instructions. Then position it carefully into your pit, making sure it’s completely level and properly aligned with your retaining wall.
Secure the frame as recommended by the manufacturer—some designs attach directly to the retaining wall, while others simply rest snugly inside. Finally, attach the springs and the jumping mat, and double-check they’re installed correctly.
6. Safety Checks
You’re nearly done—time for a thorough safety review. Confirm the trampoline is perfectly level; jumping on a tilted trampoline isn’t fun (or safe). Also, check gaps between the trampoline frame and the retaining wall. Proper air circulation is crucial for a nice bouncy trampoline.
Inspect the retaining wall one more time—ensure it’s structurally sound and secure. While you’re at it, add any additional safety features like padding around the frame or even a safety enclosure. Safety first, fun second!
For more detailed installation instructions, check out our comprehensive guide on How to Build Trampoline In-Ground.
Safety Precautions During Installation
Safety isn’t just about the final product—it’s about every step of the installation. Always call 811 before digging to ensure no underground utilities are hiding beneath your future trampoline spot.
Use proper excavation equipment and power tools safely—wear gloves, goggles, and any necessary protective gear. Never enter an unsupported hole deeper than 4 feet. If the pit is deeper, slope or shore up the sides to prevent dangerous soil collapse.
When moving heavy retaining wall materials or trampoline parts, lift with your legs, not your back! Have a friend help if needed (and maybe buy them pizza afterward).
Lastly, during installation, make sure kids and pets stay clear of the area until the project is complete. As one of Boston Landscape Co.’s project managers often jokes, “Installing a trampoline is a family-friendly project—once it’s finished. Until then, make sure the little ones aren’t ‘helping’!”
Following these clear steps and keeping safety in mind will help ensure your in-ground trampoline provides years of safe, reliable fun for the entire family. And if you’d rather leave the work to the professionals, our experienced team at Boston Landscape Co. is always ready to help!
Ensuring Proper Drainage
When it comes to installing your in-ground trampoline, proper drainage might not be the most exciting topic—but trust me, it’s crucial. (Unless you enjoy jumping on a soggy trampoline… which I assume you don’t!)
If water pools beneath your trampoline pit, you’re likely to face several unwanted issues. Excess moisture can significantly affect bounce performance by compressing the air under the trampoline. It can also encourage rust and corrosion on metal trampoline parts and create a moist, cozy home for mold, mildew, and even insects. And let’s not forget about winter—water accumulation can freeze, causing the soil and trampoline structure to shift and potentially damage your setup.
Methods to Prevent Water Pooling
Fortunately, there are several ways to keep your in-ground trampoline dry and bouncy, no matter how much it rains in Massachusetts.
One effective method is to install a central drain at the bottom of your trampoline pit. Typically a drain hole 10 to 12 inches wide filled with gravel does the trick nicely. For even better results, shape the base of your pit to have a slight slope leading directly to this central drain. This encourages water to flow naturally toward the drainage area instead of pooling around your trampoline frame.
In areas with heavier rainfall or dense soil, you might want to consider a perforated pipe system. This involves placing pipes underground that carry excess water away from your trampoline pit and discharge it safely at a lower point in your yard or into a dry well. Pairing this with a generous layer of gravel at the bottom of your pit will significantly improve water drainage.
And don’t underestimate the importance of a good venting system. Leaving adequate space (around 2-4 inches) between the trampoline and your in ground trampoline retaining wall allows for air flow. This ventilation helps moisture evaporate quickly and boosts bounce performance by letting air circulate beneath the trampoline mat.
One of our clients in Carlisle learned the importance of proper drainage. “Our yard has heavy clay soil, and we quickly realized water wasn’t going to drain naturally,” he shared. “Boston Landscape Co. recommended an extensive drainage system combined with a sump pump for heavier rains. It meant a bit more upfront investment—but keeping our trampoline pit bone-dry year-round has been worth every penny.”
Drainage Solutions for Different Soil Types
Every yard is unique, and your drainage plan should match your soil type. If you’re lucky enough to have sandy soil, you’re already ahead of the game. Sand naturally drains quickly, meaning a simple central gravel drain often does the job without additional measures.
For loamy soil, which has moderate drainage capabilities, it’s beneficial to include both a central drain and perforated pipes. Adding a gravel layer at the bottom of the pit can also help water drain more efficiently.
But if you’re dealing with heavy clay soil, you’ll likely need a bit more preparation. Clay doesn’t drain well, and you’ll need a thoroughly planned drainage system to avoid trouble. Typically, this includes a thicker gravel base, a central drain leading to perforated pipes, and—depending on your yard’s slope and rainfall patterns—possibly even a sump pump.
One homeowner from Wellesley shared their experience: “We had sandy soil, and honestly, water pooling wasn’t an issue for us. But my brother in Billerica has heavy clay soil, and they needed a more robust system. They ended up adding extra gravel and a drain pipe running to a lower area, and now they’re just as happy as we are!”
If you’d like to dive deeper into drainage solutions custom specifically for your yard, take a look at our detailed guide on In-Ground Trampoline Drainage.
Maintenance and Longevity of Your In-Ground Trampoline Setup
A properly installed in ground trampoline retaining wall can last for many years, but like any outdoor feature, it needs some TLC to stay in top shape. Think of it like your car—regular check-ups prevent bigger problems down the road.
Regular Inspections
I always tell my clients that seasonal check-ups are your best friend when it comes to maintaining your in-ground trampoline. After the snow melts in spring and before winter hits in fall are perfect times to give everything a once-over.
During these inspections, take a close look at your in ground trampoline retaining wall for any signs of trouble. Are there cracks forming? Is anything shifting or looking uneven? These early warning signs are much easier to address before they become major headaches.
“I set a reminder on my phone for the first weekend in April and October,” shares Maria from Winchester, one of our long-time clients. “My kids and I make it a family project—they actually look forward to helping clean out the trampoline pit, especially when they find interesting bugs or lost toys!”
Don’t forget to check your drainage system, particularly after heavy rainfall. Standing water is your trampoline’s worst enemy, leading to rust, reduced bounce, and even structural issues. If you notice puddles forming or water not draining properly, it’s time to address the problem.
The trampoline frame itself deserves special attention where it meets the retaining wall. These contact points can be prone to moisture buildup and eventual rust if not properly maintained. A quick wipe-down with a dry cloth and inspection for any discoloration can save you from more expensive repairs later.
Dealing with Common Issues
Water accumulation is probably the most common problem we see with in-ground trampolines here in New England. Our freeze-thaw cycles can be particularly tough on drainage systems. If you notice water pooling, first check for any obvious blockages in your drainage pipes or central drain area. Sometimes it’s as simple as clearing out fallen leaves or debris.
For more persistent water issues, you might need to improve your drainage system. Adding more gravel around drain pipes or installing a French drain that directs water away from the trampoline pit can make a world of difference. One of our clients in Lexington even added a small solar-powered pump to their system after particularly heavy spring rains last year.
Soil erosion around your in ground trampoline retaining wall is another issue to watch for, especially after we get those heavy New England downpours. Adding some fresh soil and making sure the ground slopes gently away from your trampoline (not toward it) can help prevent water from seeping in where it shouldn’t be.
“After the third time fixing erosion around our trampoline, we finally installed landscape fabric and river stones in a two-foot perimeter around the entire thing,” explains Tom from Burlington. “Haven’t had a problem since, and it actually looks really nice too!”
If you spot damage to your retaining wall, don’t wait to address it. Small cracks can quickly become big problems, especially during winter when water can freeze and expand within them. For wooden walls, replacing damaged boards promptly prevents rot from spreading. With concrete walls, appropriate patching compounds can seal minor cracks before they worsen.
Wildlife tends to find in-ground trampolines particularly inviting as shelter. In Massachusetts, we commonly see chipmunks, mice, and even the occasional skunk making themselves at home in trampoline pits. Installing fine mesh barriers around any gaps between the trampoline and retaining wall can help discourage these unwanted tenants.
Caring for Retaining Wall Materials
Different retaining wall materials require specific maintenance approaches to maximize their lifespan. Here in New England, our climate puts outdoor structures through their paces with everything from summer humidity to winter ice.
If you chose wooden materials for your in ground trampoline retaining wall, applying a fresh coat of waterproof sealant every 1-2 years is essential. I recommend doing this in early fall, when humidity levels are lower but before the winter moisture sets in. Keep an eye out for any soft spots in the wood—that’s usually the first sign of rot beginning to take hold.
For plastic or steel panel systems, regular cleaning prevents dirt buildup that can trap moisture against the material. A simple spray with the garden hose and wipe-down with a cloth is usually sufficient. Pay special attention to the connection points where panels meet—these are often the first places to show stress or weakness.
Concrete retaining walls are generally the most durable option, but they’re not completely maintenance-free. Small hairline cracks should be sealed promptly to prevent water from getting inside, especially before winter. During spring cleanup, a gentle pressure washing can remove any algae or mildew that tends to form in our humid summers.
“We invested in concrete blocks for our retaining wall seven years ago,” shares Jennifer from Stoneham. “Every spring I just give it a quick pressure wash to remove any winter grime, and it still looks almost brand new. Definitely worth the extra initial cost for us.”
For all types of retaining walls, keeping the surrounding area clear of heavy vegetation is important. While a few ground cover plants can actually help prevent erosion, large shrubs or trees planted too close can eventually damage your wall with their root systems.
With proper maintenance, your in ground trampoline retaining wall should provide many years of trouble-free service. Most of our clients report that spending about 2-3 hours on maintenance spread throughout the year prevents the need for more extensive repairs later on. And remember, a well-maintained trampoline setup isn’t just about longevity—it’s about safety for everyone who uses it.
If you’re ever unsure about a maintenance issue or notice something that doesn’t seem right with your in-ground trampoline setup, don’t hesitate to consult with professionals. Sometimes a small adjustment now can prevent a much bigger problem down the road.
Environmental and Aesthetic Considerations
Your in-ground trampoline doesn’t have to be just a functional play area tucked away in a corner of your backyard. In fact, with a little creativity and thoughtful planning, it can become a gorgeous landscaping feature that improves your home’s outdoor living space.
Impact on Landscape
When you’re planning your in ground trampoline retaining wall, it’s important to think about how it integrates visually into your existing outdoor space. Choosing materials that harmonize with your home’s style and current landscaping elements can transform your trampoline area from an afterthought to a beautiful focal point.
Select retaining wall colors and textures that echo those found around your home. Using similar stone, wood, or composite materials can help your trampoline feel like an intentional part of your landscape design rather than a separate addition. For instance, if your garden walls or patio feature natural stone, consider using the same or complementary materials for your retaining wall.
Another important consideration to keep in mind is the surrounding plantings. Opt for low-maintenance plants and shrubs around your trampoline that won’t drop leaves, petals, or debris onto the jumping surface. After all, nobody wants to spend their weekend cleaning up leaves when they could be doing backflips (we know we don’t!).
Incorporating attractive pathways to your trampoline area can also improve your landscape’s overall flow and accessibility. Consider using stepping stones or neatly-laid pavers that match or complement existing garden pathways. Subtle outdoor lighting around the perimeter of your trampoline can further boost both safety and ambiance, allowing for fun family evenings in your backyard.
Integration with Garden Design
Your trampoline doesn’t have to sacrifice the beauty of your backyard—instead, it can improve it. If your yard has a natural slope, you can incorporate your in-ground trampoline into a terraced landscaping design. This not only creates visual interest, but it also helps manage drainage and reduces soil erosion.
Adding comfortable seating areas near your trampoline is another wonderful way to integrate it within your outdoor living space. This way, family and friends can relax, chat, and keep an eye on the kids (or grown-ups!) as they bounce. You could even create a cozy fire pit or outdoor dining space nearby to encourage family gatherings and make your trampoline area feel like a true extension of your living space.
To maintain privacy without compromising safety or supervision, consider planting natural screens around the trampoline. Strategic plantings of tall shrubs, ornamental grasses, or small trees can offer privacy while enhancing your yard’s aesthetic appeal. Just make sure these plants are placed far enough away so branches don’t creep into the jumping area.
Using plants that offer seasonal interest can also keep your trampoline area inviting year-round. Choose flowering perennials or shrubs that offer colorful blooms during spring and summer and beautiful foliage during the cooler months. This simple touch can make your backyard a place of joy and beauty throughout the seasons.
Eco-Friendly Materials
If you’re passionate about sustainability (we certainly are here at Boston Landscape Co.), an in-ground trampoline retaining wall is a fantastic opportunity to make environmentally friendly choices.
Reclaimed wood can lend a rustic charm to your landscaping while giving new life to materials that might otherwise go to waste. Alternatively, recycled plastic retaining wall systems are becoming increasingly popular, combining durability with the benefit of recycling materials that would otherwise end up in landfills.
Local stone is another eco-friendly choice. Sourcing stone locally reduces your environmental footprint by cutting down on transportation emissions while supporting local businesses. Plus, natural stone often blends beautifully with New England landscapes, making it a win-win situation.
For pathways and surrounding surfaces, permeable materials, including permeable paving stones or gravel, help reduce runoff and naturally filter rainwater back into the ground, contributing to a healthier ecosystem in your yard.
At Boston Landscape Co., we believe your outdoor space is more than just a yard—it’s an extension of your home, a sanctuary for relaxation, play, and making countless memories. With a thoughtfully integrated in ground trampoline retaining wall, you can create a backyard that brings joy, beauty, and sustainability to your entire family.
Frequently Asked Questions about In-Ground Trampoline Retaining Walls
Do I Really Need an In-Ground Trampoline Retaining Wall?
The simple answer is yes, absolutely—and it’s not just us landscapers being overly cautious. An in ground trampoline retaining wall is an essential component of your trampoline setup, and skipping it can lead to headaches (and heartaches) down the road.
Without a retaining wall, the soil surrounding your trampoline pit will inevitably collapse inward. This isn’t just messy; it creates a potentially dangerous jumping environment. The wall provides structural safety by holding back the soil, especially important during Massachusetts’s rainy periods when soil pressure is highest.
Additionally, a retaining wall ensures the long-term stability of your in-ground trampoline. Without it, the pit edges would gradually lose their shape, causing uneven bouncing surfaces and damaging your trampoline frame. This would result in frequent (and costly) re-excavation and maintenance.
In short: A sturdy retaining wall isn’t optional—it’s the key to a safe, functional, and lasting backyard trampoline.
What Are the Common Challenges During Installation?
After installing countless trampolines around greater Boston, we’ve encountered just about every snag imaginable. Here are a few common challenges homeowners face—with tips on how to handle them gracefully:
Soil Challenges: One of the biggest issues we see is difficult soil types, especially clay, which is tough to dig and doesn’t drain well. If you have clay soil, plan extra excavation time and budget for a robust drainage system. Sandy soils are easier, but you’ll still need proper drainage to avoid erosion.
Drainage Issues: Another frequent mistake is underestimating drainage needs. Massachusetts gets plenty of rain (and snow!). To prevent water from pooling under your trampoline, we recommend installing a central drain, perforated pipes, and a gravel base. For more details, check out our guide on In-Ground Trampoline Drainage.
Accurate Measurements: Getting measurements wrong can derail your entire project. Our advice is to buy and assemble the trampoline first (yes, before digging), then take precise measurements. Trust us—it’s easier to adjust hole size on paper than in the dirt.
Utility Surprises: Always call 811 (“Call Before You Dig”) before excavation. We can’t emphasize this enough. Finding underground utilities mid-project isn’t fun for anyone.
Weather Delays: And lastly, let’s talk about New England weather. Rain and freezing temperatures can bring your project to a halt. Try scheduling excavation and installation during drier, warmer months—and keep a tarp handy for unexpected showers.
One homeowner from Burlington shared their experience: “We completely underestimated drainage and ended up with a mini swimming pool instead of a trampoline pit. Thankfully, Steve and the team from Boston Landscape Co. stepped in and installed a proper drainage system. Lesson learned!”
How Does the Choice of Retaining Wall Material Affect Maintenance?
Your material choice for the in ground trampoline retaining wall significantly impacts how much time and effort you’ll spend on upkeep.
Pressure-treated wood is a budget-friendly option, but it requires the most TLC. You’ll need to inspect it annually for rot or insect damage and reseal every year or two. With proper care, wood typically lasts between 7 to 15 years.
Plastic panels are a step up in durability and require less maintenance than wood. Just give them an occasional clean to prevent algae buildup and keep an eye out for any UV damage or cracking. With routine checks, plastic panels usually last around 15 to 25 years.
Steel panels provide excellent strength and durability, especially important in our New England climate. Look for rust periodically, especially around connection points and scratches, and touch up paint as needed. Steel panel systems can easily last upwards of 20 to 30 years with minimal maintenance.
Concrete blocks or poured concrete offer the lowest maintenance of all. They’ll need occasional cleaning to stay looking sharp and should be checked for any cracks or shifting, but otherwise, they’re practically worry-free. Properly constructed concrete retaining walls often exceed 30 years of trouble-free performance.
As one product specialist points out, “Steel panels offer a durable option that won’t rot over time, unlike wooden retaining walls.” Given the harsh freeze-thaw cycles and unpredictable weather in Massachusetts, durability should be a top consideration when choosing your retaining wall materials.
Whichever material you choose, investing a little more upfront can save you considerable time, money, and frustration in the long run.
Conclusion
Installing an in ground trampoline retaining wall can feel like a big project—because, well, it is! But with thoughtful planning and the right approach, it can transform your backyard into a safe, beautiful, and fun space for your whole family.
Throughout this guide, we’ve highlighted some important insights from our decades of experience here at Boston Landscape Co. First and foremost, a retaining wall is absolutely essential for any in-ground trampoline installation. It provides critical structural support, prevents soil erosion and cave-ins, and protects the trampoline frame itself.
Choosing the right materials for your retaining wall depends largely on your priorities. Pressure-treated wood offers a natural look and affordability, but requires regular maintenance to avoid rot and insect damage. Plastic panels are easy to install and care for, while steel panels provide exceptional durability, particularly important in New England’s tough climate. Concrete blocks or poured concrete represent the premium choice, offering best strength and longevity with the lowest maintenance demands.
Proper drainage is also key to a successful installation. Without effective drainage solutions, water buildup can lead to rust, mold, poor trampoline performance, and even structural damage. Depending on your backyard soil conditions—whether sandy and quick-draining, loamy, or heavy clay—your drainage strategy might range from a simple central gravel drain to a more comprehensive system with perforated pipes and possibly even a sump pump.
Another important thing to consider is whether you’ll tackle this project yourself or hire professionals. DIY installation can save money upfront, but it requires a good understanding of construction, careful planning, and extra time and physical effort. Professional installation, meanwhile, provides peace of mind, quicker completion, specialized equipment, and often includes warranties to protect your investment.
No matter who installs your trampoline and retaining wall, regular maintenance and upkeep will extend its life and keep your family safe. Be sure to inspect your trampoline setup seasonally, checking the retaining wall materials for signs of deterioration, ensuring drainage continues to work effectively, and looking out for any signs of animal nesting or vegetation growth. Each retaining wall material has its own specific maintenance needs, so staying proactive can help you catch small issues before they become bigger headaches.
At Boston Landscape Co., we’ve helped countless families across Stoneham, Billerica, and the Greater Boston area create backyard spaces that blend safety, beauty, and fun. As one delighted customer from Winchester recently shared, “The in-ground trampoline Boston Landscape Co. installed completely changed our backyard—we can’t imagine our home without it now. The kids love it, and it looks beautiful.”
For more detailed guidance and inspiration, check out our comprehensive guide on Inground Trampoline. And if you’re considering making an in-ground trampoline part of your backyard, we invite you to reach out to our experienced team here at Boston Landscape Co. We’ll help you choose the best materials, design a safe and effective drainage solution, and ensure your trampoline installation complements your overall landscape.
Installing an in ground trampoline retaining wall is about more than just enhancing your property’s value or appearance—it’s about creating a meaningful space filled with laughter, exercise, and family memories you’ll cherish for years to come.
