how are irrigation systems installed: 7 Proven Steps 2025
Transform Your Landscape with Efficient Watering
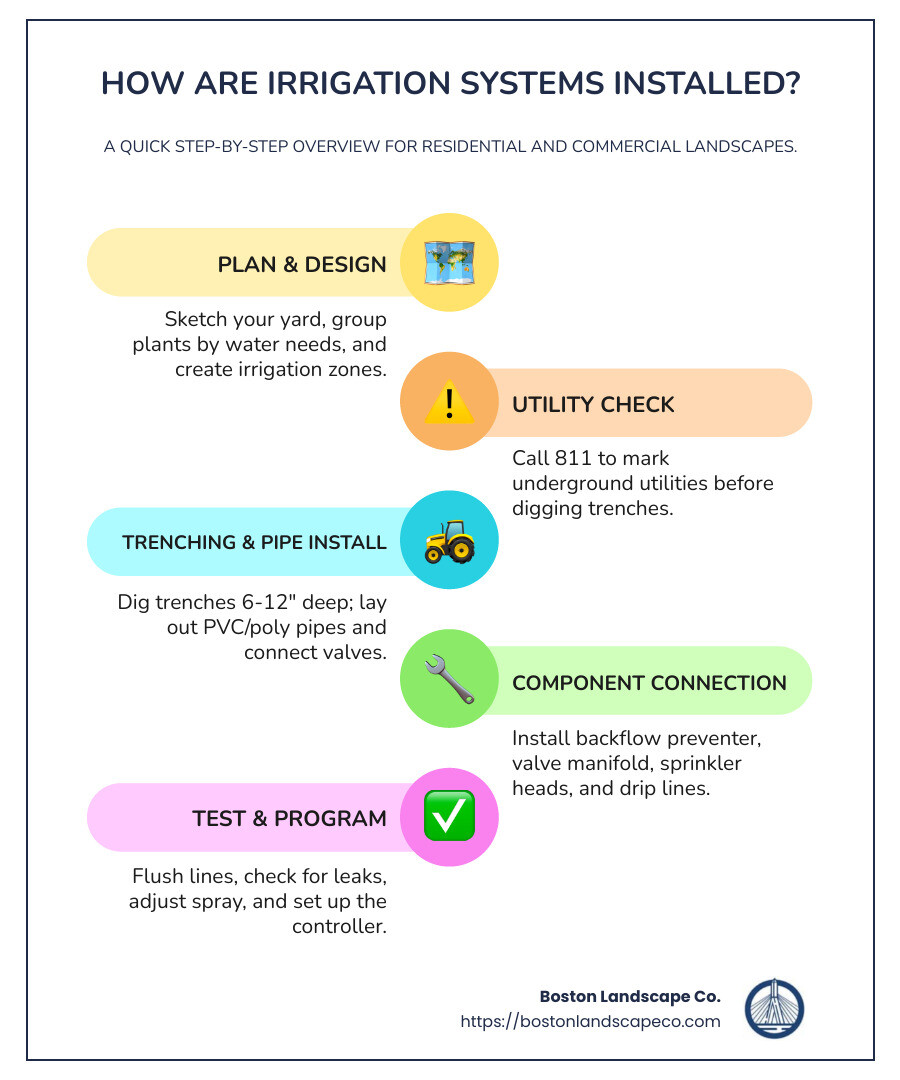
How are irrigation systems installed in a typical residential or commercial property? The process involves planning, trenching, pipe installation, connecting components, and programming a controller. Here’s a quick overview:
- Planning & Design: Map out zones based on plant water needs
- Utility Check: Call 811 to mark underground utilities
- Water Assessment: Measure pressure (40-65 PSI) and flow rate
- Trenching: Dig 6-12 inches deep for pipes
- Pipe Installation: Lay PVC or poly pipes in trenches
- Component Connection: Install valves, backflow preventer, and sprinkler heads
- Controller Setup: Wire and program the timer
- Testing & Adjustment: Check for leaks and proper coverage
An irrigation system can transform your property while saving water and time. Instead of dragging hoses and portable sprinklers around your yard, an automated system delivers precise amounts of water exactly where and when it’s needed. Modern systems can reduce water usage by 30-50% compared to manual watering, all while maintaining a healthier, more vibrant landscape.
Installing an irrigation system might seem daunting, but with proper planning and the right approach, it becomes manageable whether you choose to DIY or hire professionals. The key is understanding the components, proper sizing, and efficient zoning based on your landscape’s specific needs.
I’m Steve Schumacher, owner of Boston Landscape Co, and with over 30 years of experience in the landscaping industry, I’ve overseen hundreds of irrigation system installations throughout the Greater Boston area and understand precisely how irrigation systems installed correctly can transform properties while conserving water.
Understanding Modern Irrigation Systems: Types & Benefits
Modern irrigation systems have come a long way from the basic sprinklers of yesteryear. Today’s watering solutions combine precision engineering with smart technology to transform your landscape while being kinder to both the environment and your water bill. Before we roll up our sleeves and dig into installation details, let’s explore the different systems available and why they might be perfect for your property.
As my colleague Herbert Post often says during our consultations, “Watering plants is a precise science, and trying to keep up with daily hand-watering demands is nearly impossible.” This explains why so many Massachusetts homeowners are switching to automated systems that do the work for them.
When I visit properties around Boston, I typically recommend one of these five main irrigation approaches:
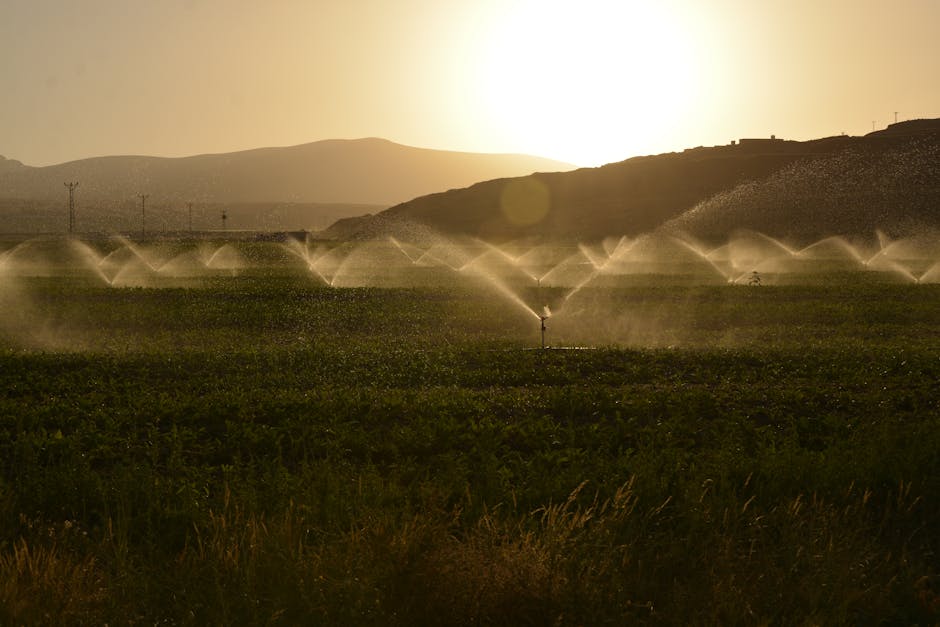
In-ground Sprinkler Systems are the classic choice for lawns and larger areas. These trusty pop-up heads hide underground until it’s watering time, then emerge to do their job before disappearing again. They’re perfect if you want that lush, green carpet of grass without dragging hoses around.
Drip Irrigation is my personal favorite for water efficiency. These systems deliver moisture directly to plant roots through small tubes and emitters. They’re practically invisible once installed, and they reduce water waste dramatically – something we all appreciate when the water bill arrives!
Micro-spray Systems provide a gentle mist for your flowerbeds and shrubs. They’re like the perfect middle ground between sprinklers and drip systems, offering targeted watering without soaking the entire area.
Rotor Systems are the marathon runners of irrigation. These rotating sprinklers cover impressive distances while using less water than fixed spray heads. If you have a larger property, rotors can be a game-changer.
Surface Irrigation methods like furrows or basins are less common in our residential Boston projects, but they have their place in certain agricultural or specialized landscape designs.
Comparing Main System Types
When I sit down with homeowners to plan their irrigation, the conversation often boils down to sprinklers versus drip systems. Here’s how they stack up:
| Feature | Sprinkler Systems | Drip Irrigation |
|---|---|---|
| Water Usage | 3-10+ gallons per minute | 0.5-4 gallons per hour |
| Coverage Area | 5-50 foot radius | Targeted to individual plants |
| Best For | Lawns, large open areas | Gardens, flower beds, trees |
| Installation Depth | 6-12 inches underground | Surface level or under mulch |
| Watering Efficiency | 65-75% | 90-95% |
| Evaporation Loss | Higher | Minimal |
| Cost Range | $1,000-$5,000+ | $500-$2,000+ |
Sprinkler systems shine when it comes to covering expansive, uniform areas like your front lawn. They use pop-up spray heads with fixed patterns or rotor heads that rotate to cover distances of 15-50 feet. When we measure their output, we talk in gallons per minute (GPM), with most heads delivering between 1-5 GPM.
Drip irrigation works on a much smaller scale, with water measured in gallons per hour (GPH), typically 0.5-4 GPH per emitter. My colleague Scott Johnson puts it perfectly: “Drip irrigation is an efficient, convenient way to water your garden. It supplies water directly to the roots of your plants, which reduces the amount of water you need to use.”
Your soil type plays a huge role in choosing the right system too. In sandy soil, water drains quickly, so you’ll need more frequent watering (we typically use 2 GPH drippers at 10-12″ spacing). Loamy soil holds moisture better (1 GPH drippers at 16-18″ spacing works well), while clay soil retains water the longest (0.5-1 GPH drippers at 18-24″ spacing is usually ideal).
Why Automate Your Watering
The convenience of automated irrigation is just the beginning. I’ve helped hundreds of Boston-area homeowners make the switch, and they consistently report these benefits:
Time savings tops the list for busy professionals. One Billerica homeowner told me, “If you travel a lot or are away from home, automated irrigation ensures your landscape is watered properly.” No more rushing home to water during a heat wave or asking neighbors to help.
Consistent hydration makes a visible difference in plant health. Your garden receives the same amount of water at the same time each day, eliminating the feast-or-famine cycle that comes with manual watering.
Water conservation becomes automatic with smart controllers. These clever devices adjust watering schedules based on weather conditions, soil moisture, and seasonal needs. Many of our clients see water usage drop by 30-50% after installation.
Improved plant health follows naturally from consistent, appropriate watering. Plants develop stronger root systems when they’re not stressed by drought or drowning in too much water.
Property value improvement is the cherry on top. A properly irrigated landscape simply looks better, and can increase property values by 5-12% – something worth considering if you might sell in the future.
The technology has gotten remarkably sophisticated too. Today’s smart controllers connect to WiFi and use local weather data to adjust watering schedules automatically. Rain sensors can detect precipitation and delay irrigation for up to 48 hours, preventing waste and protecting your plants from overwatering.
Want to learn more about how proper irrigation fits into a comprehensive landscape plan? Check out our Professional Lawn Care Services for additional information on keeping your outdoor space looking its best all season long.
How Are Irrigation Systems Installed: Step-By-Step Master Plan
How are irrigation systems installed properly to ensure efficiency and longevity? The process involves careful planning, digging, connecting, and programming – but don’t worry, I’ll walk you through each step so you understand exactly what’s involved before you decide to DIY or call the professionals.
If you’re considering a DIY approach, it’s good to know what you’re getting into. A basic two-zone system typically takes 16-20 hours to install for a homeowner – that’s a full weekend plus some evening hours. Professional teams like ours at Boston Landscape Co. can usually complete the same job in just 1-2 days, thanks to specialized equipment and years of experience.
Let’s explore the step-by-step process of bringing automated watering to your landscape:
Step 1 – Site Assessment & Layout
The foundation of any successful irrigation system starts with thoughtful planning. Think of this as the blueprint stage – time invested here prevents headaches later.
Begin by creating a scale drawing of your property on grid paper (1 inch = 10 feet works perfectly). Mark everything – your house, driveway, walkways, trees, garden beds, and any other landscape features. This visual guide becomes your planning canvas.
Next, take a walk around your property and note the different watering needs. Your thirsty hydrangeas need more water than your drought-tolerant ornamental grasses. As one of my mentors used to say, “Soil is like a storage room for plant nutrients and water” – understanding how water moves through your specific soil helps determine appropriate zones.
The sun’s path across your yard creates microclimates that affect watering needs too. South-facing areas typically bake in the afternoon heat and need more water than shady north-facing spots. Make note of these variations on your map.
Don’t forget to consider slopes! Water naturally flows downhill (sometimes surprisingly quickly), which affects distribution. Areas with poor drainage might need special attention to prevent pooling.
Now for the technical part – locate your water source and measure the pressure and flow rate:
– Water pressure: Use a pressure gauge on an outdoor faucet (ideal range is 40-70 PSI)
– Flow rate: Time how long it takes to fill a 5-gallon bucket, then calculate your gallons per minute
With this information, you can mark the optimal locations for sprinkler heads. For lawn areas, plan for head-to-head coverage – each sprinkler should reach the next sprinkler – to prevent those annoying dry spots between sprinklers.
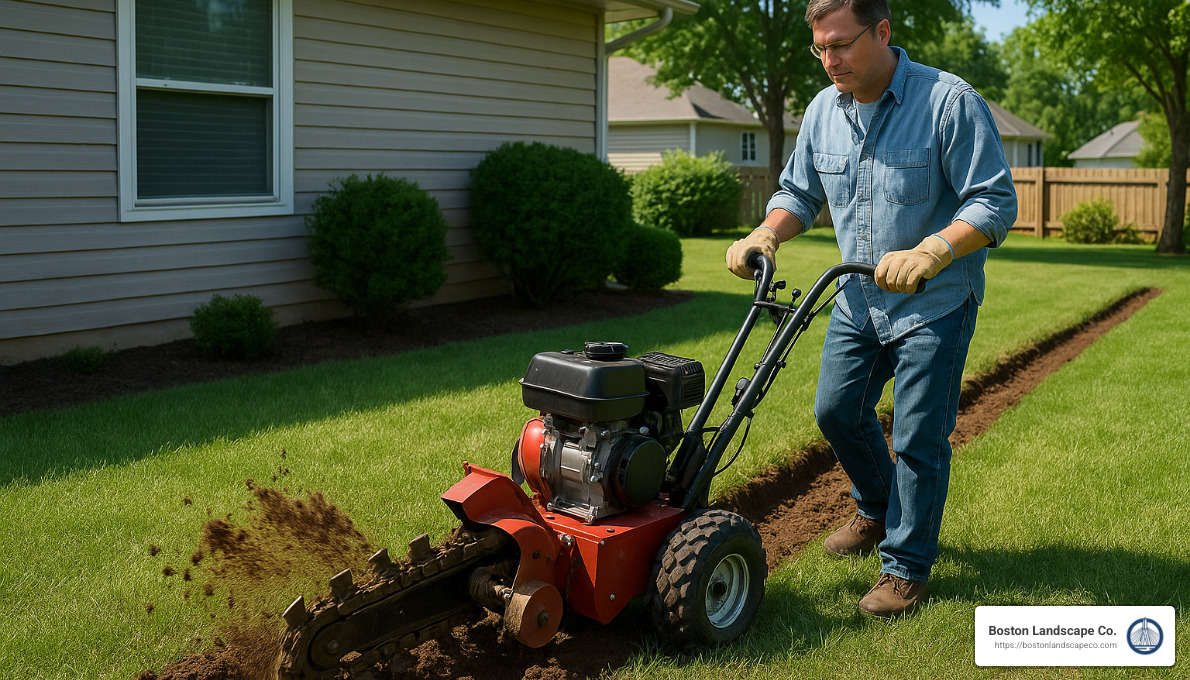
Before you pick up a shovel, make that crucial call to 811 to have underground utilities marked. It’s free, required by law in Massachusetts, and could save you from a very bad day hitting a gas or electric line!
At Boston Landscape Co., our irrigation specialists create detailed plans that account for all these factors, ensuring optimal coverage while minimizing water usage. Check out our Landscape Design services for professional assistance with this crucial planning stage.
Step 2 – How are irrigation systems installed for In-Ground Sprinklers
When installing traditional in-ground sprinklers, material selection makes a big difference in our New England climate. You’ll need to choose between:
PVC pipe is rigid, durable, and excellent for main lines. It’s the industry standard in warmer climates, but it can become brittle in freezing temperatures.
Polyethylene pipe is the more popular choice in Massachusetts because it’s flexible and freeze-resistant. It can expand slightly when frozen without cracking, and its flexibility means fewer fittings are needed around corners.
Once you’ve selected your materials, it’s time to start digging. In our Massachusetts climate, trenches should be 6-12 inches deep to protect pipes from freeze damage. You can rent a trenching machine (which makes quick work of the job) or hand-dig with a trenching shovel if you’re working in tight spaces or have a smaller yard.
I remember helping a homeowner in Winchester who was determined to protect his prize-winning perennial beds during installation. For areas under his garden walkways, we used a water-pressure drilling technique with a jet-spray nozzle to create pathways for pipes without disturbing his carefully designed hardscapes.
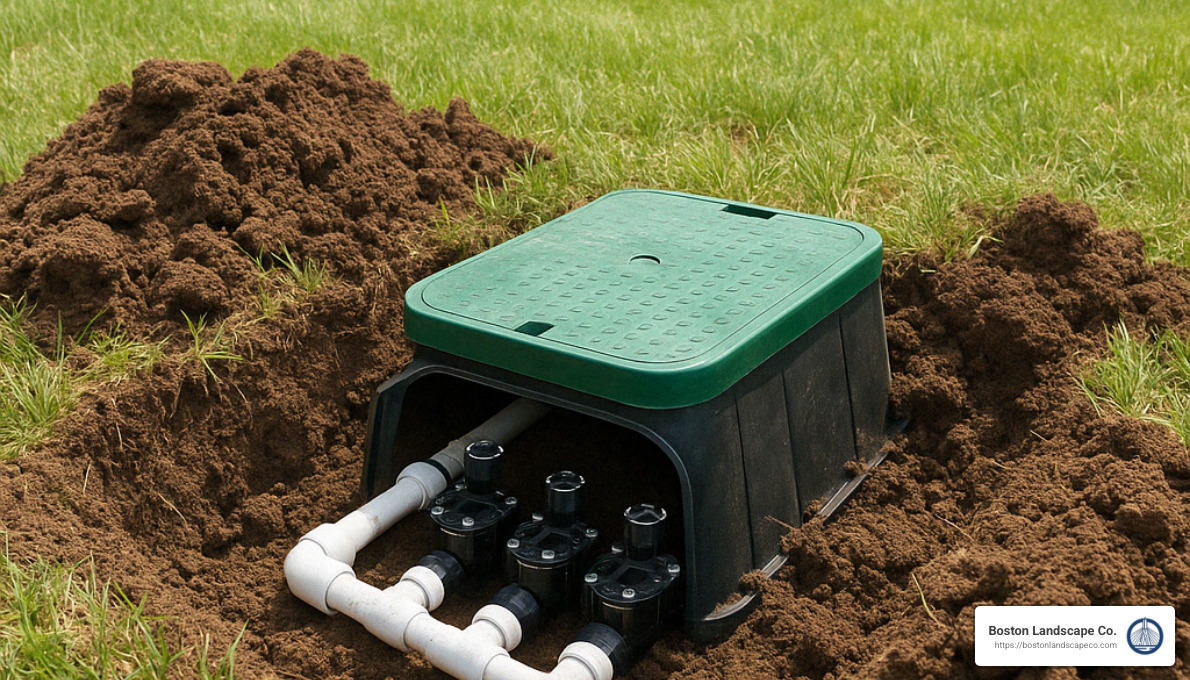
The irrigation “nervous system” consists of:
– Main lines: Larger pipes (typically 3/4″ to 1¼”) connecting to your water source
– Valve manifold: The control center that directs water to different zones
– Lateral lines: Smaller pipes that branch to individual sprinkler heads
– Swing joints: Flexible connectors that protect pipes if heads are damaged
When installing sprinkler heads, you’ll choose between fixed spray heads (covering 5-18 feet) and rotor heads (covering 15-50 feet). The key to success is proper overlap – each sprinkler should spray to the base of adjacent sprinklers. As one of our irrigation technicians always says, “Overlap sprinklers by at least 50% to avoid dry patches – nobody wants a polka-dot lawn!”
Before attaching heads, run water through the pipes to clear out any debris that could clog your sprinklers. This simple step can save hours of troubleshooting later.
Need help with your landscaping after installation? Our Landscaping services can help restore or improve your yard once the irrigation system is in place.
Step 3 – How are irrigation systems installed for Drip Lines
Drip irrigation is the water-saving superstar of irrigation systems, delivering moisture directly to plant roots with minimal waste. How are irrigation systems installed when using this efficient approach? The process differs significantly from traditional sprinklers.
First, you’ll need to decide how to connect your drip system – directly to an outdoor faucet (simplest), to a dedicated irrigation valve, or by converting an existing sprinkler zone to drip (a popular option for established gardens).
Unlike sprinklers that operate at high pressure, drip systems need much lower pressure – typically 25-30 PSI. That’s why a pressure regulator is essential. Without one, those tiny emitters would quickly blow off the lines! Similarly, a filter is non-negotiable since even tiny particles can clog the small openings in drip emitters.
For the backbone of your system, lay 1/2-inch polyethylene tubing along your planting beds. I like to secure it with ground stakes every 5-8 feet to keep everything in place. For larger gardens, you might need 3/4-inch tubing to ensure adequate flow to the furthest plants.
Now comes the fun part – choosing and installing emitters. You have several options:
– Point-source drippers deliver water to individual plants (perfect for container gardens)
– In-line emitters come pre-installed in tubing at regular intervals (ideal for hedges)
– Micro-sprayers cover slightly larger areas with a gentle spray (great for groundcover)
– Soaker hose “weeps” water along its length (excellent for dense plantings)
Connect these to your mainline using 1/4-inch feeder lines that branch out to reach individual plants. Cap the ends of all lines with end caps or figure-eight clamps to close off the system.
Here’s a tip from years of experience: the spacing of your emitters should match your soil type. For sandy soil that drains quickly, place emitters closer together (10-12 inches) with higher flow rates (2 GPH). For clay soil that holds water longer, space them further apart (18-24 inches) with lower flow rates (0.5-1 GPH).
As garden expert Marianne Lipanovich notes, “Drip irrigation is often the first choice for an edible garden. It provides slow and consistent water to the roots of each plant, where they need it most, and prevents fungal diseases and weeds.” I couldn’t agree more – we’ve seen vegetable yields increase by 30% or more after installing properly designed drip systems.
Once everything is connected, cover your drip lines with 2-3 inches of mulch. This reduces evaporation, protects the tubing from sun damage, and keeps everything looking tidy. Plus, the mulch helps the water spread horizontally through the soil before it travels downward, ensuring more even moisture distribution.
Step 4 – Safe Water Connection & Backflow Prevention
This step might not be the most exciting part of installation, but it’s arguably the most important. Proper water connection and backflow prevention protect your family’s drinking water and keep you in compliance with Massachusetts regulations.
Let’s start with the connection point. Typically, you’ll tap into your home’s main water line after the meter or connect to an outdoor spigot. Always install a dedicated shut-off valve for your irrigation system – this allows you to turn off the irrigation without affecting household water when needed for maintenance or winterization.
Now for the critical part – backflow prevention. This device prevents irrigation water (which may contain fertilizers, pesticides, or soil contaminants) from flowing backward into your drinking water supply. In Massachusetts, this isn’t just a good idea – it’s required by law.
You have several options, depending on your local codes:
– Atmospheric Vacuum Breaker (AVB): Simple and affordable, but must be installed above the highest point in your system
– Pressure Vacuum Breaker (PVB): More versatile than AVBs but still has height restrictions
– Double Check Valve Assembly (DCVA): No height restrictions, commonly required for residential systems
– Reduced Pressure Zone (RPZ): The most secure option, often required for commercial properties
As irrigation expert George Anderson points out, “To be code compliant in most areas you need a double check valve going to your irrigation system.” This is particularly true in Massachusetts municipalities, which tend to have stricter requirements than many other states.
Even if you’re handling most of the installation yourself, this is one area where professional help is often worthwhile. Improper connection can lead to water contamination or property damage – neither of which you want to deal with. Our team at Boston Landscape Co. is well-versed in Massachusetts irrigation codes and can ensure your system is safe and compliant.
For those interested in the technical details, the Irrigation Association’s guide on codes and regulations provides excellent scientific background on why these precautions are necessary.
Step 5 – Flushing, Testing & Programming
You’ve done the hard work – now it’s time to bring your system to life! The final phase ensures everything works properly before you cover those trenches.
Before installing sprinkler heads or finalizing drip connections, run water through each zone to flush out any dirt, pipe shavings, or debris that might have gotten into the lines during installation. This simple step can prevent clogged sprinkler heads and emitters down the road.
After flushing, install your sprinkler heads or finalize drip emitter placement. Then test each zone individually, checking for three things: proper coverage (no dry spots), adequate pressure (consistent spray patterns), and any leaks (wet spots where pipes join).
This is when you’ll fine-tune your sprinkler heads – adjusting spray patterns and distance to ensure uniform coverage without wasting water on sidewalks, driveways, or the side of your house. I once helped a homeowner in Lexington who was frustrated that his DIY system was watering his neighbor’s yard more than his own – a few simple adjustments to the sprinkler arcs solved the problem completely.
Now for the brains of the operation – programming your controller:
– Set watering days and times (early morning between 4-7am is generally best)
– Adjust run times based on zone needs (typically 10-30 minutes for sprinklers, 30-60 minutes for drip)
– Program seasonal adjustments if your controller offers this feature
If you’ve invested in smart sensors, now’s the time to install and calibrate them. Rain sensors, soil moisture sensors, and weather stations can reduce water usage by 30-50% by preventing irrigation when nature is already providing moisture.
Before declaring the project complete, create a simple zone map showing which zone waters which area of your landscape. Keep this information near your controller – you’ll thank yourself next spring when you’re trying to remember which zone covers the front lawn versus the side garden.
Finally, carefully backfill your trenches, ensuring pipes are well-supported, and restore any disturbed areas. Good compaction around pipes prevents settling later, which can create tripping hazards or lawn depressions.
At Boston Landscape Co., we conduct thorough testing of each system component and provide detailed operation instructions to ensure our clients get the most from their irrigation investment. After all, the best system is one that works so seamlessly you hardly notice it’s there – except for your thriving landscape and lower water bills!
Key Components, Sizing & Zoning Essentials
Understanding the essential components of an irrigation system helps ensure proper selection and installation. Think of your irrigation system as a carefully orchestrated network – each part plays a crucial role in delivering water efficiently to your landscape.
Main Components:
Let’s walk through the heart and soul of your irrigation system. The pipes serve as your system’s circulatory system, carrying water throughout your landscape. You’ll typically choose between PVC (polyvinyl chloride) – rigid and durable, requiring primer and cement for connections – or polyethylene pipes, which offer flexibility and freeze resistance, perfect for our Massachusetts winters. For most homes, pipe sizing ranges from 1/2″ to 1-1/4″ in diameter.
Valves are the gatekeepers of your system, controlling water flow to different zones. You might use manual valves for isolation or simple control, but most systems rely on electric solenoid valves that your timer operates automatically. Many professional installations include a master valve – a smart addition that shuts off water to the entire system when not in use, providing protection against leaks.
These valves typically gather in a valve manifold, housed in a protective valve box that keeps them accessible while shielding them from the elements. Above this, your backflow preventer plays the crucial safety role of ensuring irrigation water can’t contaminate your home’s drinking water supply – a component required by code in Massachusetts.
The controller or timer functions as your system’s brain. Basic models offer simple programming for set days and times, while smart controllers can adjust watering based on weather conditions or soil moisture. Many of our clients appreciate WiFi-enabled controllers that allow them to manage their irrigation from their smartphones, even when traveling.
Sprinkler heads come in various forms to match different watering needs. Fixed spray heads cover 5-18 feet and pop up in heights from 2″ to 12″. For larger areas, rotors distribute water across 30-50 feet through rotation. Bubbler heads provide focused watering for trees and shrubs, while water-efficient MP rotators use rotating streams to reduce waste.
For gardens and bedding areas, drip irrigation components deliver precise watering right to the root zone. These systems use mainline tubing (1/2″ or 3/4″), smaller microtubing (1/4″), and emitters that release water at rates from 0.5 to 4 gallons per hour. A pressure regulator and filter keep these systems running smoothly.
Rounding out a modern system, sensors add intelligence to your watering. Rain sensors prevent watering during or after rainfall, soil moisture sensors monitor actual ground conditions, and weather stations can adjust watering based on local climate data. At Boston Landscape Co., we find these smart additions pay for themselves quickly in water savings.
Determining Water Source Capacity
Before designing your irrigation system, you need to understand what your water supply can handle. This assessment prevents the frustration of a system that sputters or fails to perform.
Start by measuring your static pressure – connect a pressure gauge to an outdoor faucet with all water turned off. Most Massachusetts homes have between 40-70 PSI. Then check your working pressure by turning on a faucet and measuring again. This lower reading reflects what your system will actually work with.
Your flow rate tells you how much water is available. Time how long it takes to fill a 5-gallon bucket from your outdoor faucet, then calculate: (5 gallons ÷ fill time in seconds) × 60 = gallons per minute (GPM). This simple bucket test gives you crucial information for sizing your system properly.
Don’t forget to check your water meter size – typically 5/8″, 3/4″, or 1″ for residential properties. This affects your maximum flow capacity and helps determine how many sprinkler heads can operate simultaneously.
With these measurements in hand, you can calculate your zone capacity. For example, with a 12 GPM flow rate and spray heads using 1.5 GPM each, you could run about 8 heads per zone. For drip irrigation, that same 12 GPM flow rate could support up to 720 GPH of drip emitters.
“Most lawn irrigation systems require at least 30 to 35 psi of pressure and a flow rate of 10 to 13 gallons per minute to operate effectively,” notes an irrigation expert. In Massachusetts, where municipal water pressure varies significantly by location, this assessment is particularly important before you begin installation.
Creating Efficient Irrigation Zones
How are irrigation systems installed for maximum efficiency? The secret lies in thoughtful zoning. Creating zones isn’t just about dividing your yard – it’s about recognizing that different plants and areas have different water needs.
Start by grouping plants by water requirements. Your thirsty lawn and vegetable garden shouldn’t share a zone with drought-tolerant native plants. This simple principle prevents both overwatering and underwatering across your landscape.
Consider the microclimates in your yard. That sunny south-facing slope dries out much faster than the shaded north side of your house. By creating separate zones for these areas, you can deliver precisely the right amount of water to each.
Technical considerations matter too. Never mix sprinkler types within a zone – rotor heads and spray heads have different precipitation rates, so combining them leads to some areas getting soaked while others remain dry. Similarly, sun exposure creates different watering needs, so full-sun areas often require separate zones from shaded spots.
Pay attention to elevation changes in your landscape. Areas at different heights may need separate zones due to drainage and pressure differences. For drip zones with significant elevation changes (over 5 feet), use pressure-compensating emitters to maintain consistent flow regardless of gravity’s effects.
Always size zones appropriately based on your available flow. Each zone should operate comfortably within your system’s capacity to ensure proper pressure and coverage. This might mean creating more zones than you initially planned, but the result will be more efficient watering and healthier plants.
At Boston Landscape Co., we design zones based on plant material, sun exposure, and soil conditions to ensure each area receives precisely the water it needs—no more, no less. This thoughtful approach not only conserves water but also promotes stronger, more resilient landscapes that thrive in our New England climate.
Costs, Regulations & DIY vs Professional Choices
Let’s talk money, rules, and the big decision every homeowner faces: should you install your irrigation system yourself or call in the pros? This choice affects not just your wallet but also your weekends and peace of mind.
Cost Considerations
When I meet with homeowners considering irrigation, the first question is almost always about cost. The truth is, it varies widely depending on your property size and system complexity.
If you’re handy and considering the DIY route, be prepared to spend anywhere from $500 to $5,000 depending on your yard size. A basic drip irrigation setup for garden beds might only run $50-$500, while a comprehensive sprinkler system for a half-acre property could easily reach $3,000-$5,000 in materials alone.
These DIY costs typically include pipes, fittings, sprinkler heads, valves, a controller, and a backflow preventer. Don’t forget to factor in equipment rentals – that trenching machine will be your best friend (and worst enemy) for a weekend!
Professional installation naturally costs more, with typical projects ranging from $1,000 to $15,000+. A small quarter-acre property might run $1,000-$4,000, while larger properties can reach $8,000-$15,000 or more. The advantage? Professionals bring expertise, efficiency, and often warranties that protect your investment.
“DIY sprinkler installation typically takes 16-20 hours for a two-zone system—plan a weekend plus.” This time investment is something many homeowners underestimate. I’ve seen plenty of DIY projects that started on Saturday morning with high hopes only to stretch into the following weekend!
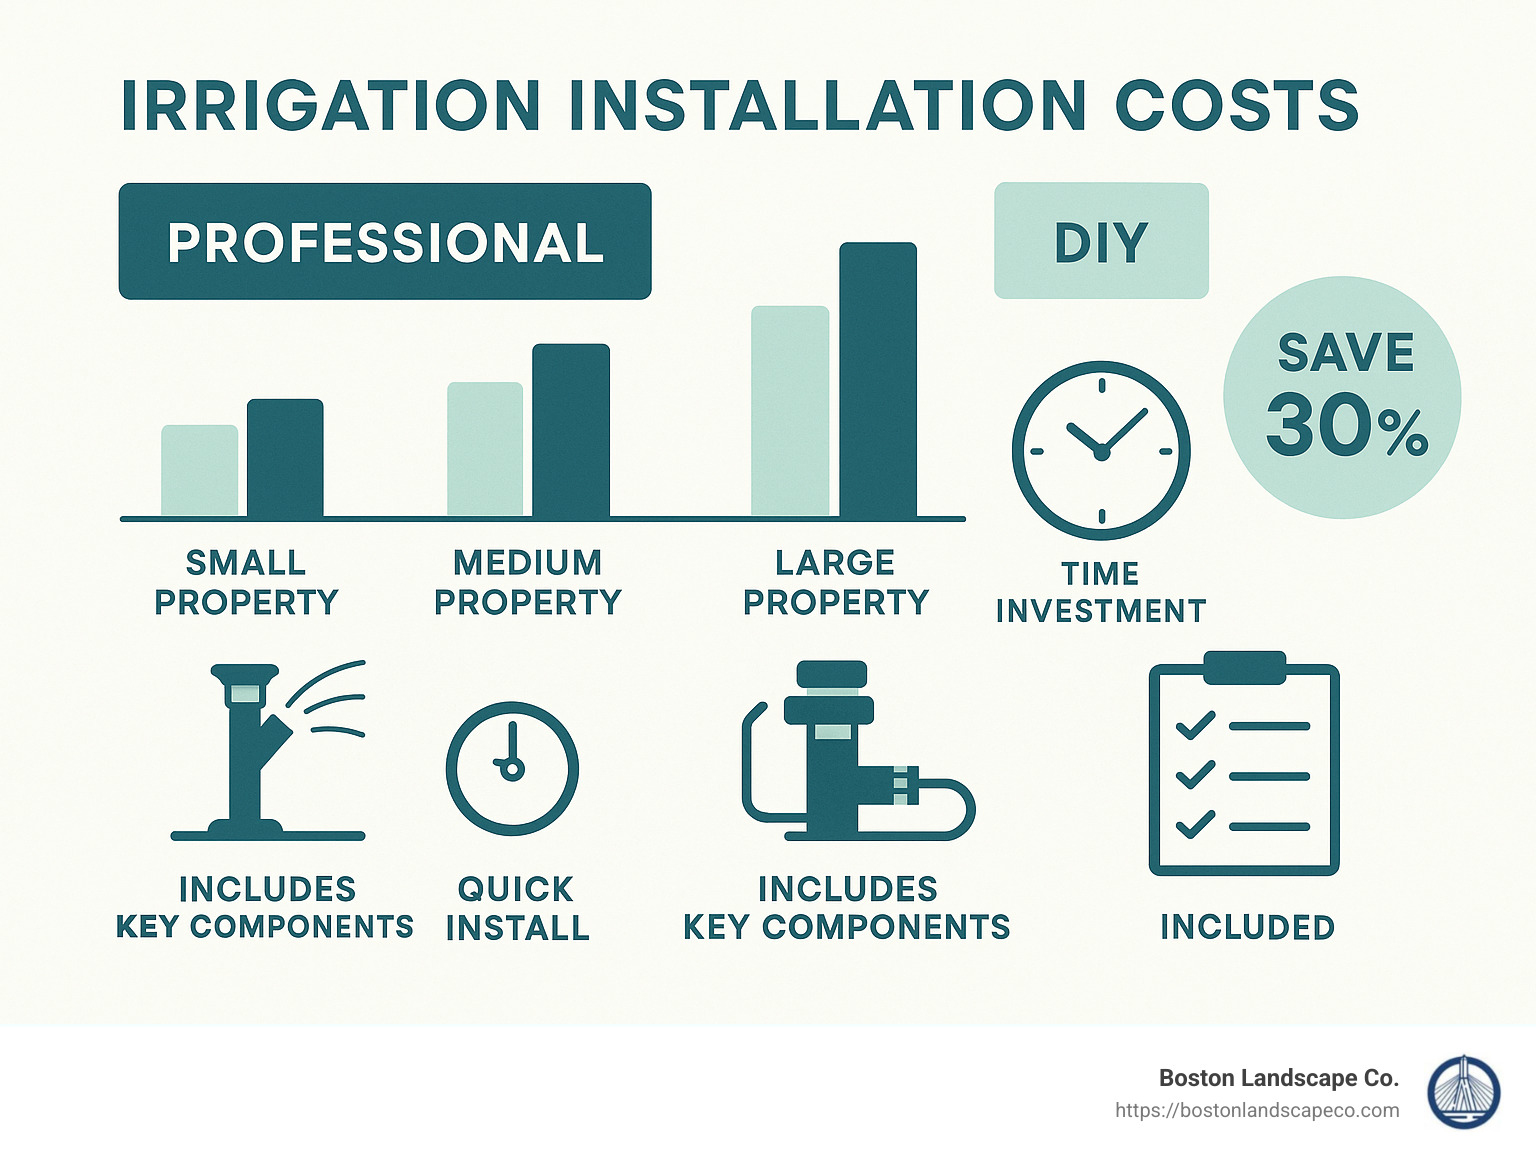
Massachusetts Regulations and Permits
Here in Massachusetts, we have specific rules about how irrigation systems installed must meet local codes and water conservation standards.
Most municipalities require permits before you start digging. These permits ensure your system won’t interfere with underground utilities and meets local building codes. The paperwork might seem tedious, but it protects both you and your neighbors.
Backflow prevention is non-negotiable in our state. Massachusetts requires appropriate devices on all irrigation systems connected to potable water to prevent contamination of drinking water. Most towns mandate a testable double check valve assembly or RPZ device, which must be installed correctly to pass inspection.
Water restrictions are another reality in many Massachusetts communities, especially during summer months. Your system needs to comply with these seasonal rules, which may limit watering to specific days or times. Some forward-thinking towns even offer rebates for installing water-efficient systems with smart controllers – a nice bonus for doing the right thing environmentally.
If you’re installing a commercial system, you’ll likely need to work with licensed professionals to meet stricter requirements. Even for residential installations, having someone familiar with local codes can save headaches down the road.
At Boston Landscape Co., we’ve steerd these regulations countless times and can handle all permitting requirements, ensuring your system is not just effective but fully compliant with local laws.
DIY vs Professional Installation
This decision often comes down to three factors: budget, time, and expertise.
The DIY approach offers clear cost savings on labor – often 30-50% less than professional installation. There’s also that satisfying feeling of creating something with your own hands and the flexibility to work at your own pace. When you’ve installed every pipe and sprinkler head yourself, you’ll know exactly where everything is located for future maintenance.
However, DIY installation comes with significant challenges. The learning curve is steep, and mistakes can be costly. I’ve seen homeowners accidentally cut through existing utility lines or install systems with inadequate pressure calculations that never worked properly. DIY installations typically lack warranties, and some manufacturers won’t honor product warranties unless installed by professionals.
Professional installation brings expertise to the table. An experienced installer can design a system optimized specifically for your property’s unique conditions – from soil type to plant needs to sun exposure patterns. They’ll ensure proper sizing and zoning, which directly affects water efficiency and plant health.
Most professional installations include a warranty (at Boston Landscape Co., we stand behind our work with comprehensive guarantees). Professionals can typically complete in 1-2 days what might take a homeowner several weekends, using commercial-grade equipment and components that often last longer than DIY alternatives.
The decision ultimately depends on your comfort level with technical projects, your available time, and your budget priorities. If you’re considering professional installation, look for a company with experience in your specific area – Massachusetts has unique soil and climate conditions that affect how irrigation systems installed should be designed for optimal performance.
For homeowners throughout Stoneham, Billerica, and the Greater Boston area, we’re always happy to provide a consultation to explore what would work best for your specific property and needs. You can learn more about our approach through our More info about Lawn Maintenance Service Cost page, which gives insight into how we price our various landscape services.
Post-Installation Care: Testing, Maintenance & Winterization
Your irrigation system is an investment worth protecting. Like any sophisticated system, it needs regular care to perform at its best and last for years to come. This is especially true in Massachusetts, where our distinct seasons create unique maintenance challenges throughout the year.
Regular Maintenance Tasks
During the growing season, I recommend spending just 15-20 minutes each month giving your irrigation system a quick check-up. Trust me, this small investment of time can prevent costly repairs down the road!
Start by turning on each zone and watching for clogged or damaged sprinkler heads. You’d be surprised how quickly heads can get filled with dirt or damaged by lawnmowers. While the water’s running, verify proper spray patterns and coverage – look for dry spots or areas getting too much water.
“Clean sprinkler heads thoroughly once a month to remove dirt and debris,” recommends our irrigation maintenance team. “This simple task prevents most common issues we see in systems throughout Boston’s suburbs.”
Take a stroll around your property and look for any suspicious wet spots or leaks when the system isn’t running. If you have drip irrigation, be sure to clean the filters regularly – they can clog up with sediment surprisingly fast.
For optimal performance, you’ll want to make seasonal adjustments to your watering schedule. In spring, gradually increase watering as temperatures rise. Summer usually requires maximum watering during peak heat (though always respect local water restrictions). In fall, reduce watering as temperatures cool, and winter means complete system shutdown in our New England climate.
Don’t forget your controller! After power outages or at the change of seasons, take a moment to review and update your programming. Many homeowners set their system once and forget it, missing opportunities for significant water savings with seasonal adjustments.
For the most comprehensive care, consider an annual professional audit of your system. At Boston Landscape Co., our irrigation specialists can perform a thorough check of all components, evaluate efficiency, test for optimal performance, and review your controller programming to maximize both landscape health and water conservation.
Winterization in Massachusetts
If there’s one maintenance task you absolutely shouldn’t skip in Massachusetts, it’s proper winterization. Our freezing winters can wreak havoc on irrigation systems, potentially causing thousands of dollars in damage if water freezes and expands inside your pipes and components.
Timing is everything with winterization. We recommend completing this process before the first hard freeze, typically by mid-October in the Greater Boston area. Wait too long, and you’re gambling with your system’s health.
The process begins by shutting off the main water supply to your irrigation system. If you have a backflow preventer with test cocks (small screws on the device), open these to relieve pressure.
The most critical step is blowing out the system with compressed air. This forces water out of all pipes and components where it could otherwise freeze and cause damage. Each zone should be blown out individually until no water emerges from the sprinkler heads.
“Many DIYers make the mistake of using too much air pressure during blowouts,” warns our irrigation technician. “Pressure should never exceed 50 PSI to avoid damaging components – professional-grade compressors have regulators to ensure this.”
If your system has manual drain valves, be sure to open them to release any remaining water. Your backflow preventer needs special attention too – if it’s above ground, either insulate it thoroughly or remove and store it indoors for the winter.
Don’t forget about your controller. For standard controllers, switch to “rain” or “off” mode, but don’t disconnect the power as this can affect programming and battery backup. Smart controllers often have specific winterization instructions from the manufacturer.
At Boston Landscape Co., we offer comprehensive Landscape Maintenance services including professional winterization. Our teams use commercial-grade equipment and follow a detailed checklist to ensure every drop of water is cleared from your system before freezing temperatures arrive.
Spring Start-Up
When the snow melts and spring arrives, your irrigation system needs proper reactivation to ensure a smooth start to the growing season.
Begin by inspecting all visible components for winter damage before turning on any water. Look for cracked pipes, damaged heads, or shifted components.
When you’re ready to restore water to the system, do so gradually. Open the main valve slowly (taking about 30 seconds to open fully) to prevent water hammer that can damage pipes.
It’s smart to check each zone individually, running them briefly to verify operation. Watch carefully for any signs of leaks or unusual spray patterns. This is also the perfect time to clean any filters in your system and adjust sprinkler heads that may have shifted during the winter.
Don’t forget to reprogram your controller with an appropriate spring watering schedule and test all sensors to ensure they’re functioning correctly after the winter months.
Many homeowners in Stoneham, Billerica, and surrounding communities rely on Boston Landscape Co. for professional spring start-up service. Our thorough process ensures your system is ready for the growing season and identifies any needed repairs after winter.
Regular maintenance isn’t just about preventing problems – it’s about maximizing the efficiency and lifespan of your irrigation investment. With proper care, your system can deliver years of trouble-free operation while keeping your landscape lush and healthy with minimal water waste.
For more comprehensive landscape care beyond just irrigation, explore our complete Landscape Maintenance services to keep your property looking its best year-round.
Frequently Asked Questions about Installing Irrigation Systems
What permits or inspections are required in Massachusetts?
Navigating the permit landscape in Massachusetts can be a bit tricky since requirements vary across different towns and cities. Most communities will ask for a plumbing permit for your backflow preventer installation, and some go a step further, requiring a dedicated irrigation permit as well. After installation, many municipalities will want to inspect that backflow device to ensure it’s up to code.
The good news? If you choose Boston Landscape Co. for your installation, we handle all the permitting headaches for you. We’ve worked throughout the Greater Boston area for years and know exactly what’s needed in Boston, Burlington, Lexington, Winchester, and all the communities we serve. One less thing for you to worry about!
How deep should pipes be buried to prevent freeze damage?
With our notorious New England winters, proper pipe depth is crucial. In Massachusetts, we recommend burying irrigation pipes between 8-12 inches deep to keep them safe from freezing temperatures. If you’re in an area that gets particularly brutal winters (looking at you, Western Mass!), aim for the deeper end of that range.
Something to keep in mind: main lines often benefit from being buried a bit deeper than lateral lines. But depth alone won’t protect your system – proper winterization is essential. Even pipes buried 12 inches deep can crack if they’re full of water when temperatures plummet. This is why professional winterization service is so valuable in our climate.
Can I retrofit an existing sprinkler zone to drip irrigation?
Absolutely! Converting existing sprinkler zones to drip irrigation is not only possible but often a smart move, especially if you’ve replaced lawn areas with garden beds, shrubs, or perennials. The conversion is relatively straightforward:
First, cap any sprinkler heads you no longer need. Then, convert one head to a drip adapter (essentially your entry point for the drip system). Next, install a pressure regulator and filter at this point – drip systems need much lower pressure than spray heads. Finally, run your drip tubing from the adapter throughout your planting area.
This type of conversion dramatically improves water efficiency, typically using 30-50% less water than traditional sprinklers. At Boston Landscape Co., we’ve helped countless homeowners make this switch as part of our water conservation efforts, and the results are always impressive – healthier plants and lower water bills!
How long should I run my irrigation system?
This is one of those “it depends” questions, but I’ll give you some helpful guidelines. For sprinkler systems, most zones need about 10-30 minutes per watering, 2-3 times weekly. Drip irrigation generally requires longer run times – typically 30-60 minutes per zone, also 2-3 times weekly.
Your soil type plays a major role too. Clay soils need longer, less frequent watering because they hold moisture but absorb it slowly. Sandy soils need shorter, more frequent watering since they drain quickly. During hot, dry summer months, you’ll need to increase duration, while in cooler, wetter periods, you can dial it back.
Different plants have different needs too. Your lawn, vegetable garden, and annual flowers typically need more frequent watering than established trees and shrubs. The ultimate goal is to apply enough water to reach the root zone (6-8 inches deep for lawns, 12-18 inches for shrubs) without causing wasteful runoff.
What is the average lifespan of an irrigation system?
With proper care, irrigation systems can serve you for decades, though individual components have different lifespans. The underground PVC pipes are the marathon runners of the system, often lasting 40+ years, with polyethylene pipes not far behind at 30-40 years.
Other components need more frequent attention: valves typically last 10-15 years, sprinkler heads about 5-10 years, and controllers around 7-10 years. Drip emitters have the shortest lifespan, usually needing replacement every 2-5 years as minerals in the water gradually clog the tiny openings.
Regular maintenance dramatically extends these lifespans. At Boston Landscape Co., we focus on durability in our designs and use professional-grade components that stand up to our challenging New England climate. Think of it like maintaining your car – regular check-ups prevent major breakdowns.
How can I make my irrigation system more environmentally friendly?
Making your irrigation system greener isn’t just good for the planet – it’s good for your wallet too! Smart controllers are probably the biggest game-changer, reducing water usage by 20-40% by adjusting to weather conditions automatically. No more sprinklers running during rainstorms!
High-efficiency nozzles like MP rotators apply water more slowly and evenly, dramatically reducing runoff and evaporation. Converting appropriate zones to drip irrigation takes efficiency even further, delivering water directly to plant roots with minimal waste.
Simple additions like rain sensors prevent watering during or after rainfall, while thoughtful scheduling (watering early morning, between 5-9am) reduces evaporation losses. Regular maintenance is perhaps the most overlooked environmental strategy – fixing leaks promptly and adjusting heads prevents wasting thousands of gallons annually.
At Boston Landscape Co., we’ve seen how these water-efficient approaches create healthier, more resilient landscapes while conserving our precious resources. Our irrigation audits often identify simple changes that make big differences in both environmental impact and water bills. After all, being green can save you some green too!
Conclusion
There’s something truly magical about watching your landscape flourish with just the right amount of water, delivered precisely when and where it’s needed. That’s the gift of a properly installed irrigation system—health, beauty, and value added to your property without the hassle of dragging hoses around on hot summer days.
Understanding how irrigation systems are installed isn’t just academic—it empowers you to make better choices, whether you’re tackling installation yourself or hiring professionals. Here in Massachusetts, our unique climate throws everything at us, from scorching summer heat waves to bone-chilling winter freezes. Your irrigation system needs to handle it all with grace.
I’ve seen countless properties transformed by thoughtfully designed irrigation. The lush, even lawns. The thriving perennial beds. The healthy trees and shrubs that add thousands to property values. But perhaps most satisfying is watching homeowners reclaim their weekends instead of spending them watering plants.
At Boston Landscape Co., we’ve spent decades perfecting irrigation installation throughout Greater Boston. Every system we design is a custom solution, custom to the specific contours, plant materials, and soil conditions of your unique property. We believe irrigation should be invisible when working properly—you should notice the beautiful results, not the mechanics behind them.
A truly well-installed irrigation system accomplishes several key goals:
It delivers precisely the right amount of water to each area, never too much or too little. Your lawn gets the generous drink it needs while your drought-tolerant natives receive their modest share.
It operates with remarkable efficiency, conserving water (and your money) by eliminating waste and runoff. With water restrictions becoming more common in Massachusetts towns, this efficiency isn’t just environmentally responsible—it’s practical.
The zones are thoughtfully organized based on plant needs, sun exposure, and soil conditions. Your sunny south-facing slope won’t receive the same treatment as your shaded northern beds.
Smart technology adapts to weather conditions, automatically adjusting to rainfall, temperature, and seasonal changes. Your system becomes intelligent enough to skip watering during rainy periods without any input from you.
And perhaps most critically for our Massachusetts climate, it’s designed with winter in mind, with proper components and winterization protocols to ensure your investment is protected during freezes.
We bring this thoughtful approach to communities throughout the region, including Boston, Bedford, Billerica, Burlington, Carlisle, Concord, Lexington, Malden, Medford, Reading, Somerville, Stoneham, Waltham, Wellesley, Winchester, and Woburn.
I’d love to show you how we can transform your property with an efficient, reliable irrigation system that’s built to last. There’s something deeply satisfying about watching a landscape thrive with minimal intervention, knowing that beneath the surface, everything is working in perfect harmony.
More info about Irrigation System Installation
