Fire Pit Construction: Top 5 Expert DIY Tips in 2025
Fire pit construction offers an exciting opportunity to improve your outdoor living space by creating a cozy and inviting atmosphere perfect for gatherings. Whether you desire an above-ground pit to foster warmth during cold Boston nights or a practical center for entertaining guests, constructing a fire pit can be a gratifying and cost-effective endeavor.
- Types of Fire Pits: Above-ground, gas-powered, in-ground, or portable.
- Materials: Typically, concrete blocks, steel fire rings, and gravel are used.
- DIY Benefits: Customized designs, cost savings, and the joy of creating a personalized space.
Fire pit construction is not only about creating a gathering spot but also about tailoring it to your personal style and space needs while saving on costs compared to pre-made units or professional installations. DIY projects like this offer customization benefits, allowing you to make adjustments to meet your preferences and ensure it complements your property’s aesthetic.
My name is Steve Schumacher, and with over 30 years in the landscaping industry, I have experience in fire pit construction. At Boston Landscape Co., we aim to transform outdoor spaces into functional and beautiful environments. Now, let’s dive into the essentials of planning your fire pit construction, ensuring a beautiful outcome that you can enjoy for years to come.

Fire pit construction terms simplified:
– Custom outdoor fireplaces
– Hardscape installation company
– Brick patio installation
Planning Your Fire Pit Construction
In the journey of fire pit construction, planning is your first and most crucial step. This phase lays the groundwork for a successful project and ensures your fire pit meets both aesthetic and safety standards. Let’s break down the key elements: location selection, size determination, and material selection.
Location Selection
Choosing the right location for your fire pit is vital for safety and enjoyment. Here are some key considerations:
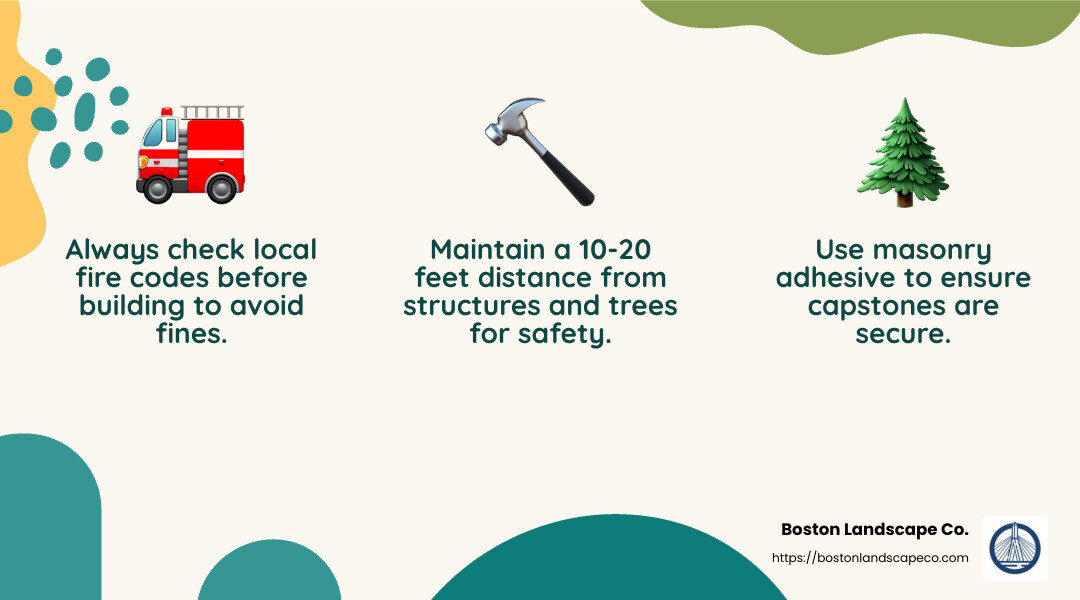
- Safety First: Ensure your fire pit is at least 10 feet away from any structures, trees, or overhanging branches. This minimizes fire hazards and ensures a safe environment.
- Wind Direction: Consider wind patterns. Position your fire pit so that smoke is directed away from seating areas and your home.
- Convenience: Place your fire pit near your outdoor seating area but far enough to prevent any accidental burns. Also, consider proximity to your woodpile or other fuel sources for easy access.
- Local Regulations: Check with your local fire department or city hall for specific regulations regarding fire pit placement and obtain any necessary permits.
Size Determination
The size of your fire pit will affect both its functionality and the ambiance it creates.
- Diameter: A common size for a fire pit is an interior diameter of 36 to 44 inches. This size is ideal for small gatherings and allows for a robust fire.
- Height: Typically, a fire pit should be about 12 inches above the ground. This height allows easy access to the fire while maintaining safety.
- Local Guidelines: Be sure to review any local ordinances that might dictate size restrictions for fire pits in your area.
Material Selection
Materials not only influence the look of your fire pit but also its durability and safety.
- Concrete Blocks: A popular choice for DIY fire pits due to their affordability and ease of use. They mimic natural stone and are heat-resistant.
- Steel Fire Ring: Essential for protecting the interior of your fire pit from heat damage and prolonging its lifespan.
- Gravel: Used for drainage and as a stable base for your fire pit. It prevents water buildup, which can damage the structure over time.
- Masonry Adhesive: Keeps the blocks securely in place, ensuring the structural integrity of your fire pit.
- Capstones: These provide a finished look and protect the top of your fire pit wall.
Selecting the right materials ensures that your fire pit is not only beautiful but also safe and long-lasting. The joy of a DIY fire pit lies in crafting a space that reflects your personal style while serving as a functional and inviting centerpiece for your outdoor area.
With these planning essentials in mind, you’re well on your way to creating a fire pit that will be the heart of your backyard gatherings. Next, we’ll dig into the steps of building the fire pit base, setting the stage for a solid and enduring structure.
Building the Fire Pit Base
Creating a strong foundation is crucial for the fire pit construction process. Let’s break it down into three main steps: site preparation, excavation, and leveling.
Site Preparation
Before you start digging, ensure your site is ready for construction:
- Marking the Area: Use a stake at the center of your desired location. Attach a string and extend it to half the diameter of your planned fire pit. Walk around the stake, marking the circle with spray paint. This gives you a clear boundary for your work.
- Clearing Debris: Remove any grass, rocks, or debris from the marked area. A clean site ensures that nothing interferes with your construction process.
- Safety Gear: Equip yourself with gloves, safety glasses, and a dust mask. Safety should always be a priority when working with tools and materials.
Excavation
With your site prepared, it’s time to dig:
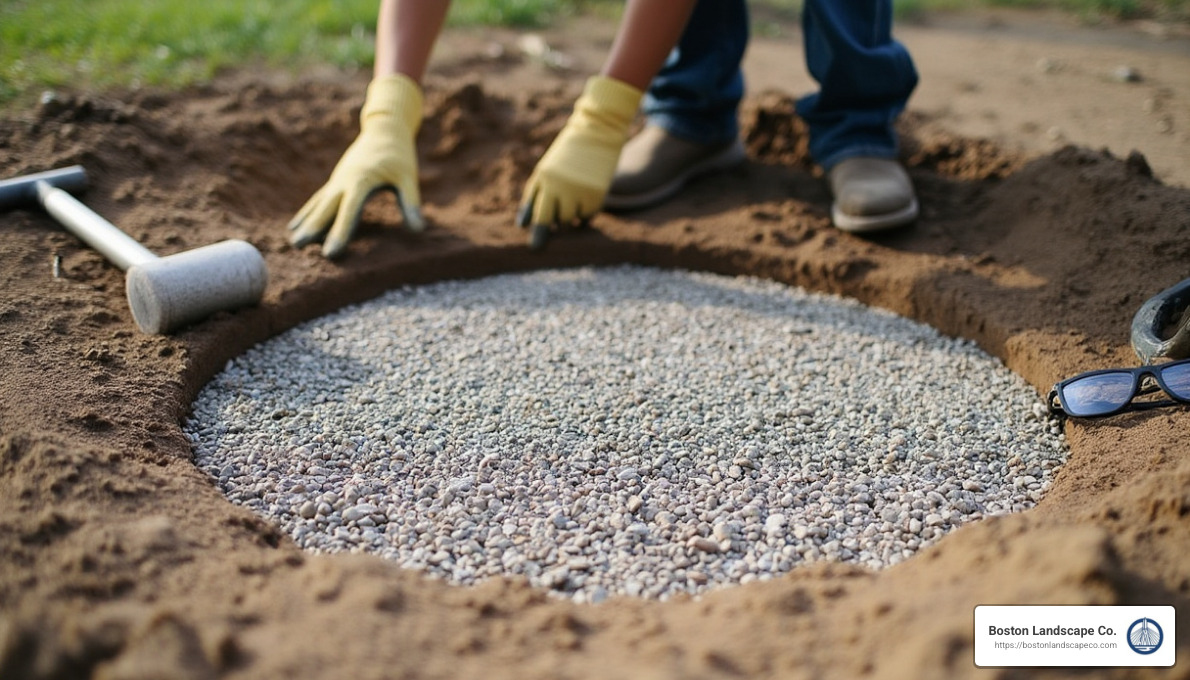
- Digging the Trench: Start by digging a circular trench about 12 inches deep along the marked circle. This trench should be as wide as one block.
- Excavating the Interior: Dig the interior of the circle to a depth of 6 inches. This will be the base where your gravel and blocks sit.
- Straight and Even Sides: Ensure the sides of your trench are straight and even. This is important for the stability of the fire pit walls.
Leveling
A level base is key to a stable fire pit:
- Adding Gravel: Fill the trench with about 6 inches of 3/4-inch drainage gravel. This not only provides a solid base but also ensures proper drainage.
- Compacting the Gravel: Use a hand tamper to compact the gravel firmly. This step prevents shifting and settling over time.
- Checking for Level: Use a 4-foot level to check the surface. Adjust by adding or removing gravel to achieve a perfectly even base.
By taking the time to prepare, excavate, and level the site properly, you set the stage for a durable and long-lasting fire pit. This foundation is crucial for the next steps in your fire pit construction journey, where you’ll start building the walls and adding those finishing touches.
Constructing the Fire Pit Walls
Now that your base is solid, it’s time to start constructing the fire pit walls. This involves stacking blocks, using masonry adhesive, and installing a fire ring. Let’s explore each step.
Block Stacking
Stacking blocks forms the main structure of your fire pit. Here’s how to do it:
- First Course: Begin by placing the first block in the circle. Check that it’s level from side to side and front to back. Use a rubber mallet to tap it into place if needed.
- Continuing the Circle: Place the next block tightly against the first. Continue around the circle, ensuring each block is level and snug against its neighbor.
- Checking Level: Use a four-foot level periodically to check that the ring is even. Small adjustments now will save headaches later.
Masonry Adhesive
For added stability, use masonry adhesive between the courses of blocks:
- Applying Adhesive: Apply a zigzag bead of adhesive on top of two adjacent blocks. This ensures a strong bond.
- Placing Blocks: Set the next block on top, centering it over the seam between the two below. Press down firmly to secure it.
- Repeat: Continue this process for each subsequent course, usually three or four courses in total. Remember to stagger the joints for added strength.
Fire Ring Installation
The fire ring is essential for protecting your blocks from heat damage:
- Insert the Ring: Place the steel fire ring inside the circle of blocks. Adjust it so that it sits level with the top of the wall.
- Filling Gaps: Fill any gaps between the ring and the blocks with gravel. This provides additional support and ensures the ring stays in place.
By carefully stacking blocks, using masonry adhesive, and installing a fire ring, you’re building a sturdy and safe fire pit. These steps are crucial to ensure your fire pit is both functional and long-lasting.
Next, we’ll explore the finishing touches and important safety considerations to complete your fire pit construction.
Finishing Touches and Safety Considerations
Completing your fire pit construction involves adding finishing touches and ensuring safety. Let’s cover capstones, decorative elements, and local fire codes.
Capstones: The Final Layer
Capstones provide a polished finish and protect your fire pit walls. They also add stability and an aesthetic touch.
- Placement: Arrange capstones loosely on top of your wall to find the best fit. Aim for a slight overhang both inside and outside the pit.
- Cutting and Fitting: Mark and cut stones as needed to ensure a snug fit around the entire circle.
- Securing with Adhesive: Apply masonry adhesive to the top of the wall. Carefully place each capstone and tap gently with a rubber mallet to secure them.
Adding Decorative Elements
Improve your fire pit area with decorative elements to make it more inviting.
- Borders and Stones: Consider adding a paver border or decorative stones around the base.
- Glass Beads: Use glass beads for a touch of elegance and color.
- Landscape Lighting: Install lighting around the pit to create ambiance and improve safety during nighttime gatherings.
Adhering to Local Fire Codes
Ensuring safety means following local regulations and codes.
- Check Regulations: Before lighting your first fire, verify compliance with local fire codes. Contact your local fire department or city hall for specific rules.
- Secure Permits: Obtain necessary permits and ensure your pit meets size and location requirements.
- Ventilation: Choose an open area to prevent smoke buildup. Avoid enclosed spaces and consider wind patterns to keep smoke away from seating areas.
- Distance from Structures: Place the fire pit at least 10-20 feet away from buildings, fences, or trees. Maintain a non-flammable zone around the pit using gravel or pavers.
By finishing with capstones and adding decorative elements, you improve the visual appeal of your fire pit. Adhering to local fire codes ensures safety, allowing you to enjoy your fire pit worry-free.
Next, we’ll address frequently asked questions about fire pit construction.
Frequently Asked Questions about Fire Pit Construction
What do you put in the bottom of a fire pit?
When building a fire pit, the foundation is key. The bottom layer should consist of materials that provide stability and drainage. Gravel is a popular choice because it allows water to drain away easily, preventing puddles after rain. You can also use sand for a smooth, level base. Both materials help to insulate the fire pit and protect the ground beneath from heat damage.
Is it cheaper to build or buy a fire pit?
Building your own fire pit can be more cost-effective than buying a pre-made one, especially if you already own some of the necessary tools. According to online data, the cost of a DIY fire pit can range widely, from as low as $60 to over $500, depending on the materials and size. In contrast, purchasing a pre-made fire pit or hiring a contractor could cost three times as much or more. DIY projects also offer the benefit of customization, allowing you to tailor the design to your specific needs and preferences.
How deep should a fire pit be?
The depth of your fire pit is crucial for both safety and functionality. A typical fire pit should be around 6 to 12 inches deep. This depth is sufficient to contain the fire while allowing for adequate airflow. However, always check local ordinances as they may have specific requirements regarding the depth and overall dimensions of fire pits. It’s important to comply with these guidelines to ensure your fire pit is safe and legal to use.
By understanding these aspects of fire pit construction, you can create a safe and enjoyable space for gatherings. Next, we’ll discuss maintenance tips and troubleshooting common issues.
Conclusion
Creating a fire pit is not just about stacking blocks and lighting a fire; it’s about crafting a space where memories are made. At Boston Landscape Co., we understand the importance of a well-designed outdoor area. Our expertise in hardscaping helps transform your backyard into a welcoming retreat.
Maintenance Tips
Maintaining your fire pit ensures it remains a safe and enjoyable feature of your outdoor space. Here are some key maintenance tips:
- Regular Cleaning: After each use, allow the ashes to cool completely before removing them. This prevents buildup and keeps your fire pit looking neat.
- Seasonal Checks: Inspect your fire pit for any damage from weather changes, especially after winter. Reapply masonry adhesive if necessary and ensure the drainage system is working properly.
- Covering: If you don’t plan to use your fire pit during harsh weather, consider covering it to protect it from the elements. This helps prevent potential damage and extends the life of your fire pit.
Troubleshooting Common Issues
Even with careful planning, issues can arise. Here’s how to tackle some common problems:
- Uneven Ground: If your fire pit isn’t level, use a long level to identify low spots and adjust the soil or sand base as needed.
- Loose Blocks: Over time, blocks may shift. Reapply masonry adhesive and tap them back into place using a rubber mallet for a secure fit.
- Water Accumulation: Ensure your fire pit has proper drainage to prevent water from pooling. Adding gravel or checking the existing drainage system can help.
By following these maintenance tips and troubleshooting advice, you can enjoy your fire pit for years to come. And remember, if you need professional assistance, Boston Landscape Co. is here to help improve your outdoor space with our comprehensive range of services. Contact us today to bring your fire pit dreams to life!
