Lawn Irrigation: 5 Powerful Tips for Healthier Lawns 2025
Smart Watering Solutions: Understanding Lawn Irrigation Systems
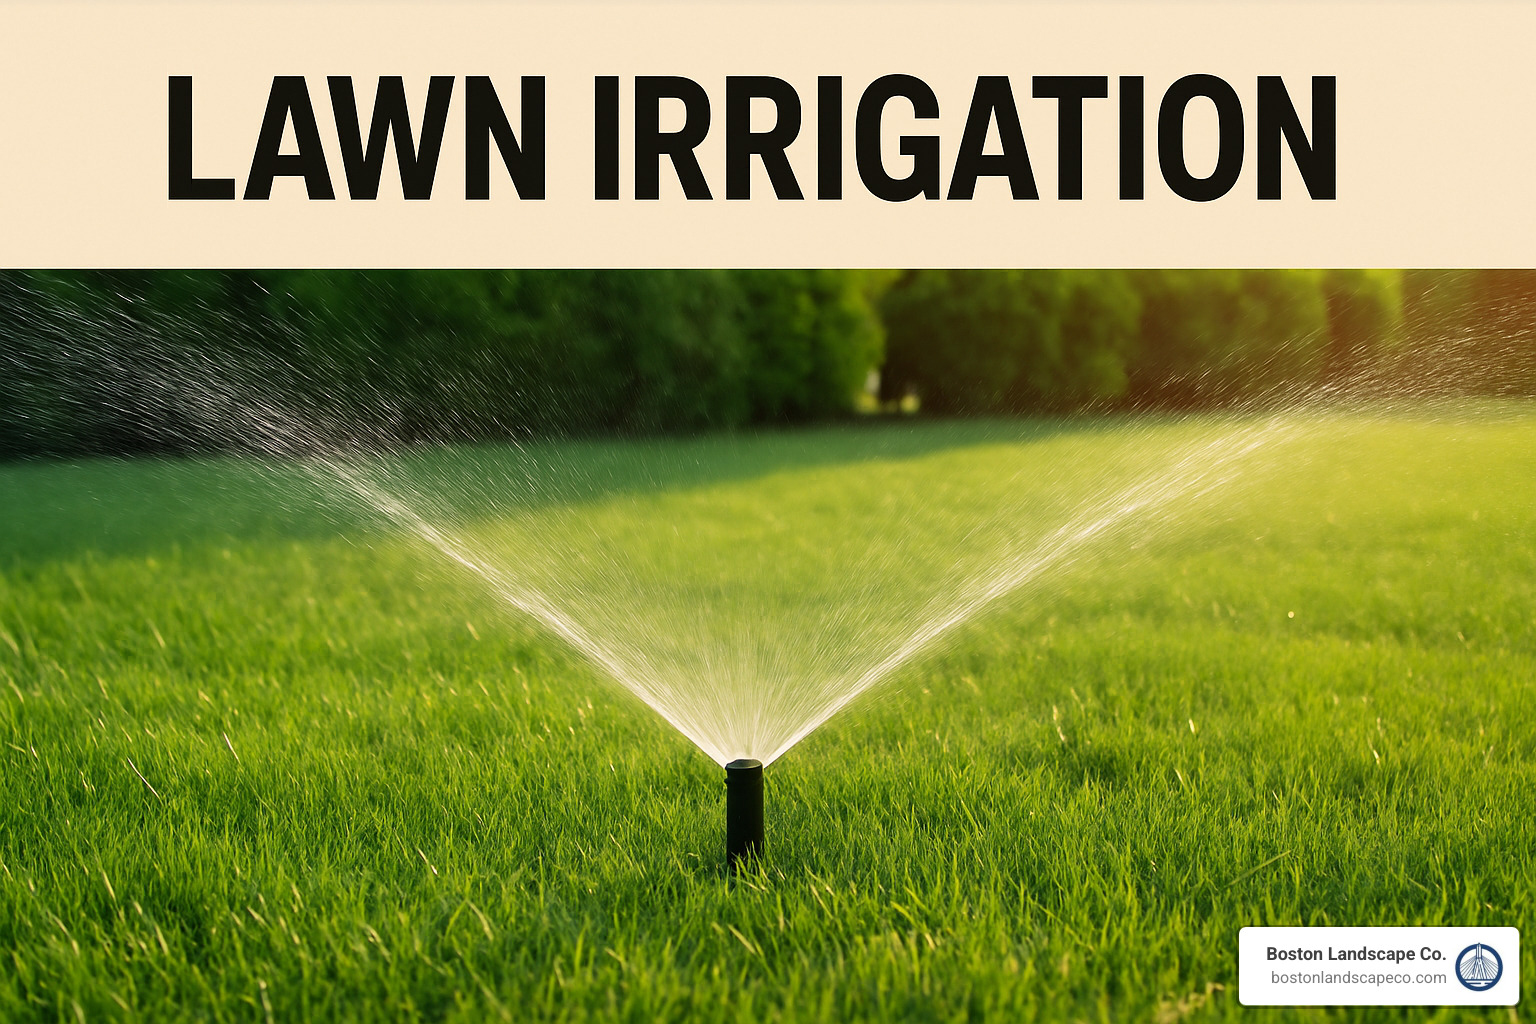
Lawn irrigation is a systematic method of delivering water to your landscape, ensuring proper hydration for healthy grass growth while conserving water. For busy homeowners, the right system can make all the difference in maintaining a lush, green lawn without wasting time or resources.
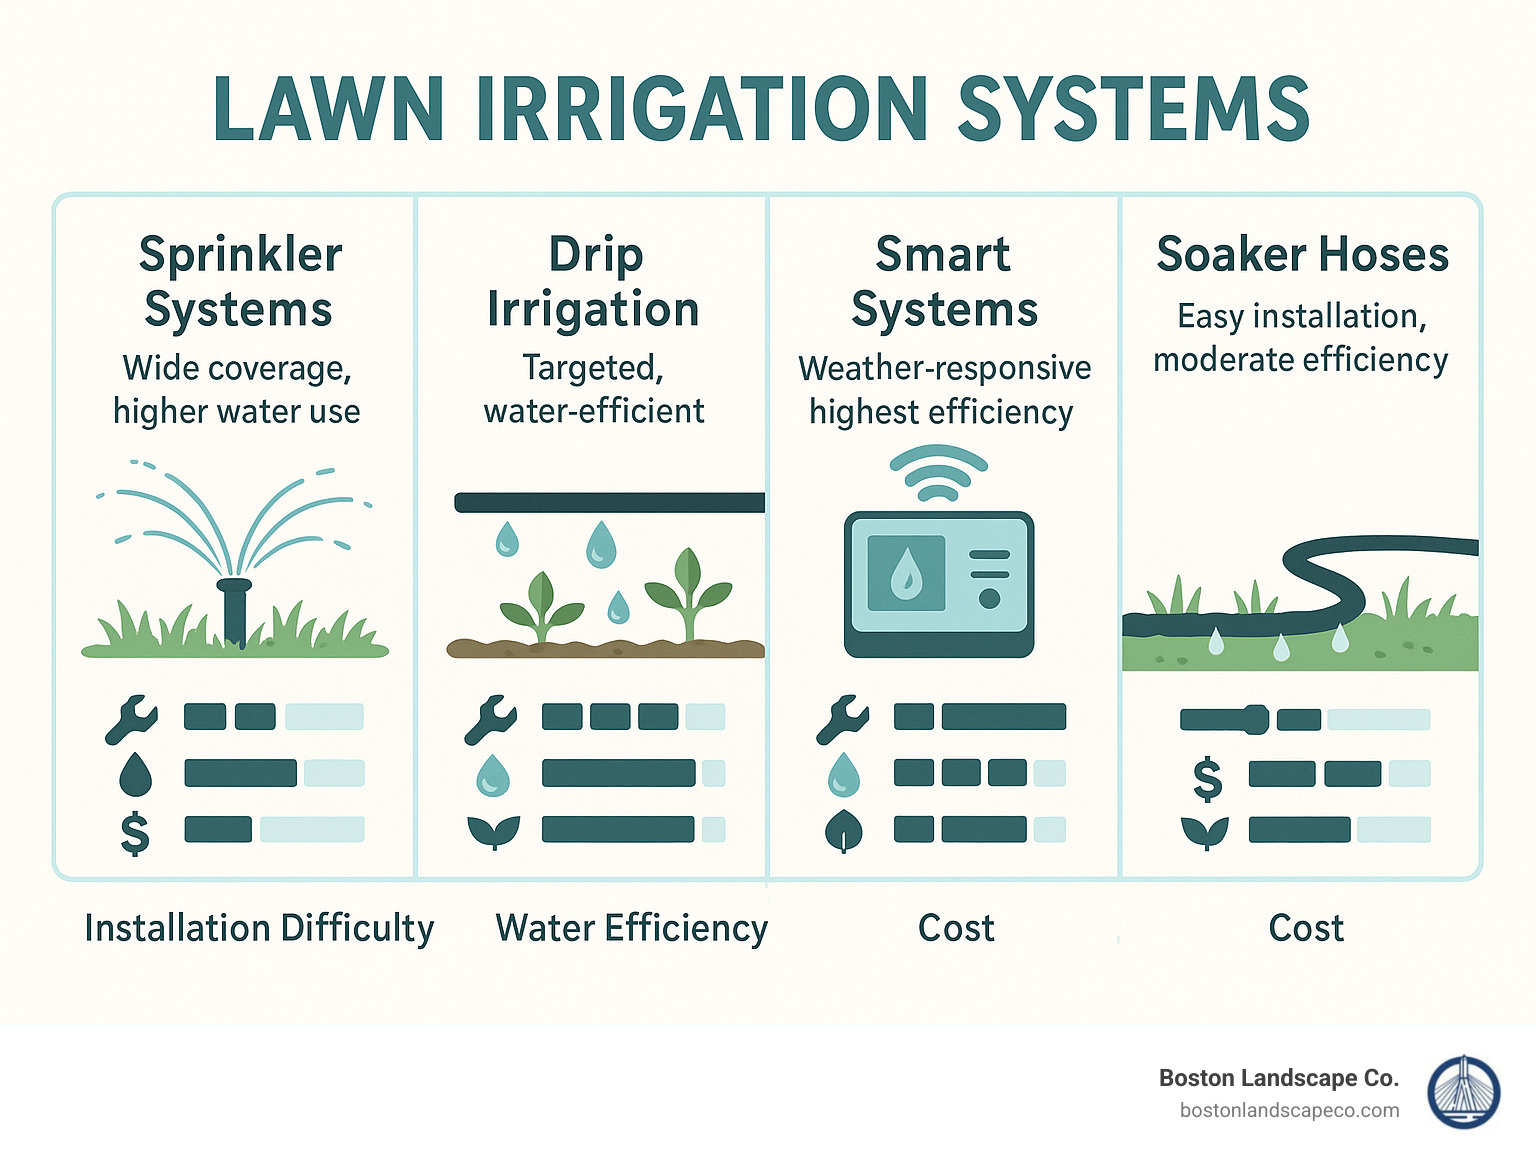
Types of Lawn Irrigation Systems:
1. Sprinkler Systems – Underground pipes with pop-up heads that spray water across lawn areas
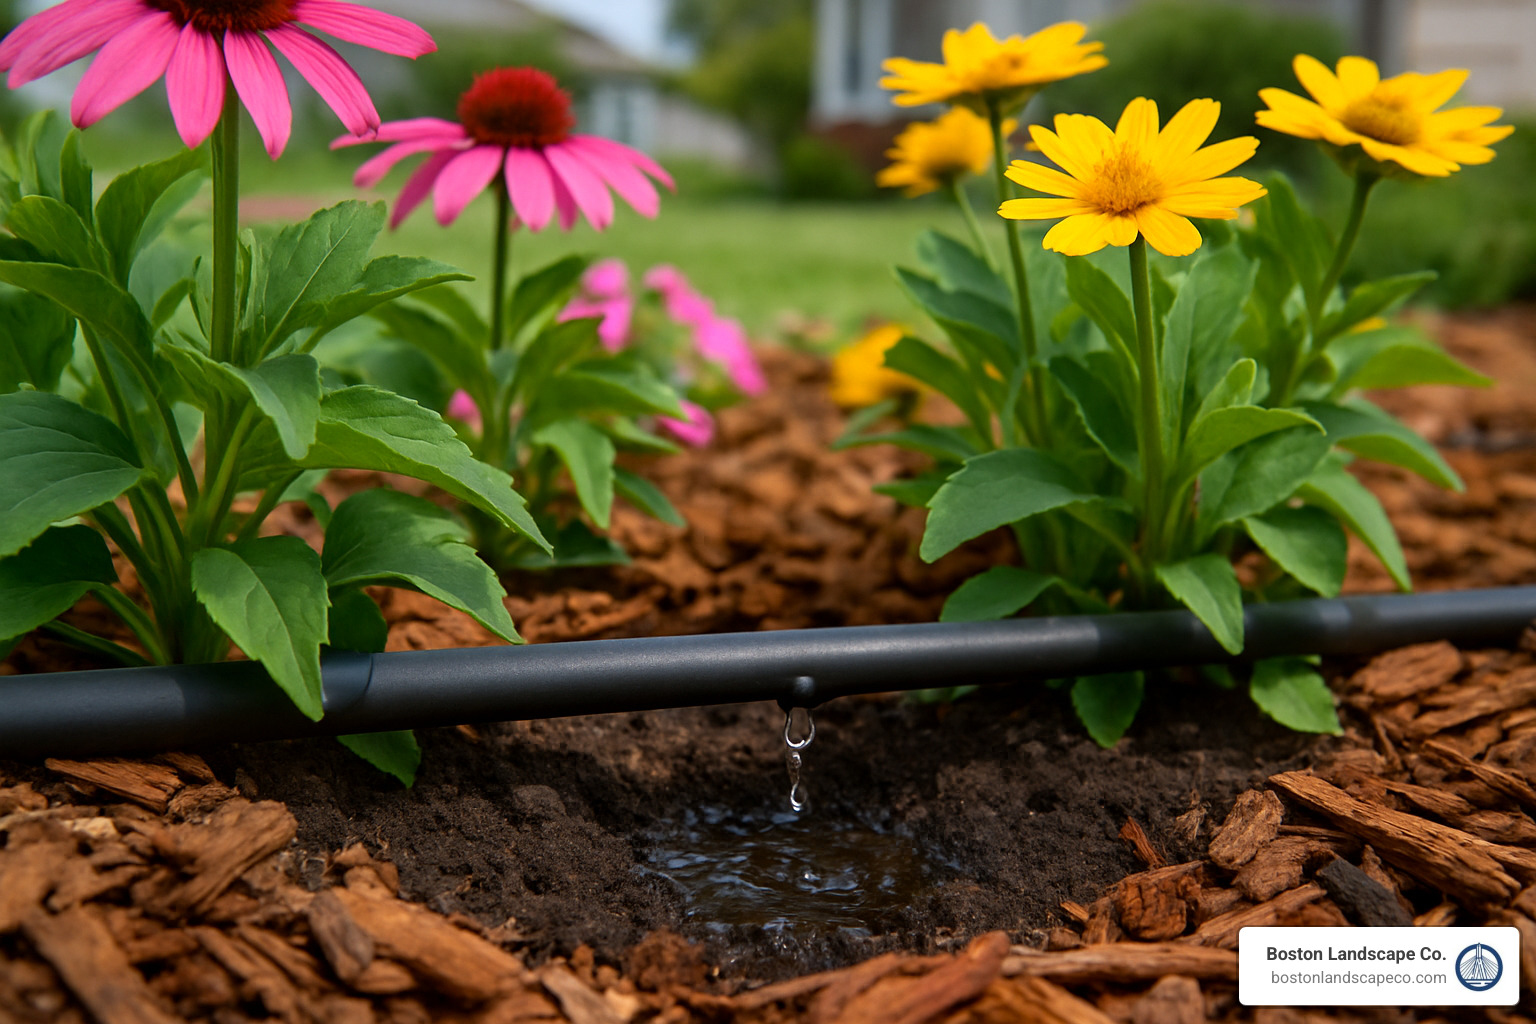
2. Drip Irrigation – Delivers water directly to plant roots, reducing evaporation and runoff
3. Smart Systems – WiFi-enabled controllers that adjust watering based on weather conditions
4. Soaker Hoses – Porous hoses that release water slowly along their length
Did you know that lawn irrigation accounts for nearly 50% of residential water usage? With the right system, you can maintain a beautiful lawn while reducing your water consumption and utility bills.
Most lawns only require watering once every 4-8 days, rather than daily shallow watering which promotes weak root systems. A properly designed irrigation system delivers precisely the right amount of water (typically 1-2 inches per week) directly where it’s needed.
I’m Steve Schumacher, owner of Boston Landscape Co since 1991, with extensive experience designing and installing custom lawn irrigation systems throughout Massachusetts that conserve water while promoting healthy turf growth. My team specializes in creating irrigation solutions that work with New England’s unique climate challenges.
Smart Wi-Fi Controller Systems for Lawn Irrigation
Remember when you had to wake up early to adjust sprinklers or rush home during a rainstorm to turn off your system? Those days are gone! Smart controllers have revolutionized lawn irrigation, bringing convenience and efficiency right to your Massachusetts property.
As John, one of our clients in Winchester, told me recently: “I used to stress about wasting water when it rained. Now my smart system handles everything automatically, and my water bill dropped by almost 30% last summer!”
Smart controllers connect to your home’s Wi-Fi network, letting you control your watering schedule from anywhere using your smartphone. But what makes them truly “smart” is their ability to automatically adjust watering based on local weather forecasts, soil moisture readings, and seasonal changes.
Why Go Smart? Key Benefits for Lawn Irrigation
The advantages of smart controllers go far beyond convenience. Automation is just the beginning – these systems can actually make decisions about your lawn’s needs better than most humans!
Rain-skip features prevent wasteful watering during or after rainfall. No more embarrassing sprinklers running during a downpour! Smart systems also handle seasonal adjustments automatically, increasing watering during hot summer months and reducing it during cooler periods without any programming on your part.
Perhaps most appealing to many homeowners are the utility savings. Our clients typically see water usage drop by 20-50% after installing smart controllers. For a medium-sized property, this can mean hundreds of dollars saved each year.
“Modern lawn irrigation systems target specific areas of your yard by delivering only the precise amount of hydration based on factors such as humidity and rainfall,” explains Mike, our lead irrigation specialist at Boston Landscape Co. “This technology has transformed how we approach lawn care in New England’s variable climate.”
Top Features to Compare
When helping our clients choose the right smart controller, we focus on several key features:
Flow monitoring capability is worth the investment – it can detect unusual water patterns that might indicate leaks or broken sprinkler heads, potentially saving thousands in water damage and waste.
Consider the number of zones you’ll need based on your property size and landscape diversity. Most residential systems require 4-8 zones, but larger properties may need more.
Wi-Fi range matters more than you might think. The controller needs reliable connectivity to your home network, so placement and signal strength deserve careful consideration during installation.
The app user experience varies widely between brands. We always recommend test-driving the smartphone app before committing to ensure it feels intuitive and offers the features you need.
Quick Setup Tips
After installing hundreds of smart controllers across Massachusetts, we’ve developed some foolproof setup guidelines:
Always check your water pressure first – aim for 40–65 PSI for optimal performance. Too low, and your sprinklers won’t cover properly; too high, and you risk damaged components.
When it comes to wiring basics, take photos of existing connections before disconnecting anything if you’re replacing an old controller. Label each zone wire with tape to save yourself headaches later.
Mounting height might seem trivial, but installing your controller at eye level in a protected location within Wi-Fi range makes a big difference for ease of use and system longevity.
Don’t forget firmware updates after installation. Many homeowners skip this step, but it ensures your controller has the latest features and security protections.
Here’s good news for budget-conscious homeowners: many smart controllers qualify for rebates from local Massachusetts water utilities, making them even more cost-effective in the long run. More info about Irrigation System Installation
Want to dive deeper into the research behind smart watering technology? Check out this excellent resource with Latest research on smart watering.
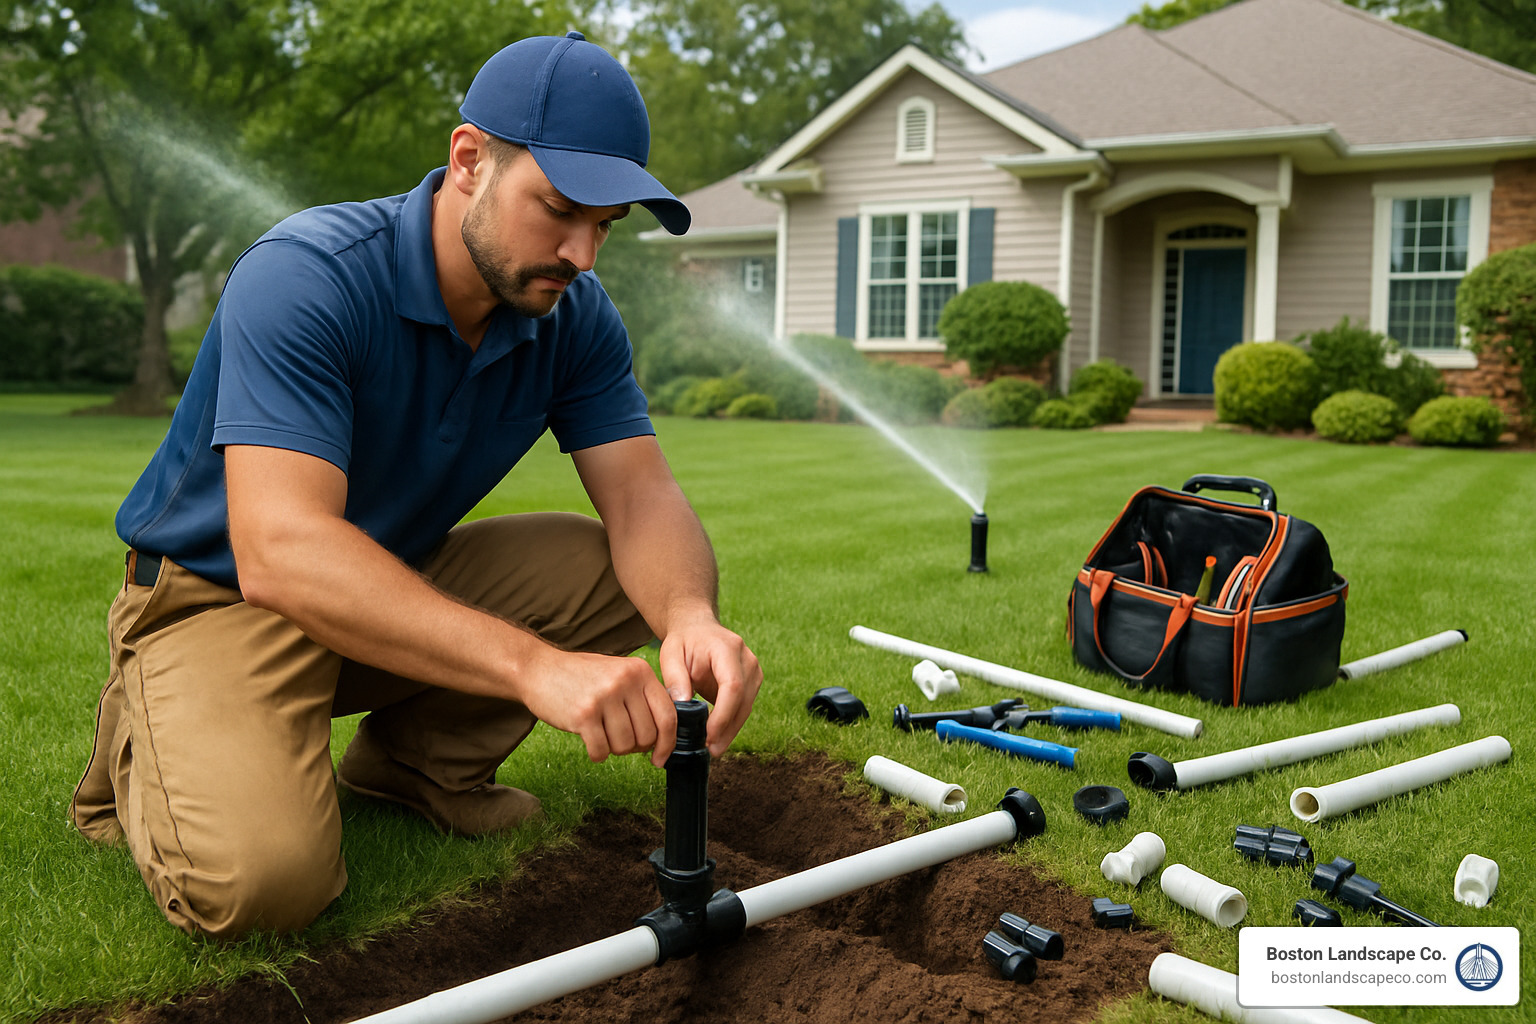
DIY Underground Sprinkler Kits
For the hands-on homeowner with a weekend to spare, DIY underground sprinkler kits offer a cost-effective path to professional-quality lawn irrigation. These comprehensive packages include everything you need: sprinkler heads, valves, pipes, fittings, and a controller to bring your lawn watering dreams to life.
“The satisfaction of installing your own system is incredible,” shares our installation team lead. “Yes, there’s plenty of digging involved—that’s definitely the most labor-intensive part—but seeing those first sprinkler heads pop up and deliver perfect coverage makes it all worthwhile.”

DIY kits come in various sizes to suit different lawn dimensions. Here’s how they typically break down:
| Kit Size | Typical Coverage | Sprinkler Heads | Zones | Best For |
|---|---|---|---|---|
| Small | 1,000-3,000 sq ft | 6-8 | 1-2 | Townhomes, small yards |
| Medium | 3,000-5,000 sq ft | 8-12 | 2-3 | Average suburban lots |
| Large | 5,000-10,000 sq ft | 12-20 | 3-4 | Larger properties |
| Custom | 10,000+ sq ft | 20+ | 4+ | Estate properties |
Most residential systems incorporate either pop-up spray heads for smaller areas or rotor heads for wider coverage. The key difference is in their distribution pattern—spray heads deliver a fixed spray pattern covering 5-15 feet, while rotors distribute water in a rotating pattern reaching 15-35 feet.
Your material choices typically come down to PVC pipe (rigid and durable, ideal for warmer regions) or polyethylene pipe (flexible and freeze-resistant—a better match for our Massachusetts winters). Proper valve manifolds ensure water flows to the right zones at the right times, while backflow prevention devices protect your drinking water from contamination.
Planning Your Lawn Irrigation Layout
Before grabbing your shovel or purchasing components, take time to plan thoroughly:
Water pressure and flow are your starting points. Your home’s water pressure (measured in PSI) should ideally fall between 40-65 PSI for most sprinkler systems. There’s an important distinction between static pressure (measured when water isn’t flowing) and working pressure (what matters for irrigation, typically 10-15% lower than static).
To calculate your flow rate in GPM (gallons per minute), time how long it takes to fill a 5-gallon bucket from your outdoor faucet. If it takes one minute, you’ve got 5 GPM—simple as that.
Creating a detailed property map is next. Draw everything to scale—your house, driveway, landscaping features, and don’t forget to note slopes and wind patterns, as these factors significantly impact sprinkler performance. On hillsides, place heads at the top and bottom rather than on the slope itself, and in windy areas, reduce the spacing between heads by about 10%.
The principle of head-to-head coverage is essential—each sprinkler’s spray should reach the adjacent heads for even watering without dry spots.
Perhaps most importantly, always call 811 at least 72 hours before digging to have underground utilities located. This free service isn’t just helpful—it’s required by law in Massachusetts and prevents potentially dangerous and costly accidents.
Step-by-Step Weekend Install
With proper planning complete, here’s how to transform your weekend into a productive irrigation installation:
Day 1 is all about trenching and layout. Start by marking your design with flags or marking paint. Then dig trenches 6-12 inches deep—on the deeper side here in Massachusetts to protect from frost. A trenching shovel or rented trencher will save your back and hours of time. Once trenches are ready, dry-fit the system by laying out all pipes and fittings without gluing to ensure proper fit and coverage.
Day 2 focuses on assembly and testing. Connect to your water source with the appropriate backflow preventer and main valve (following local codes). Assemble your valve manifold in an accessible valve box, then make all pipe connections—properly priming and cementing PVC or clamping poly pipe fittings.
Before attaching sprinkler heads, flush the lines thoroughly to clear any debris that could clog your new heads. Then install your sprinklers, ensuring proper height and alignment. Program your controller with initial watering schedules for each zone, and finally, test and adjust each zone’s coverage.
“Take your time during the testing phase,” advises our irrigation specialist. “I see too many DIYers rush through this critical step. Spend time observing each zone in operation, making those fine adjustments to ensure even coverage. Your lawn will thank you, and so will your water bill.”
Maintenance & Winterization Essentials
The work doesn’t end at installation—proper maintenance ensures your DIY system delivers years of reliable service.
Make monthly inspections part of your routine, checking for clogged or damaged heads, leaks in pipes or connections, and proper spray patterns. Adjust your watering schedules as seasons change—your lawn needs less water in spring and fall than during summer’s peak heat.
Winterization is absolutely critical in Massachusetts. When temperatures start dropping in late fall, shut off your system’s water supply and either use built-in drain valves or blow out the system with compressed air (the most thorough method). Skipping this step almost guarantees cracked pipes and expensive repairs come spring.
When warmer weather returns, perform a thorough spring start-up: inspect for winter damage, clean filters, check valve operation, gradually restore water pressure to identify any leaks, and recalibrate your timer settings for the new growing season.
“One pro tip we share with all our clients,” recommends our landscape maintenance team, “is to do a deep watering just before the soil freezes. This helps ensure your shrubs and trees stay healthy through winter. This practice, combined with proper system winterization, protects both your plants and your irrigation investment.”
For ongoing professional maintenance of your DIY system or to save yourself the weekend project entirely, More info about Landscape Maintenance
Drip, Soaker & Hose-End Solutions
Not every yard needs a complex underground system to stay green and healthy. For many Massachusetts homeowners, simpler lawn irrigation options like drip systems, soaker hoses, and portable sprinklers offer practical, budget-friendly alternatives that still deliver impressive results.
“We love a good drip irrigation system!” shares our garden specialist with a smile. “They deliver water directly to plant roots, reducing evaporation and runoff, making them ideal for gardens, trees, and shrubs.”
These above-ground solutions shine in specific situations like newly planted flower beds, container gardens, vegetable patches, and those tricky spots where digging trenches just isn’t practical. They’re perfect for targeted watering that puts moisture exactly where plants need it most.
When Drip Beats Spray for Lawn Irrigation
While traditional sprinklers work wonders for large lawns, drip irrigation has some compelling advantages in certain situations. By delivering water directly to the soil at plant roots, these systems can reduce water loss from evaporation by up to 60% compared to overhead spraying – a significant benefit during our hot New England summers.
The slow, steady application of water with drip systems prevents runoff, even on slopes or clay-heavy soils where sprinklers might send water streaming down the hill. This patient approach allows proper absorption and deeper root growth.
During drought restrictions (which we’ve seen more frequently in recent years), drip irrigation is often exempt from watering bans because of its efficiency. This allows you to keep your prized perennials and shrubs thriving even when conventional sprinklers are temporarily off-limits.
A Burlington client recently shared, “After switching my perennial beds to drip irrigation, I’ve noticed significantly fewer weeds and my plants look healthier despite using less water. It’s been a game-changer for my garden maintenance.”
The precision of drip systems also means you can target specific plants with exact water amounts – perfect for those mixed beds where thirsty hydrangeas sit alongside drought-tolerant lavender.
Choosing the Right Flow Rate & Spacing
Setting up an effective drip system starts with selecting the right components for your specific plants and soil conditions.
For emitter flow rates, think about matching the water output to your plant sizes. Small annuals and perennials do well with 0.5-1 gallon per hour (GPH) emitters, while medium shrubs prefer 1-2 GPH. For larger shrubs and trees, multiple 2 GPH emitters placed around the drip line will encourage healthy root development.
Your tubing choices matter too. Most systems start with 1/2-inch mainline tubing for the primary runs, branching off to 1/4-inch microtubing for connections to individual plants. For vegetable gardens or hedgerows, inline drip tubing with pre-installed emitters at regular spacing offers convenient coverage.
“Understanding your soil type is crucial for effective drip irrigation,” explains our design specialist. “In the clay-heavy soils common in parts of Lexington and Concord, water spreads horizontally, allowing wider emitter spacing. In the sandier soils of coastal areas, closer spacing is necessary.”
Don’t forget the essential components that keep your system running smoothly: a pressure regulator to bring household water pressure down to the 20-30 PSI needed for drip systems, a filter to prevent tiny emitters from clogging, a backflow preventer to protect your household water, and end caps or flush valves for system maintenance.
Quick Connect & Go: Hose-End Options
Sometimes the simplest solution is the best one. For maximum flexibility or temporary watering needs, hose-end devices offer convenience without permanent installation.
Oscillating sprinklers have been a backyard favorite for generations, covering rectangular areas up to 4,000 square feet with their gentle back-and-forth spray pattern. Modern versions offer adjustable width and length settings to customize coverage for your specific lawn shape.
For larger areas, impact sprinklers deliver water in a circular pattern up to 85 feet in diameter. That distinctive “ch-ch-ch-ch” sound might bring back childhood memories, but there’s solid science behind it – their pulsating action reduces water runoff and provides excellent distance.
Adding a mechanical timer to your setup automates the process without complex wiring or programming. Simply attach it directly to your spigot, set the duration (typically from 15 minutes to 2 hours), and enjoy the convenience of scheduled watering without standing watch.
For odd-shaped areas or beds near walkways, adjustable pattern sprinklers let you customize the spray to match irregular shapes, keeping water on plants and off pedestrians.
“For a small lawn in Medford, we recently recommended a quality hose combined with a mechanical timer and an adjustable sprinkler,” shares our irrigation consultant. “This simple setup provides reliable coverage while preventing overwatering, all without permanent installation.”
The humble soaker hose remains one of the most effective tools for watering foundation plantings and garden rows. These porous hoses slowly “sweat” water along their entire length, delivering moisture directly to the soil with minimal evaporation.
For newly planted trees or shrubs, hydration mats slowly release water directly to establishing root systems, reducing transplant shock and improving survival rates during those critical first weeks.
For more information on efficient watering techniques and scheduling, check out the latest research on drip efficiency.
Lawn Irrigation FAQs
How much does a typical system cost in Massachusetts?
When homeowners ask me about lawn irrigation costs, I always explain that the price range in Massachusetts is quite broad. Like buying a car, you have your economy models and your luxury options!
Based on internet data (not Boston Landscape Co.’s actual pricing), residential systems typically range from $2,000 to $8,000 for average suburban properties. For larger estates or properties with complex landscaping needs, systems can easily reach $15,000 or more.
What drives these price differences? Several factors come into play:
The size of your property is obviously a major factor – more ground to cover means more materials and labor. The type of system matters too – a basic controller with standard spray heads costs significantly less than a smart WiFi system with weather-responsive features and high-efficiency rotors. Your property’s unique characteristics also impact pricing – things like rocky soil, existing landscaping to work around, and local permitting requirements.
“Many homeowners are surprised by how customizable irrigation systems can be,” shares our installation team lead. “We can design something for virtually any budget by phasing installation or focusing on priority areas first.”
While DIY kits might seem tempting at $800-$2,400 for materials, professional installation offers significant advantages: proper hydraulic design, efficient zoning, quality components with warranty protection, and the peace of mind that comes with proper installation. Many of our clients tell us the water savings and reduced maintenance headaches quickly offset the initial investment difference.
How often should I water my lawn?
This might be the question I hear most often, and the answer surprises many Massachusetts homeowners: less is actually more when it comes to lawn irrigation.
Most lawns in our region need only about 1-2 inches of water per week, and it’s far better to deliver this water in one or two deep watering sessions rather than daily light sprinklings. Why? Deep, infrequent watering encourages grass to develop deeper root systems that can better withstand drought conditions.
For most Massachusetts lawns, watering once every 4-8 days is ideal. The specific interval depends on your soil type, grass variety, and current weather conditions. During hot summer stretches, you might need to water every 4 days, while spring and fall typically allow for 5-8 day intervals.
Timing matters too! Early morning (between 4-9 AM) is the sweet spot for irrigation. The air is typically calmer for better distribution, there’s less evaporation than during midday, and unlike evening watering, the grass has time to dry before nightfall, reducing disease risk.
“One simple way to check if your lawn needs water is the footprint test,” I often tell homeowners. “Walk across your lawn and look back – if your footprints remain visible because the grass blades don’t spring back up, it’s time to water.”
What PSI and flow rate do I need?
Understanding your water pressure (PSI) and flow rate (GPM) is crucial for designing an effective lawn irrigation system that works properly without wasting water.
For most residential sprinkler systems in Massachusetts, you’ll want water pressure between 40-65 PSI. If your pressure falls below this range, your sprinklers won’t throw water as far as designed, creating dry spots. Too high, and you’ll get misting and overspray, wasting water and potentially damaging components.
Different components have specific needs:
– Spray heads work best at 30-45 PSI
– Rotor heads typically need 40-65 PSI to rotate properly
– Drip irrigation requires only 20-30 PSI (and usually needs a pressure reducer)
Your flow rate (measured in gallons per minute or GPM) is equally important. Most rotor heads need at least 6 GPM to function correctly, while typical spray zones require 10-15 GPM and rotor zones need 15-25 GPM.
“Many older homes in Lexington and Winchester have adequate pressure but limited flow capacity,” explains our irrigation designer. “In these cases, we carefully design zones with fewer heads operating simultaneously to ensure proper coverage without exceeding available water supply.”
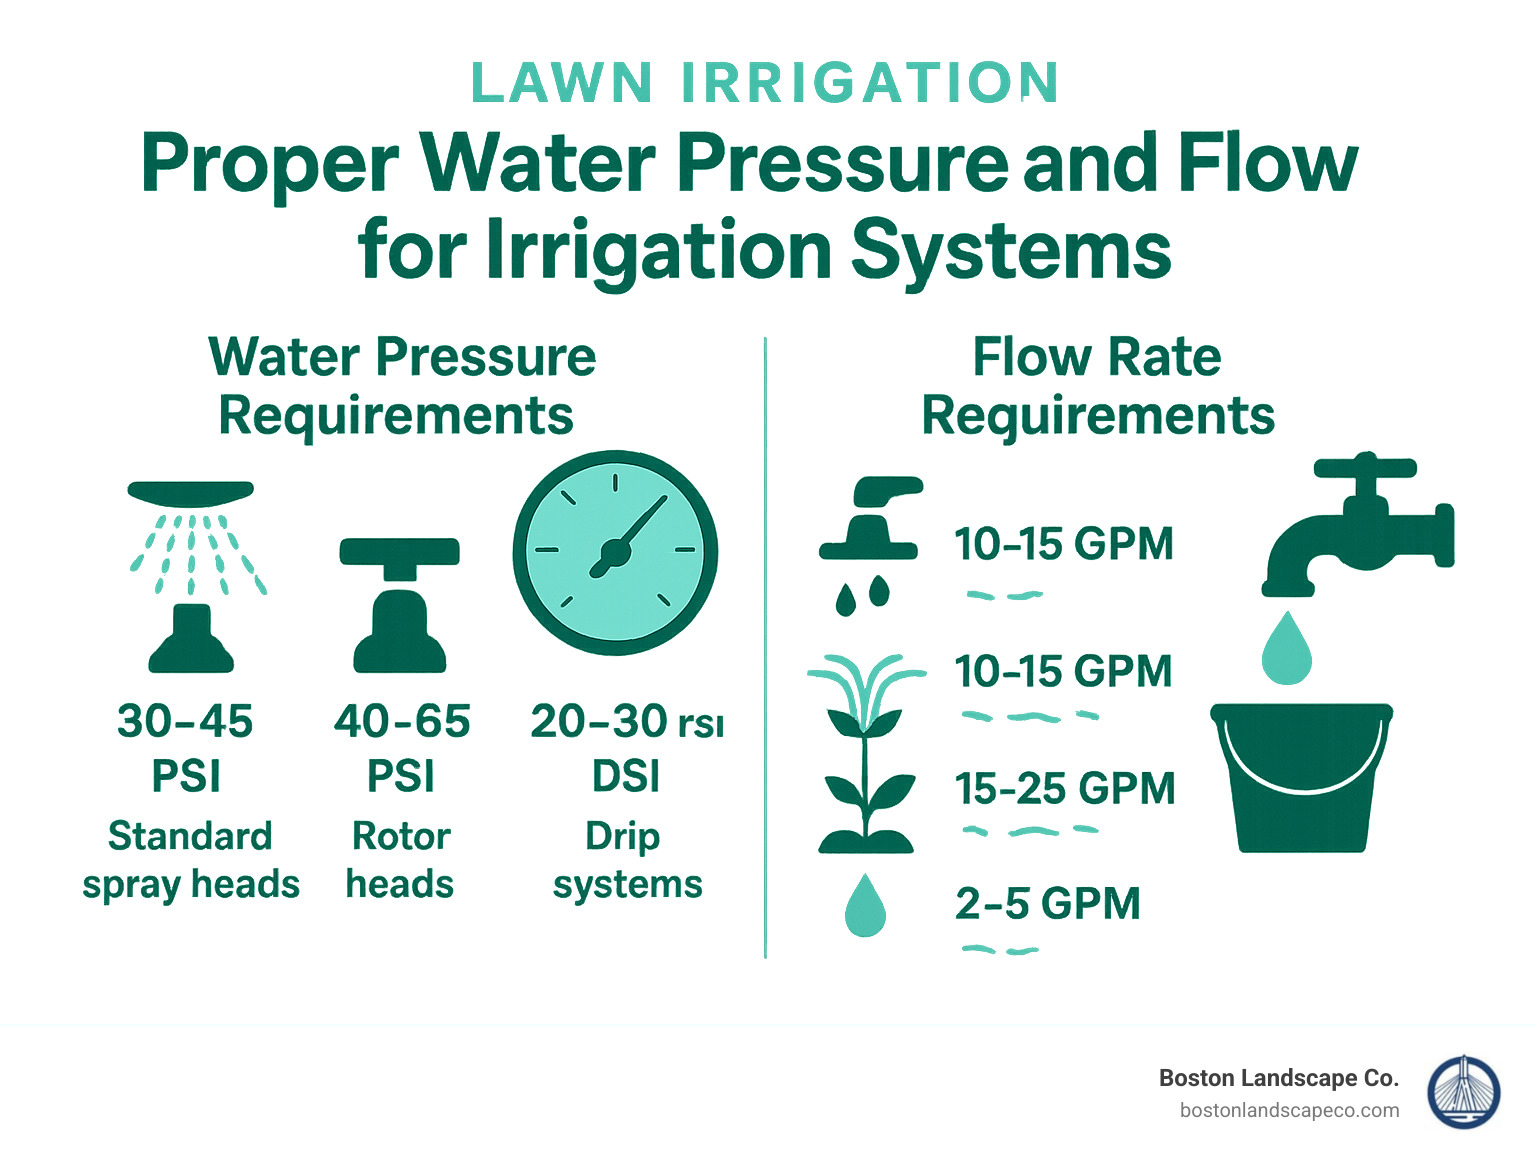
You can measure your home’s flow rate with a simple bucket test: time how long it takes to fill a 5-gallon bucket from your outdoor spigot, then calculate your GPM using this formula: (5 gallons ÷ seconds to fill) × 60 = GPM.
For properties with limited flow rates, we often recommend water-efficient solutions like drip irrigation for planting beds and high-efficiency rotary nozzles for lawn areas. These specialized components deliver excellent results while using significantly less water than traditional options.
Conclusion
Choosing the right lawn irrigation system for your Massachusetts property doesn’t have to be overwhelming. Whether you’re considering a cutting-edge smart controller, traditional in-ground sprinklers, or a simple drip solution, the perfect system balances your landscape’s unique needs with your water conservation goals and budget.
A thoughtfully designed irrigation system delivers benefits that extend far beyond just saving you time (though that’s certainly a nice perk!). Your lawn will develop deeper, stronger roots thanks to consistent, even watering patterns. Those deeper roots create a naturally more drought-resistant lawn that stays greener longer during dry spells.
“I used to spend my weekends dragging hoses around the yard,” shares one of our Winchester clients. “Now my system waters automatically at 5 AM while I’m still sleeping, and my lawn has never looked better.”
Modern irrigation technology has made incredible strides in water efficiency. Many of our clients report 30-50% reductions in their water usage after upgrading from manual watering to a properly zoned automatic system. That’s good for both your wallet and our environment!
Here in Massachusetts, we face unique challenges – from our harsh winters to our occasionally brutal summer heat waves. At Boston Landscape Co., we’ve spent over three decades designing irrigation solutions specifically custom to New England conditions. We understand the differences between the sandy coastal soils in some communities and the clay-heavy areas further inland, adjusting our designs accordingly.
Your property deserves a custom approach. The irrigation needs of a compact urban yard in Somerville differ dramatically from those of a sprawling estate in Lexington or Bedford. Our design team takes the time to evaluate your specific landscape conditions, existing plantings, and water access before recommending solutions.
Patience plays a key role when establishing proper irrigation. The initial setup and calibration process might take a little time, but the results – a lush, healthy landscape that requires minimal maintenance – are well worth the investment.
For Massachusetts homeowners looking to transform their approach to lawn care with efficient, effective watering solutions, we offer free irrigation consultations throughout the Boston metro area. Our service area includes Bedford, Burlington, Concord, Lexington, Medford, Reading, Stoneham, Winchester, and surrounding communities.
Ready to enjoy a greener lawn with less effort and lower water bills? More info about irrigation installation is just a click away, or contact us today to schedule your personal consultation.
